
GraphQL Sorting: A Beginner's Guide
Sorting data in GraphQL is a powerful tool that enhances the usability and performance of your applicatio ...
Learn more

Update: On April 16th 2021, Slash GraphQL was officially renamed Dgraph Cloud. All other information below still applies.
Slash GraphQL is a production-ready GraphQL as a Service, which creates a managed GraphQL backend with native GraphQL support using Dgraph so that you can focus on your GraphQL app instead of tables or infrastructure.
In this tutorial, we will learn how to make a real-time chat application, something like the Instagram/Youtube Live chat, where anyone can post a message and everyone else in the chat sees it in real-time. The user just has to spin up a frontend and point it to the same backend as everyone. User management and fancy UI will be out of scope for the sake of simplicity. This app can also be tweaked to make a Hacker News clone, with add-on real-time feature.
Slash GraphQL is Dgraph’s managed backend service: a production-ready, fully-functional serverless computing platform, and a painless way to get started with GraphQL application development where you can easily focus on learning and growing as a developer. From just a schema and nothing else, you have an API ready to accept GraphQL requests; no need to go through grunt work like writing resolver functions on your own, just plain GraphQL.
If you are a first-time user, head on to the Slash GraphQL page and sign up for free. After signing up, you’ll see an empty dashboard:
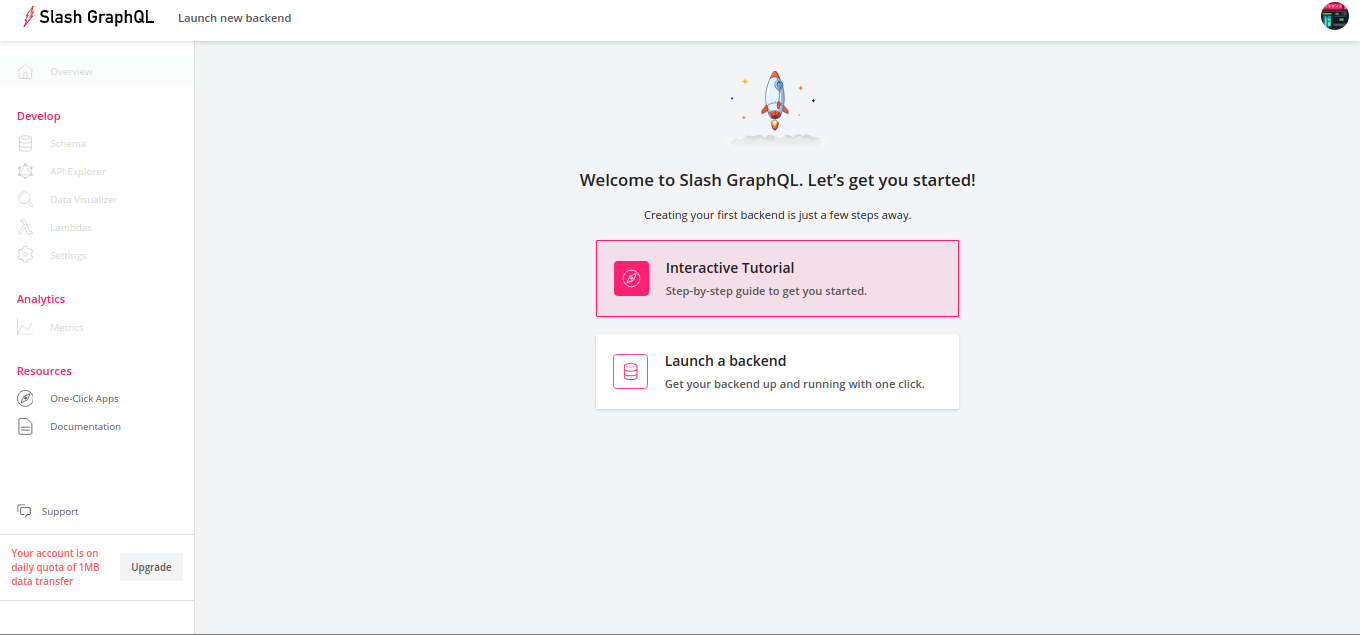
Slash GraphQL comes with a 7-day free trial. So play around and feel free to take the “Interactive Tutorial” to get a guided tour of how to get around with Slash GraphQL.
Log in to Slash GraphQL by using the same signup credentials. Once you’re in the dashboard, click on “Launch a backend”.
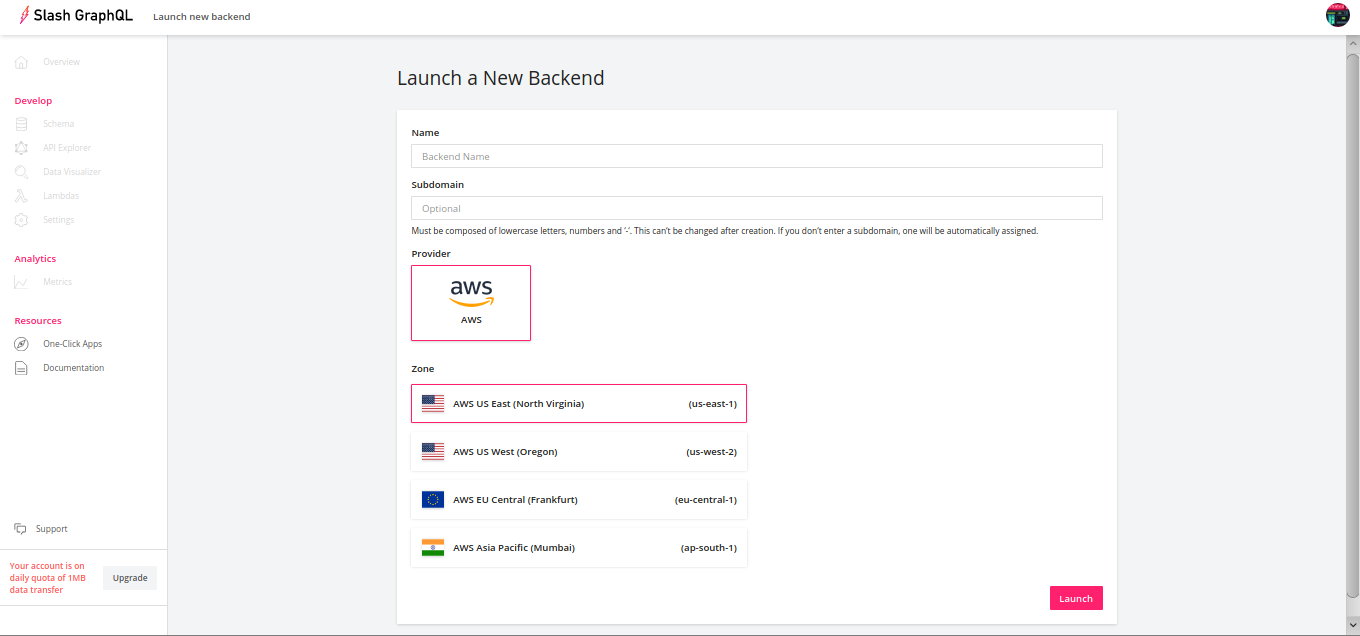
Fill in the details and click “Launch”. It’ll take a few moments to spin up.
After your backend goes live, your dashboard will show some information, including the URL of your server. Note that down—that’s where all your requests would go.
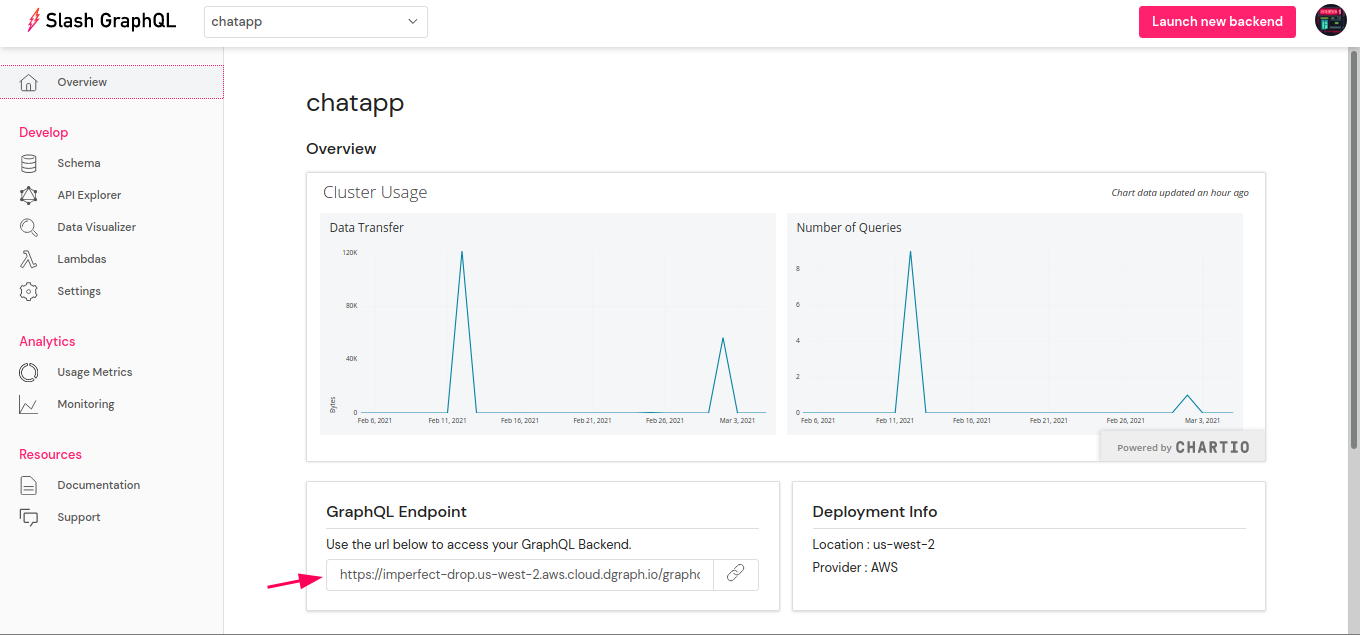
There you go, you have a GraphQL server ready.
The next step is to create the GraphQL schema. Let’s have a type Message which will consist of id, name, message text, and the timestamp. All fields will be mandatory (enforced by the exclamation mark!). Dgraph auto-generates unique values for scalar ID, think of it as auto-increment of primary keys in relational databases.
@withSubscriptiondirective enables subscriptions with the associatedtype. Subscription queries will not be generated for types without this directive. This way, you can selectively allow/disallow subscriptions on types.
type Message @withSubscription {
  id: ID!
  name: String!
  text: String!
  time: DateTime!
}
Click “Schema” from the left sidebar of your dashboard. Go to the “GraphQL Schema” tab and paste the above schema.
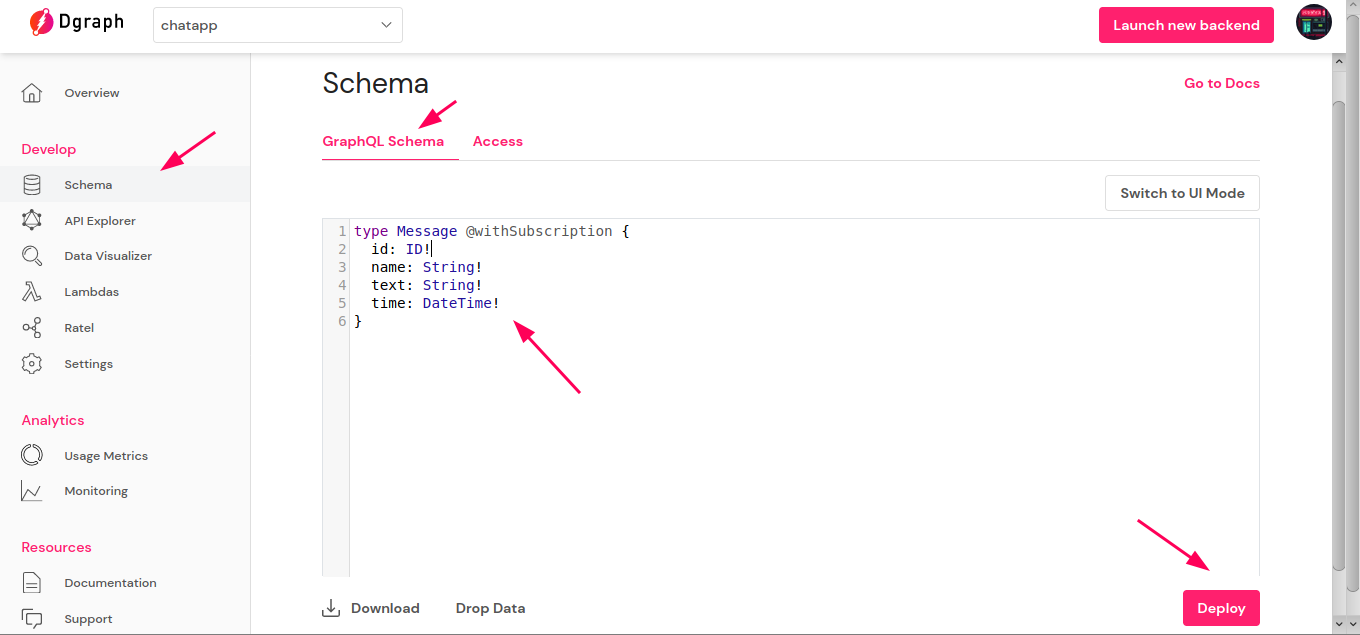
Then hit “Deploy”.
With this, the backend is ready for queries, mutations, and subscriptions.
The frontend is mostly React and Apollo Client boilerplate. The remaining tasks are to establish a GraphQL Subscription on startup, provide the functionality to publish a post, and updating the component on receiving subscription events. Choose the app name of your choice and install these dependencies.
npx create-react-app chatapp

npm install @apollo/client @apollo/link-ws subscriptions-transport-ws graphql
index.jsThis will be the starting point of the application which create-react-app generates by default.
import React from 'react';
import ReactDOM from 'react-dom';
import App from './App';

ReactDOM.render(
  <React.StrictMode>
    <App />
  </React.StrictMode>,
  document.getElementById('root')
);
ApolloSetup.jsWe’re going to use Apollo Client as our GraphQL client. For that, create an ApolloClient instance. The ApolloClient requires a link that defines the protocol and the endpoint to send the requests. For our chat application, we need to support HttpLink for queries and mutations and WebSocketLink for subscriptions. We can achieve this by using split which accepts both an HTTP and a WebSocket link and uses the appropriate link based on the request. Pass this split to the ApolloClient. Now, queries and mutations will go over HTTP as normal, but subscriptions will be done over the WebSocket transport.
Set the endpoint variable to the GraphQL endpoint created above. Skip the scheme(https) as it is appended as needed(https/wss).
import { ApolloClient } from '@apollo/client/core';
import { getMainDefinition } from '@apollo/client/utilities';
import { InMemoryCache } from '@apollo/client/cache';
import { HttpLink, split } from '@apollo/client';
import { WebSocketLink } from "@apollo/link-ws";

const endpoint = "<Slash GraphQL endpoint>";

const wsLink = new WebSocketLink({
    uri: `wss://${endpoint}`,
    options: {
        reconnect: true
    }
});

const httpLink = new HttpLink({
    uri: `https://${endpoint}`
});

const link = split(
    // split based on operation type
    ({ query }) => {
        const definition = getMainDefinition(query);
        return (
            definition.kind === "OperationDefinition" &&
            definition.operation === "subscription"
        );
    },
    wsLink,
    httpLink
);

export default new ApolloClient({
    cache: new InMemoryCache(),
    link
});
App.jsEnclose the App component with ApolloProvider. This will allow all the enclosed components to use the React Apollo Client features. ApolloProvider requires an ApolloClient to provide the transport features. Import and pass the client created in ApolloSetup.js.
import React from 'react';
import { ApolloProvider } from '@apollo/client'
import Post from './Post';
import apolloClient from './ApolloSetup';

function App() {
  return (
    <ApolloProvider client={apolloClient}>
      <Post />
    </ApolloProvider>
  );
}

export default App;
Query.jsThis file is for GraphQL queries. For this demo, we only have a subscription query for real-time updates and a mutations query for creating a new post.
import { gql } from "@apollo/client";

const SUBSCRIPTION_QUERY = gql`
  subscription {
    queryMessage(order: { desc: time }) {
      name
      text
      time
    }
  }
`;

const SEND_MESSAGE = gql`
  mutation sendMessage($name: String!, $text: String!, $time: DateTime!) {
    addMessage(input: [{ name: $name, text: $text, time: $time }]) {
      message {
        name
        text
        time
      }
    }
  }
`;

export { SUBSCRIPTION_QUERY, SEND_MESSAGE };
Post.jsAnd finally, we have the application logic. For this demo, there is a simple HTML layout that has a form to create new posts, show the total post count, and a table of all the posts made so far by all the users. Set up the Apollo Client React hooks, one for the mutation and, one for the subscription.
useMutationaccepts a mutation query and returns a function on component render, which can be called anytime to execute the mutation.
useSubscriptionaccepts a subscription query and returns a data variable. Every time a subscription event is triggered, the data variable is set with the new data from the backend and the component is re-rendered, thus updating the Post table.
import React, { useState } from "react";
import { useMutation, useSubscription } from "@apollo/client";
import { SUBSCRIPTION_QUERY, SEND_MESSAGE } from "./Query"
import "./index.css";

const Posts = () => {
  const [name, setName] = useState('');
  const [text, setText] = useState('');

  const [sendMessage, { error: mutationError }] = useMutation(SEND_MESSAGE);
  const { data, error: subscriptionError } = useSubscription(SUBSCRIPTION_QUERY);

  if (!data || !data.queryMessage) return (<h1>Connecting...</h1>);
  if (subscriptionError || mutationError) return (<h1>Error...</h1>);

  const handleClick = () => {
    if (name && text) {
      sendMessage({ variables: { name, text, time: (new Date()).toISOString() } });
    }
  }

  return (
    <>
      <hr></hr>
      <label>Enter you name : </label>
      <input required type="text" name="name" maxLength="25" onChange={e => setName(e.target.value)}></input>
      <label> Enter your message : </label>
      <input required type="text" name="message" onChange={e => setText(e.target.value)}></input>
      <button type="button" onClick={() => handleClick()}>Post</button>
      <hr></hr>
      <h3>Total Posts : {data.queryMessage.length}</h3>
      <hr></hr>
      <table>
        <thead>
          <tr>
            <th>Time</th>
            <th>Author</th>
            <th>Post</th>
          </tr>
        </thead>
        <tbody>
          {data.queryMessage.map(m => (
            <tr>
              <td>{(new Date(m.time)).toUTCString()}</td>
              <td align="left">{m.name}</td>
              <td width="1000" align="left">{m.text}</td>
            </tr>
          ))}
        </tbody>
      </table>
    </>
  );
};

export default Posts;
And with this, the chat app is ready. Run the app as follows. By default, it will run on port 3000.
npm install
npm start
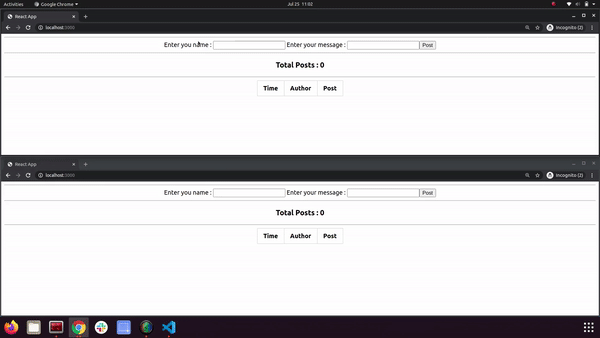
Open http://localhost:3000 in multiple browser tabs and give it a shot. Here is a working demo of the app.
The complete source code is hosted here. Feel free to fork or clone the code and try it yourself.
To add more features to this app, just iterate over the frontend, without worrying about the backend. This is what Slash GraphQL intends to solve.
Thank you for following along and hope this was helpful. Sign-up for Slash GraphQL now and start building apps without worrying about your backend. If you want a head start, go over to Dgraph Learn.
With lots of learning resources and courses curated for developers, you’ll go from GraphQL novice to building full-stack applications (like a Message Board App in React and Vue). Do reach out to us for any queries or feedback and share your creations on our Discuss.
You’ll find many resources on our other blog posts as well, including short tutorials on building a book review app and a DevJoke app with Slash GraphQL.