
GraphQL Sorting: A Beginner's Guide
Sorting data in GraphQL is a powerful tool that enhances the usability and performance of your applicatio ...
Learn more

In the last article, we saw how to enable authentication using Auth0 and integrate it with our app. We also built out a basic UI.
As I promised, today, we’re going to learn how to handle the authorization part and connect Dgraph with Auth0, the identity provider of our choice. In doing so, Dgraph will be able to trust the tokens issued by Auth0 and verify requests from the user. Using the logged-in user’s email address inside this token, we’ll also learn how to write authorization rules to restrict specific tasks to unauthenticated users.
Let’s take a look at our table of content and learning objectives today:
Without further ado, let’s dive in!
First, let’s get the difference between “authentication” and “authorization” clear.
With authentication in place, you’d be able to log in and out. The Identity Provider, in this case Auth0, will look at your credentials and verify that you should have access to the system you are trying to log into. Once authenticated, you would then move to the next step of figuring out which operations you are authorized to perform.
An authenticated user can then be moved into the authorization stage of our security flow. Authorization is the process that establishes and grants specific privileges to the user. As I mentioned at the start, this is what Dgraph deals with.
In the simplest form, authentication makes sure the user is who they say they are and authorization depicts what operations that authenticated user is able to perform.
Dgraph has the @auth directive for defining authorization rules. These rules determine what operations a user is allowed to do. We’re building a GraphQL application, so under the hood, these “operations” boil down to queries and different kinds of mutations like add, update, and delete (CRUD).
We aren’t going to get too fancy and only start with a couple of simple rules on each type. These rules come from the following concerns and how we’re designing our toy application:
Now it’s time to add the authorization rules that address those concerns. As a first step, we’ll make the following change to the email field:
type User {
  ...
  email: String! @id @search(by: [hash])
  ...
}
...
With this change, we’ve made email a unique identifier for each user. Users will log into the application via their email or Google account and hence it’ll be easier to use that to implement the authorization rules. We’ve also added the @search directive on the field to enable search by emails. This will come in handy when we write the rules.
The delete and update rules for the User type look like the following:
update: { rule: """
  query($USER: String!) {
    queryUser (filter: { email: { eq: $USER }}) {
    __typename
    }
  }"""
}
delete: { rule: """
  query($USER: String!) {
    queryUser (filter: { email: { eq: $USER }}) {
    __typename
    }
  }"""
}
Notice that the rules are just normal GraphQL queries wrapped in triple quotation marks. They’re preceded by the keyword rule and the name of the GraphQL operation (add, update, or delete). Each rule must be satisfied in order for a particular GraphQL operation to be valid.
Let’s break it down:
USER. This is the logged-in user’s email address. Using it, we filter out the matching user.
@search directive, hash, exposes the eq function that we’re using here to test for equality.updateUser and deleteUser, corresponding to the events of updating and removal of an account.The rules say that you’re allowed to update or delete a User type data as long as that data’s email field matches the email address that you used to log into the application. So the email entered can’t be anyone else’s email address.
Now you might ask how it’s going to gain access to this $USER parameter. That’s where the Dgraph.Authorization object comes into play. We’ll discuss that in detail in a bit.
We can address our concerns on adding, updating and deleting posts through the following rules:
add: { rule: """
 query($USER: String!) {
    queryPost {
      postedBy (filter: { email: { eq: $USER }}) {
        __typename
      }
    }
  }"""
}
update: { rule: """
  query($USER: String!) {
    queryPost {
      postedBy (filter: { email: { eq: $USER }}) {
        __typename
      }
    }
  }"""
}
delete: { rule: """
  query($USER: String!) {
    queryPost {
      postedBy (filter: { email: { eq: $USER }}) {
        __typename
      }
    }
  }"""
}
We follow the same line of inquiry here as well: the rules check whether the user who’s trying to add, update or delete a post has an email value in the mutation data that matches with the email address that user authenticated (logged-in) with.
The rules are the same since we’re not allowing unauthenticated users to add comments:
add: { rule: """
    query($USER: String!) {
        queryComment {
            commentBy(filter: { email: { eq: $USER }}) {
            __typename
            }
        }
    }"""
}
delete: { rule: """
    query($USER: String!) {
        queryComment {
            commentBy(filter: { email: { eq: $USER }}) {
            __typename
            }
        }
    }"""
}
update: { rule: """
    query($USER: String!) {
        queryComment {
            commentBy(filter: { email: { eq: $USER }}) {
            __typename
            }
        }
    }"""
}
With these rules set, we can now add them to each type in our schema by wrapping them up in the @auth directive:
type User
@auth(
  update: { rule: """
  	query($USER: String!) {
    	queryUser (filter: { email: { eq: $USER }}) {
    		__typename
  		}
  	}"""
  }
  delete: { rule: """
  	query($USER: String!) {
    	queryUser (filter: { email: { eq: $USER }}) {
    		__typename
  		}
  	}"""
  }
)	{
  username: String! @id
  name: String!
  about: String
  email: String! @id @search(by: [hash])
  avatarImageURL: String!
  posts: [Post!] @hasInverse(field: postedBy)
  following: Int!
  follower: Int!
}

type Post
@auth(
  update: { rule: """
  	query($USER: String!) {
    	queryPost {
    		postedBy (filter: { email: { eq: $USER }}) {
      		__typename
    		}
  		}
  	}"""
  }
  add: { rule: """
  	query($USER: String!) {
    	queryPost {
    		postedBy (filter: { email: { eq: $USER }}) {
      		__typename
    		}
  		}
  	}"""
  }
  delete: { rule: """
  	query($USER: String!) {
    	queryPost {
    		postedBy (filter: { email: { eq: $USER }}) {
      		__typename
    		}
  		}
  	}"""
  }
)	{
  id: ID!
  postedBy: User!
  imageURL: String!
  description: String
  likes: Int!
  comments: [Comment!] @hasInverse(field: commentOn)
}

type Comment
@auth(
  add: { rule: """
  	query($USER: String!) {
    	queryComment {
    		commentBy(filter: { email: { eq: $USER }}) {
      		__typename
    		}
  		}
  	}"""
  }
  delete: { rule: """
  	query($USER: String!) {
    	queryComment {
    		commentBy(filter: { email: { eq: $USER }}) {
      		__typename
    		}
  		}
  	}"""
  }
  update: { rule: """
  	query($USER: String!) {
    	queryComment {
    		commentBy(filter: { email: { eq: $USER }}) {
      		__typename
    		}
  		}
  	}"""
  }
)	{
  id: ID!
  text: String!
  commentBy: User!
  commentOn: Post!
}
All the rules require the logged-in user’s email address via the $USER parameter. How do you supply that parameter to Dgraph?
You do that by defining the Dgraph.Authorization object and configuring its parameters where you specify the authentication details. You have to define this object at the very last line of the schema.
As part of the details, you have to specify the connection method too. There are several options for this, such as JWT (JSON Web Token), a single JWK (JSON Web Key) URL, or multiple JWK URLs.
For our application, we’ll use the JWT method. As we saw in the last article, our Dgraph.Authorization object would look like the following:
# Dgraph.Authorization {"VerificationKey":"-----BEGIN PUBLIC KEY-----\nMIIBIjANBgkqhkiG9w0BAQEFAAOCAQ8AMIIBCgKCAQEAySC4ObdOmwz4uNncFGTJ\nLAlvDVyU1Rrku87Z7a6pQ+FOSUhx1gRa0XOr7KlPFQx0H+MYKnZb/n30ROZXGB1H\n9iNyvY7NixCqO6i918MBC0xJyVFMfOQhy9m0GjTjofy2lJcu4axyG2eZ4SnfV3vi\nKlEK8ma5hB93kPwextBYQ6nrgpo1C+65YeXyg+hRE3GbTKIr7DNnOQFA04MihfpG\njQyjA/u8nHhgm6dV+YnupmmJPzA+6sGZXZ4jiKkGEE7q4ZlyXr6hsz2sF85uycVE\nLD23bNlyOKOP+jhbSbdNU7L8j7QMbQf4CrwzKtxm1ul5HySJDajjaiXrVL0xYdsB\n2wIDAQAQ\n-----END PUBLIC KEY-----","Header":"X-Auth-Token","Namespace":"https://dgraph.io/jwt/claims","Algo":"RS256","Audience":["<<your-auth0-application-client-id>>"]}
Let’s break this down:
id_token value as we saw in the last article.VerificationKey parameter, so it trusts any JWT that was signed by the corresponding private key.Header parameter. This defines the HTTP header that will contain the signed JWT.Namespace is an arbitrary key inside the token containing the relevant claims. In this case, this is the $USER claim that we added. This way Dgraph knows where to look for this parameter so that it can execute the schema rules. See the following screenshot from the previous post: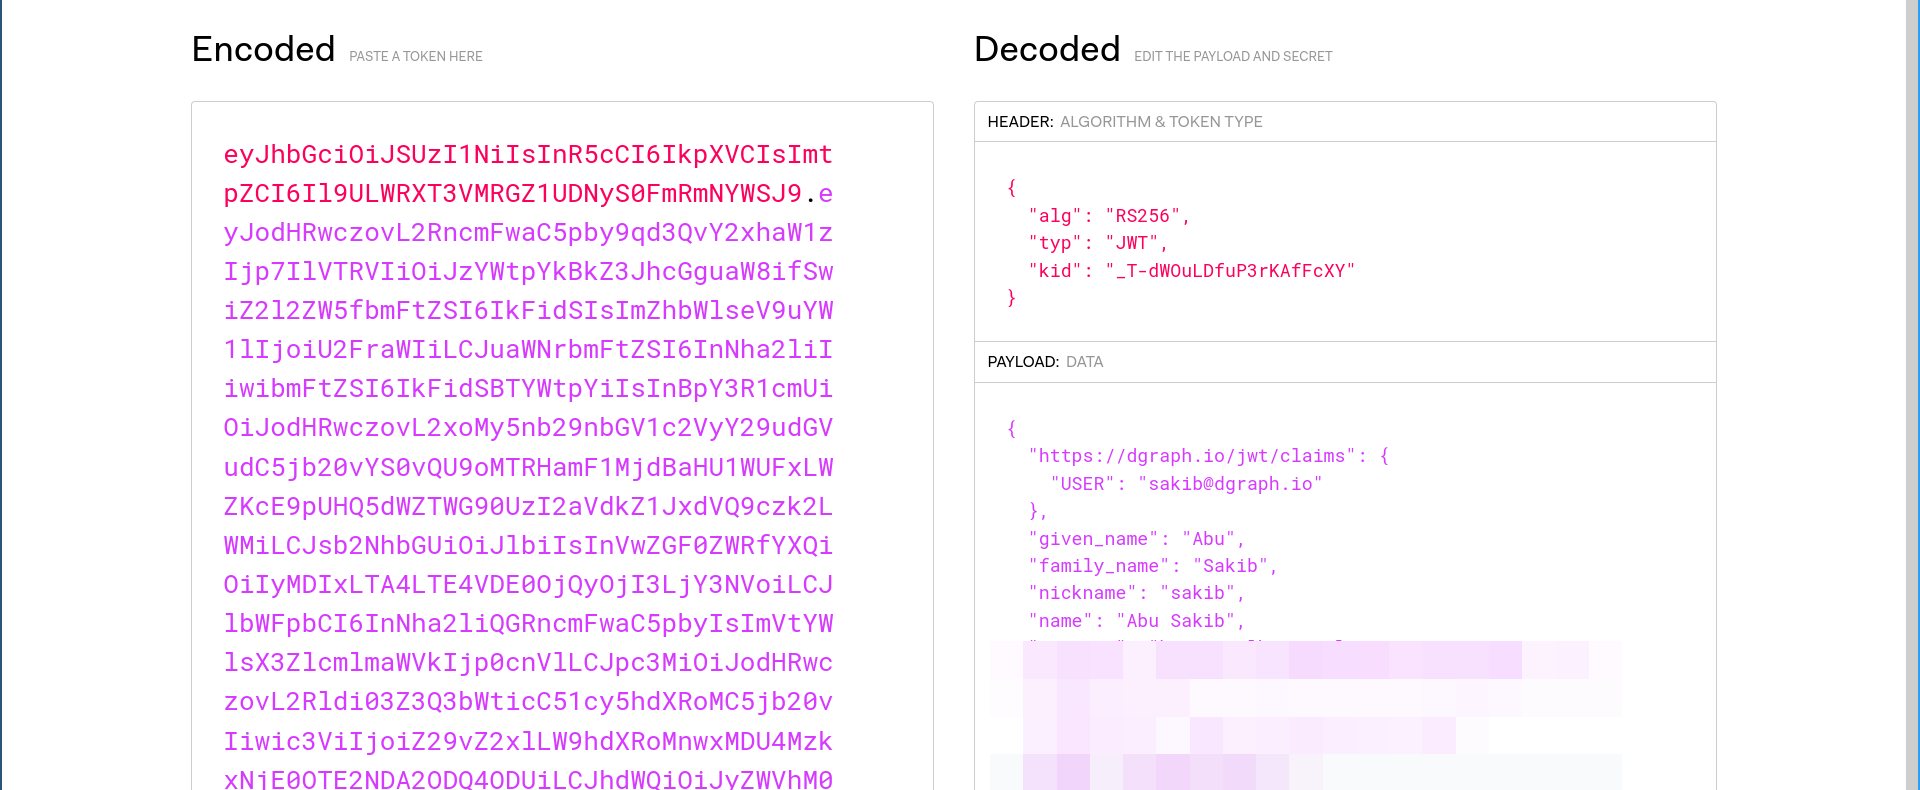
Algo indicates the signing algorithm that was used to sign the JWTs.Audience parameter contains the Client ID of your Auth0 application.With this object, the final schema will look like the following, as we saw in the previous article:
type User
@auth(
  update: { rule: """
  	query($USER: String!) {
    	queryUser (filter: { email: { eq: $USER }}) {
    		__typename
  		}
  	}"""
  }
  delete: { rule: """
  	query($USER: String!) {
    	queryUser (filter: { email: { eq: $USER }}) {
    		__typename
  		}
  	}"""
  }
)	{
  username: String! @id
  name: String!
  about: String
  email: String! @id @search(by: [hash])
  avatarImageURL: String!
  posts: [Post!] @hasInverse(field: postedBy)
  following: Int!
  follower: Int!
}

type Post
@auth(
  update: { rule: """
  	query($USER: String!) {
    	queryPost {
    		postedBy (filter: { email: { eq: $USER }}) {
      		__typename
    		}
  		}
  	}"""
  }
  add: { rule: """
  	query($USER: String!) {
    	queryPost {
    		postedBy (filter: { email: { eq: $USER }}) {
      		__typename
    		}
  		}
  	}"""
  }
  delete: { rule: """
  	query($USER: String!) {
    	queryPost {
    		postedBy (filter: { email: { eq: $USER }}) {
      		__typename
    		}
  		}
  	}"""
  }
)	{
  id: ID!
  postedBy: User!
  imageURL: String!
  description: String
  likes: Int!
  comments: [Comment!] @hasInverse(field: commentOn)
}

type Comment
@auth(
  add: { rule: """
  	query($USER: String!) {
    	queryComment {
    		commentBy(filter: { email: { eq: $USER }}) {
      		__typename
    		}
  		}
  	}"""
  }
  delete: { rule: """
  	query($USER: String!) {
    	queryComment {
    		commentBy(filter: { email: { eq: $USER }}) {
      		__typename
    		}
  		}
  	}"""
  }
  update: { rule: """
  	query($USER: String!) {
    	queryComment {
    		commentBy(filter: { email: { eq: $USER }}) {
      		__typename
    		}
  		}
  	}"""
  }
)	{
  id: ID!
  text: String!
  commentBy: User!
  commentOn: Post!
}
# Dgraph.Authorization {"VerificationKey":"-----BEGIN PUBLIC KEY-----\nMIIBIjANBgkqhkiG9w0BAQEFAAOCAQ8AMIIBCgKCAQEAySC4ObdOmwz4uNncFGTJ\nLAlvDVyU1Rrku87Z7a6pQ+FOSUhx1gRa0XOr7KlPFQx0H+MYKnZb/n30ROZXGB1H\n9iNyvY7NixCqO6i918MBC0xJyVFMfOQhy9m0GjTjofy2lJcu4axyG2eZ4SnfV3vi\nKlEK8ma5hB93kPwextBYQ6nrgpo1C+65YeXyg+hRE3GbTKIr7DNnOQFA04MihfpG\njQyjA/u8nHhgm6dV+YnupmmJPzA+6sGZXZ4jiKkGEE7q4ZlyXr6hsz2sF85uycVE\nLD23bNlyOKOP+jhbSbdNU7L8j7QMbQf4CrwzKtxm1ul5HySJDajjaiXrVL0xYdsB\n2wIDAQAQ\n-----END PUBLIC KEY-----","Header":"X-Auth-Token","Namespace":"https://dgraph.io/jwt/claims","Algo":"RS256","Audience":["<<your-auth0-application-client-id>>"]}
When making a GraphQL request, we include that JWT as a X-Auth-Token header. If Dgraph is able to verify that token against the public key that we provided in the schema, it’ll process that request successfully.
In our last article’s “Enforcing authorization rules using JWT” section, we used the X-Auth-Token header to pass the JWT to Dgraph. Dgraph was able to verify the requests and returned appropriate responses, respecting the rules we defined.
In this article, we learned how to define authorization rules to restrict access and functions of our application to make it secure. Dgraph’s approach to defining these rules are very intuitive as they’re just normal GraphQL queries under the hood. We also learned that Dgraph is quite flexible about how we choose to do authentication. We just need to provide Dgraph the necessary details it needs to verify requests so that it can execute the rules and compose appropriate responses, leaving the rest to the developer’s freedom. If you want to read up on all the technical details of authorization in GraphQL, check out the Dgraph docs on authorization.
Stay tuned for the future articles where we explore more concepts as we continue building the clone. You can find the previous two articles in this series below, or by opening the “instagram-clone” tag on our blog for all of them: