
GraphQL Sorting: A Beginner's Guide
Sorting data in GraphQL is a powerful tool that enhances the usability and performance of your applicatio ...
Learn more

Update: On April 16th 2021, Slash GraphQL was officially renamed Dgraph Cloud. All other information below still applies.
Slash GraphQL is a managed GraphQL
cloud service that gives your app a /graphql API endpoint from nothing more than your app’s schema. It’s the fastest way to start a GraphQL app.
This post will get you started building an app on Slash GraphQL in just a few minutes.
We’ll be building a simple todo app with a React UI. The tech stack is a Slash GraphQL backend, with a React + Apollo Client 3.0 frontend.
We’ll be building a simple app. It’s a list of todo items, rendered from a GraphQL query, and a set of actions you can perform on the items. Those actions are GraphQL mutations. On-screen, it’ll look like this.

Slash GraphQL takes GraphQL development to a whole new level. You don’t spend your time building a GraphQL server, or designing a database and then working out how to translate that database to a GraphQL API — Slash GraphQL is a GraphQL database.
When you’re building an app with Slash GraphQL, you’re working with the GraphQL ecosystem the whole time. That starts from when you are first designing your data needs.
For our app, we just need one type of thing: a Todo. Those todos need three bits of data:
With Slash GraphQL, you design your app’s data as a GraphQL schema. That’s so nice as a developer: no other tech stack, no translations, no GraphQL layers to manage or deploy, nothing to think about except GraphQL.
As a GraphQL type, that’s this:
type Todo {
  id: ID!
  value: String!
  completed: Boolean! @search
}
That simply says that our app is about things called Todos, those have an id (an ID auto-generated by Slash GraphQL), a value (some String text describing what needs to be done), and are marked with a boolean value completed to let you know what you’ve ticked off and what you haven’t. The exclamation marks ! state that all the fields are required. The @search on completed tells Slash GraphQL that we want to be able to search by completed or not, so Slash GraphQL will build that search capability into the GraphQL API.
Loading just that much into Slash GraphQL provides a GraphQL API for our todo app. To get that running GraphQL API, we’ll first need to deploy a Slash GraphQL backend.
You’ll need an account to create GraphQL backends on Slash GraphQL. There’s a generous free tier. If you don’t have an account, head over to the sign up page and register for your free account.
Once you have confirmed your account from the email Slash GraphQL sends you, head over to the Slash GraphQL site and start building.
You’ll see the empty dashboard screen when you first log into Slash GraphQL.
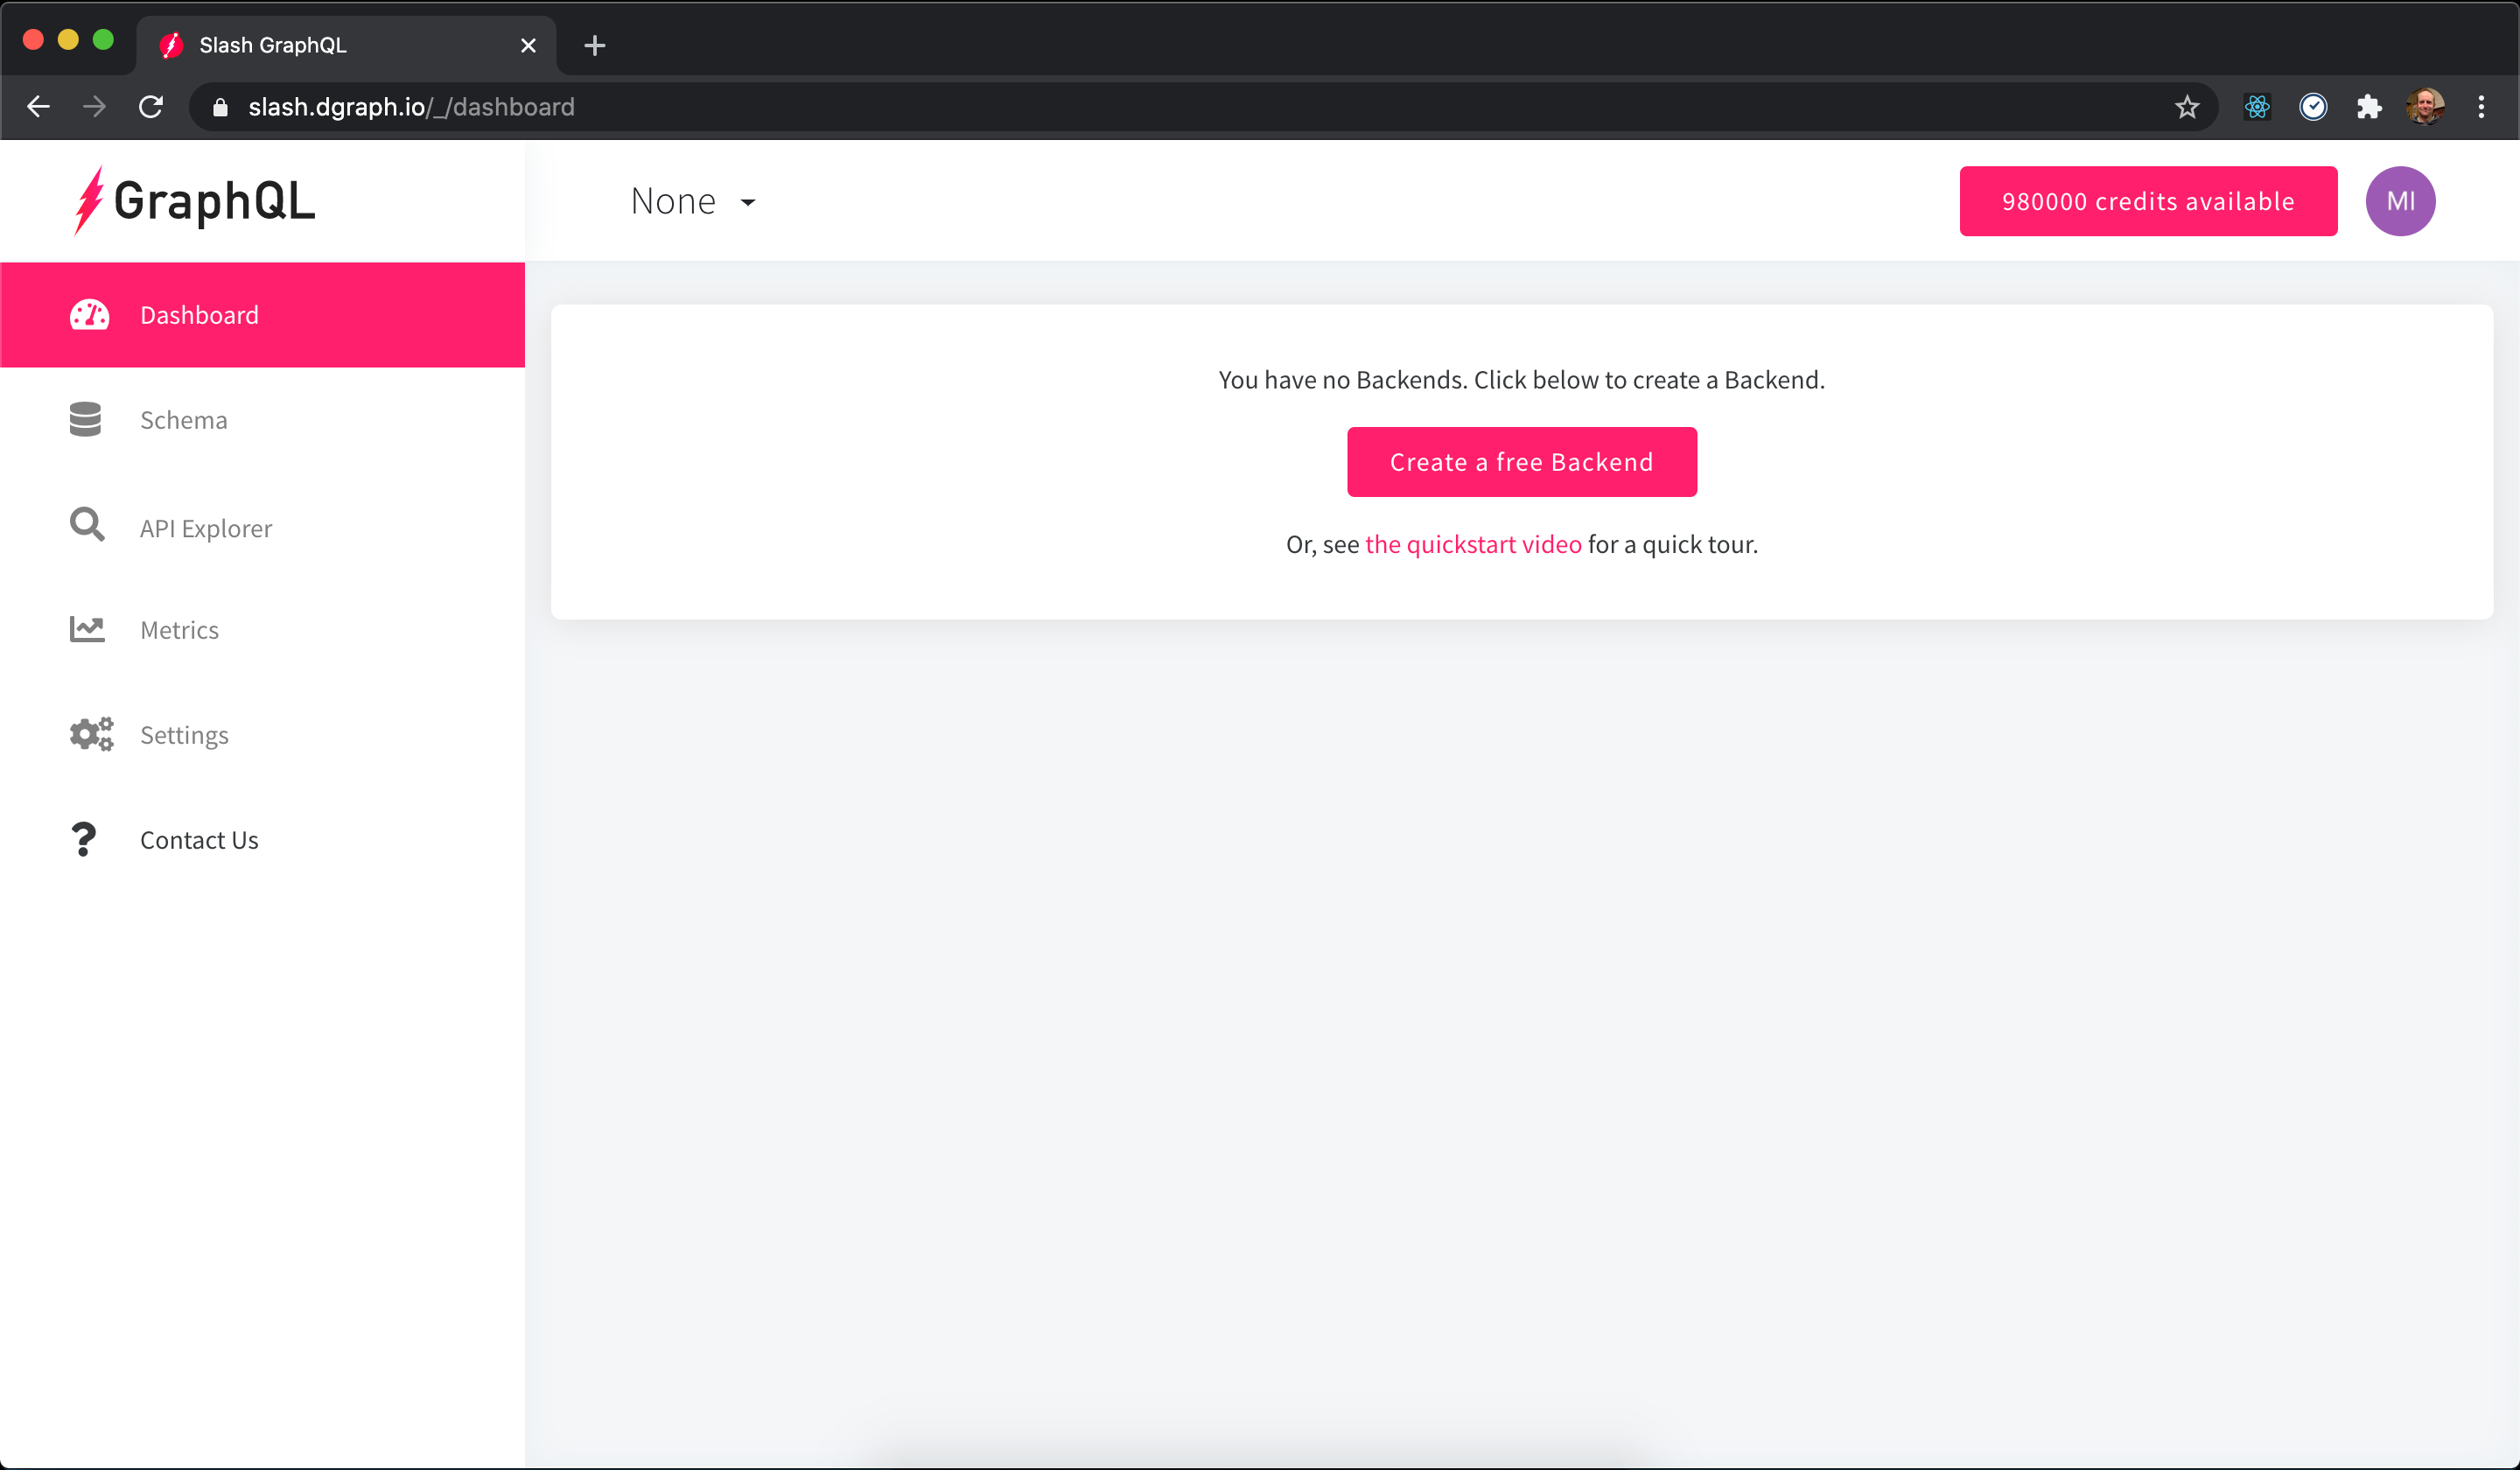
No prizes for guessing how to spin up your GraphQL backend - just press the big pink “Create a free Backend” button. That takes you to a screen to create the backend. All that is required is a name for the GraphQL backend.
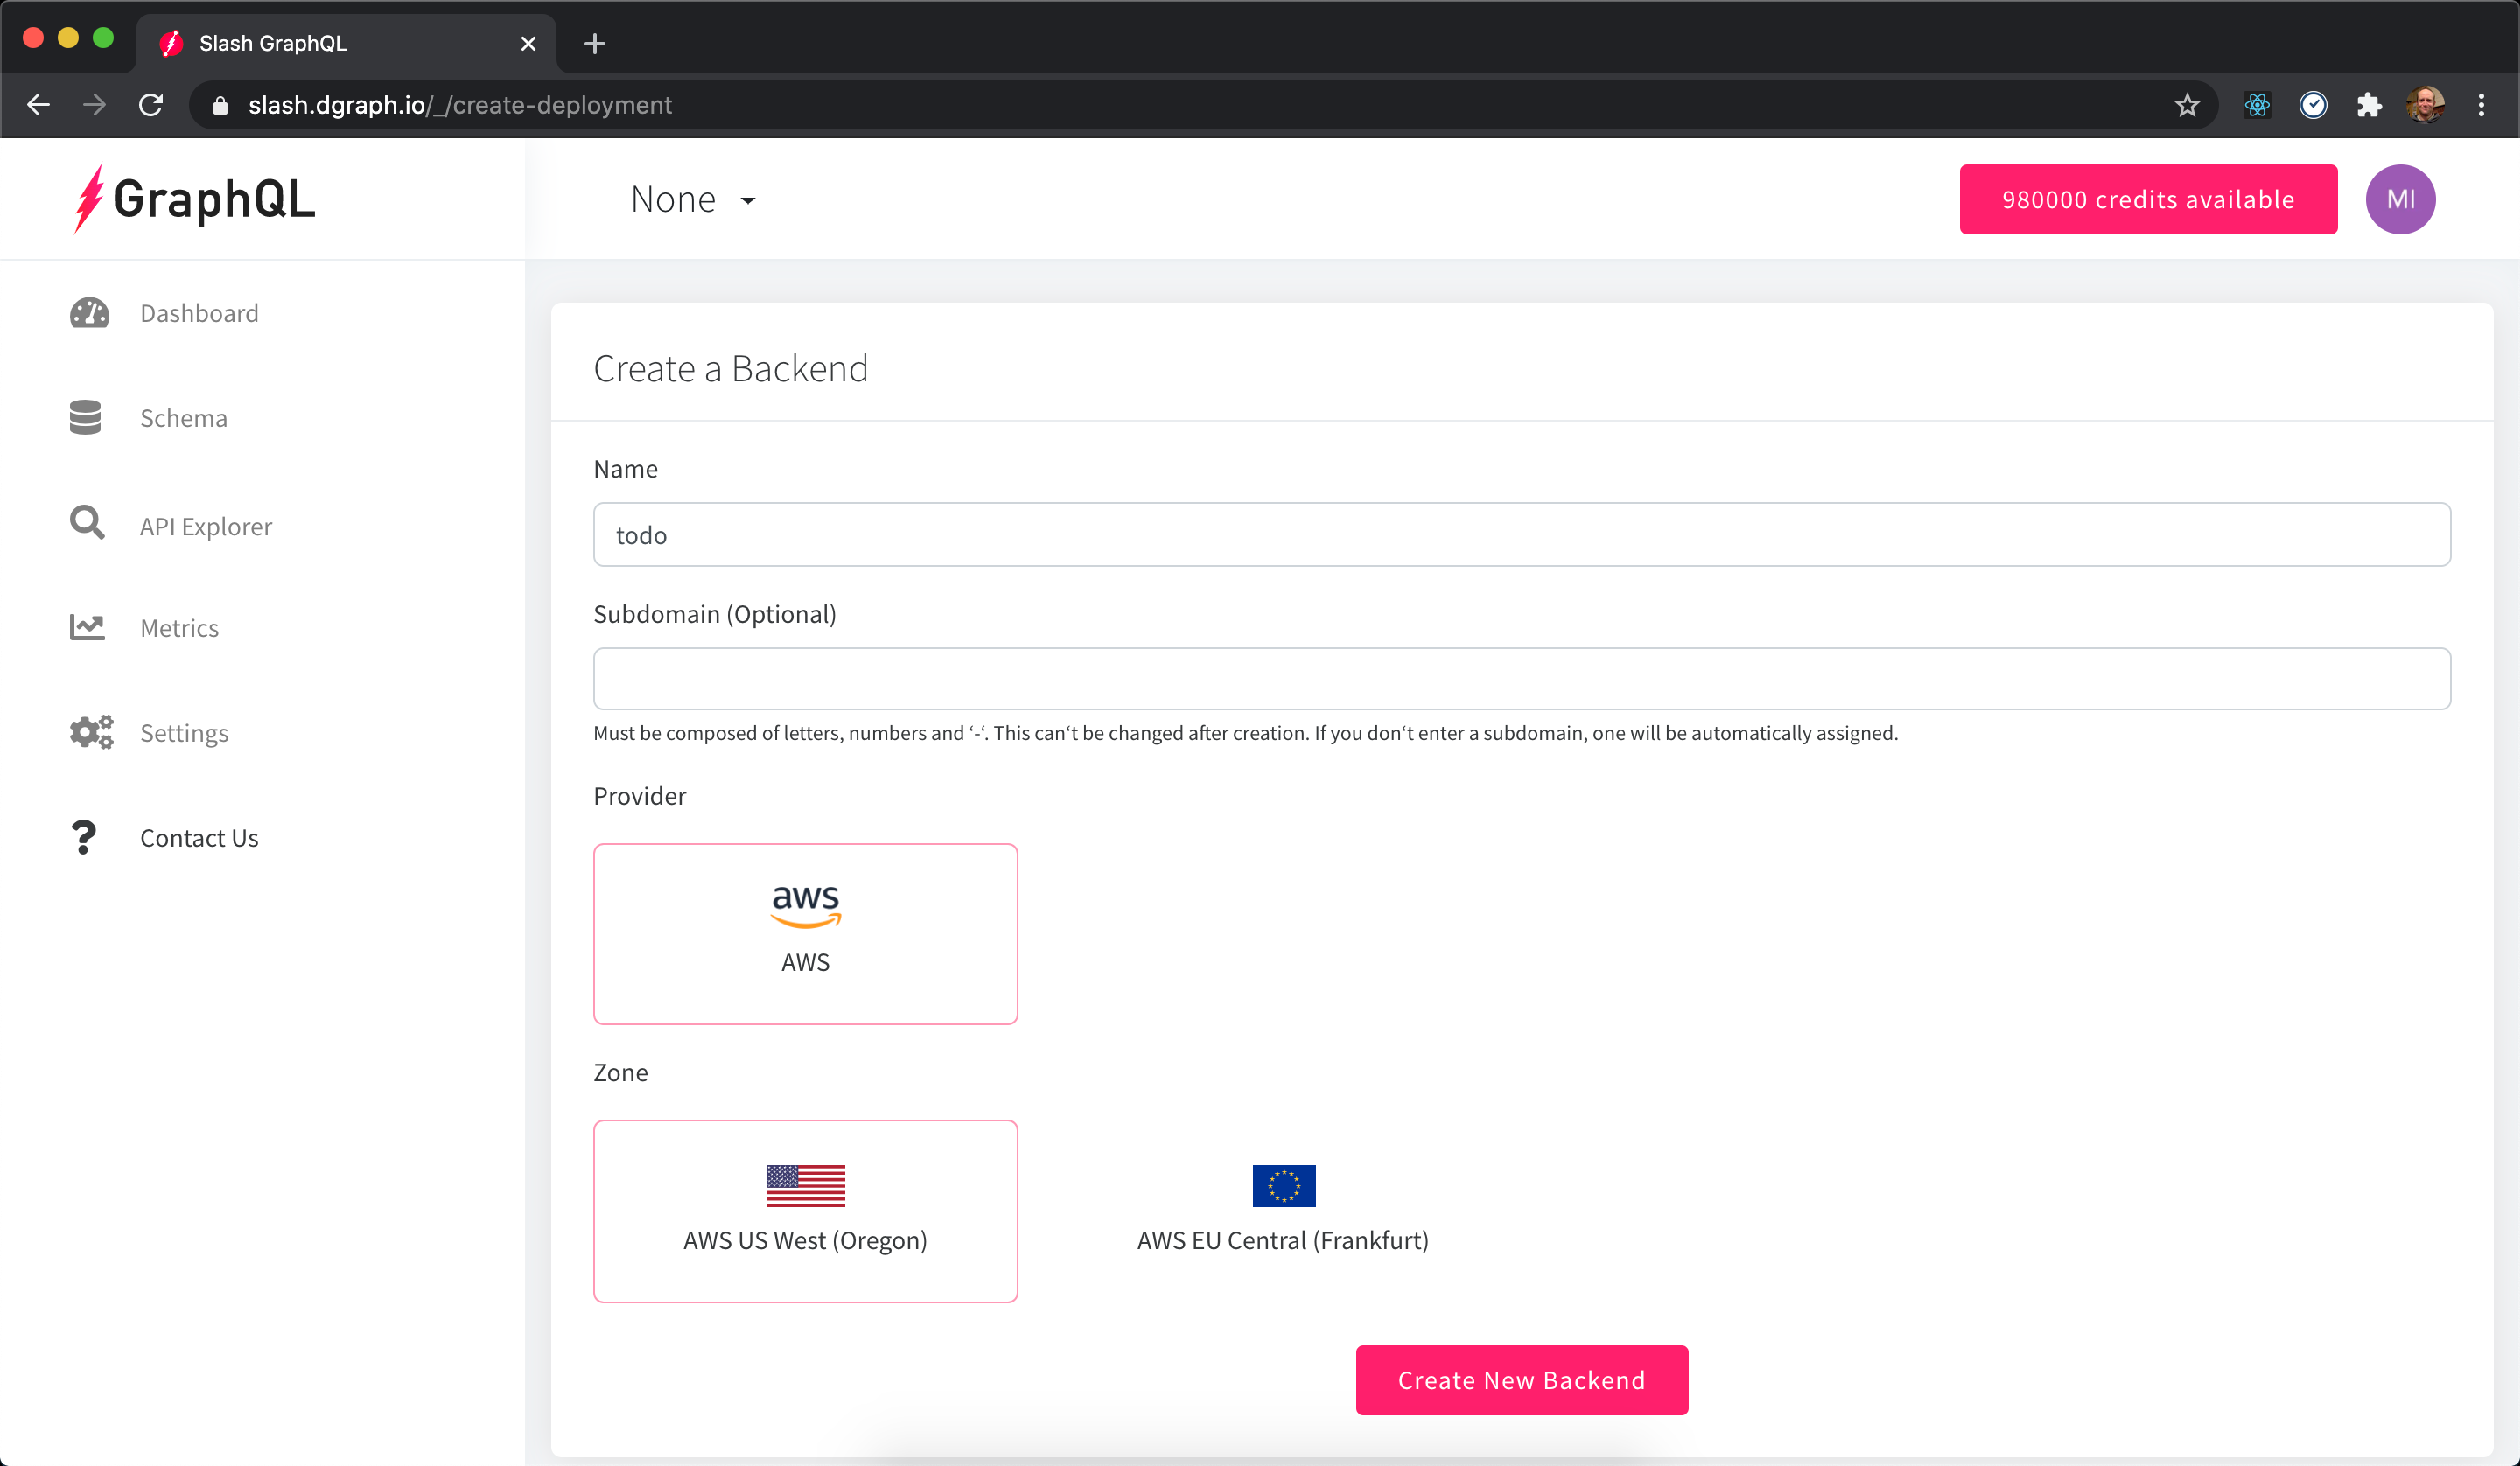
I named my deployment todo and set it up in AWS, in the US region. Clicking “Create New Backend” spins up the backend infrastructure to serve your GraphQL App. That’ll spin for just a few moments, and once you have the green tick, it’s live.
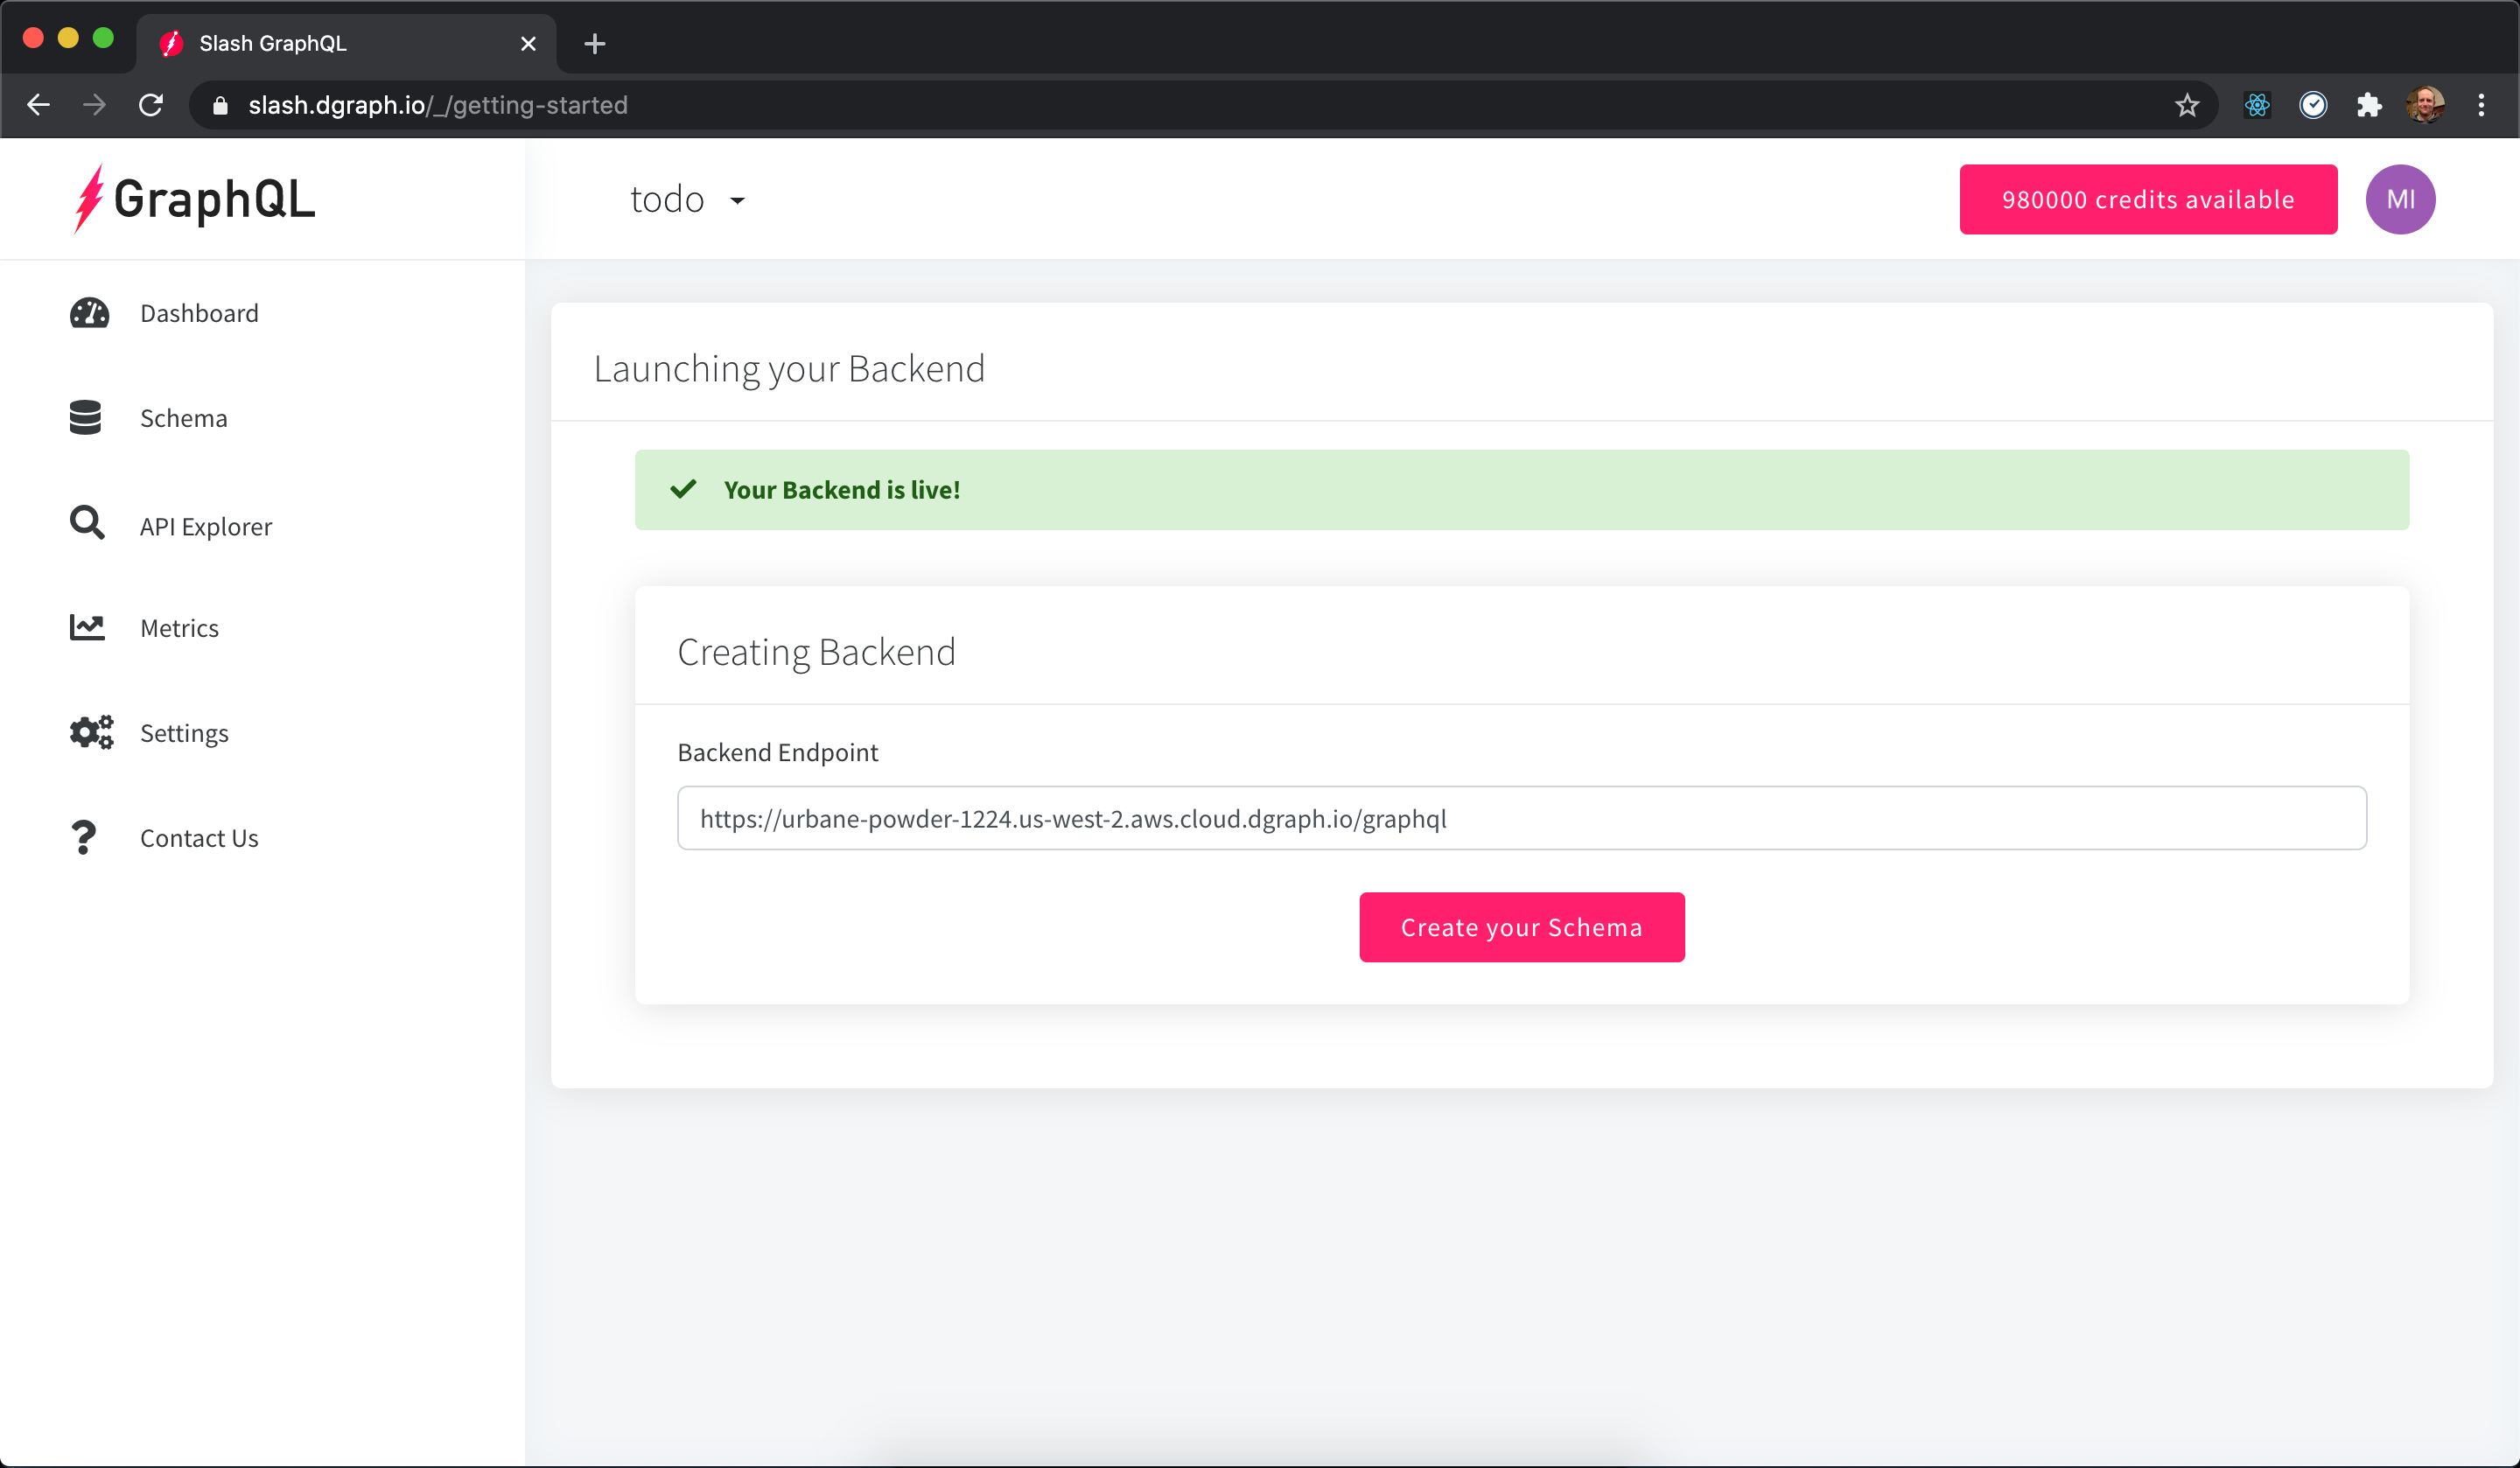
While it’s spinning up, note down the URL of your GraphQL API. You’ll need that to connect it to the React GraphQL application. Mine came up as https://urbane-powder-1224.us-west-2.aws.cloud.dgraph.io/cloud. Loving the ‘urbane’. I’ll take that as a description of me; it’s much better than the time it called me a pest.
Once the GraphQL backend is live, you give it your GraphQL schema, it serves a GraphQL API - no layers, no translations, no SQL, just GraphQL. So press “Create your Schema”, paste the schema in and press “Update Schema”.
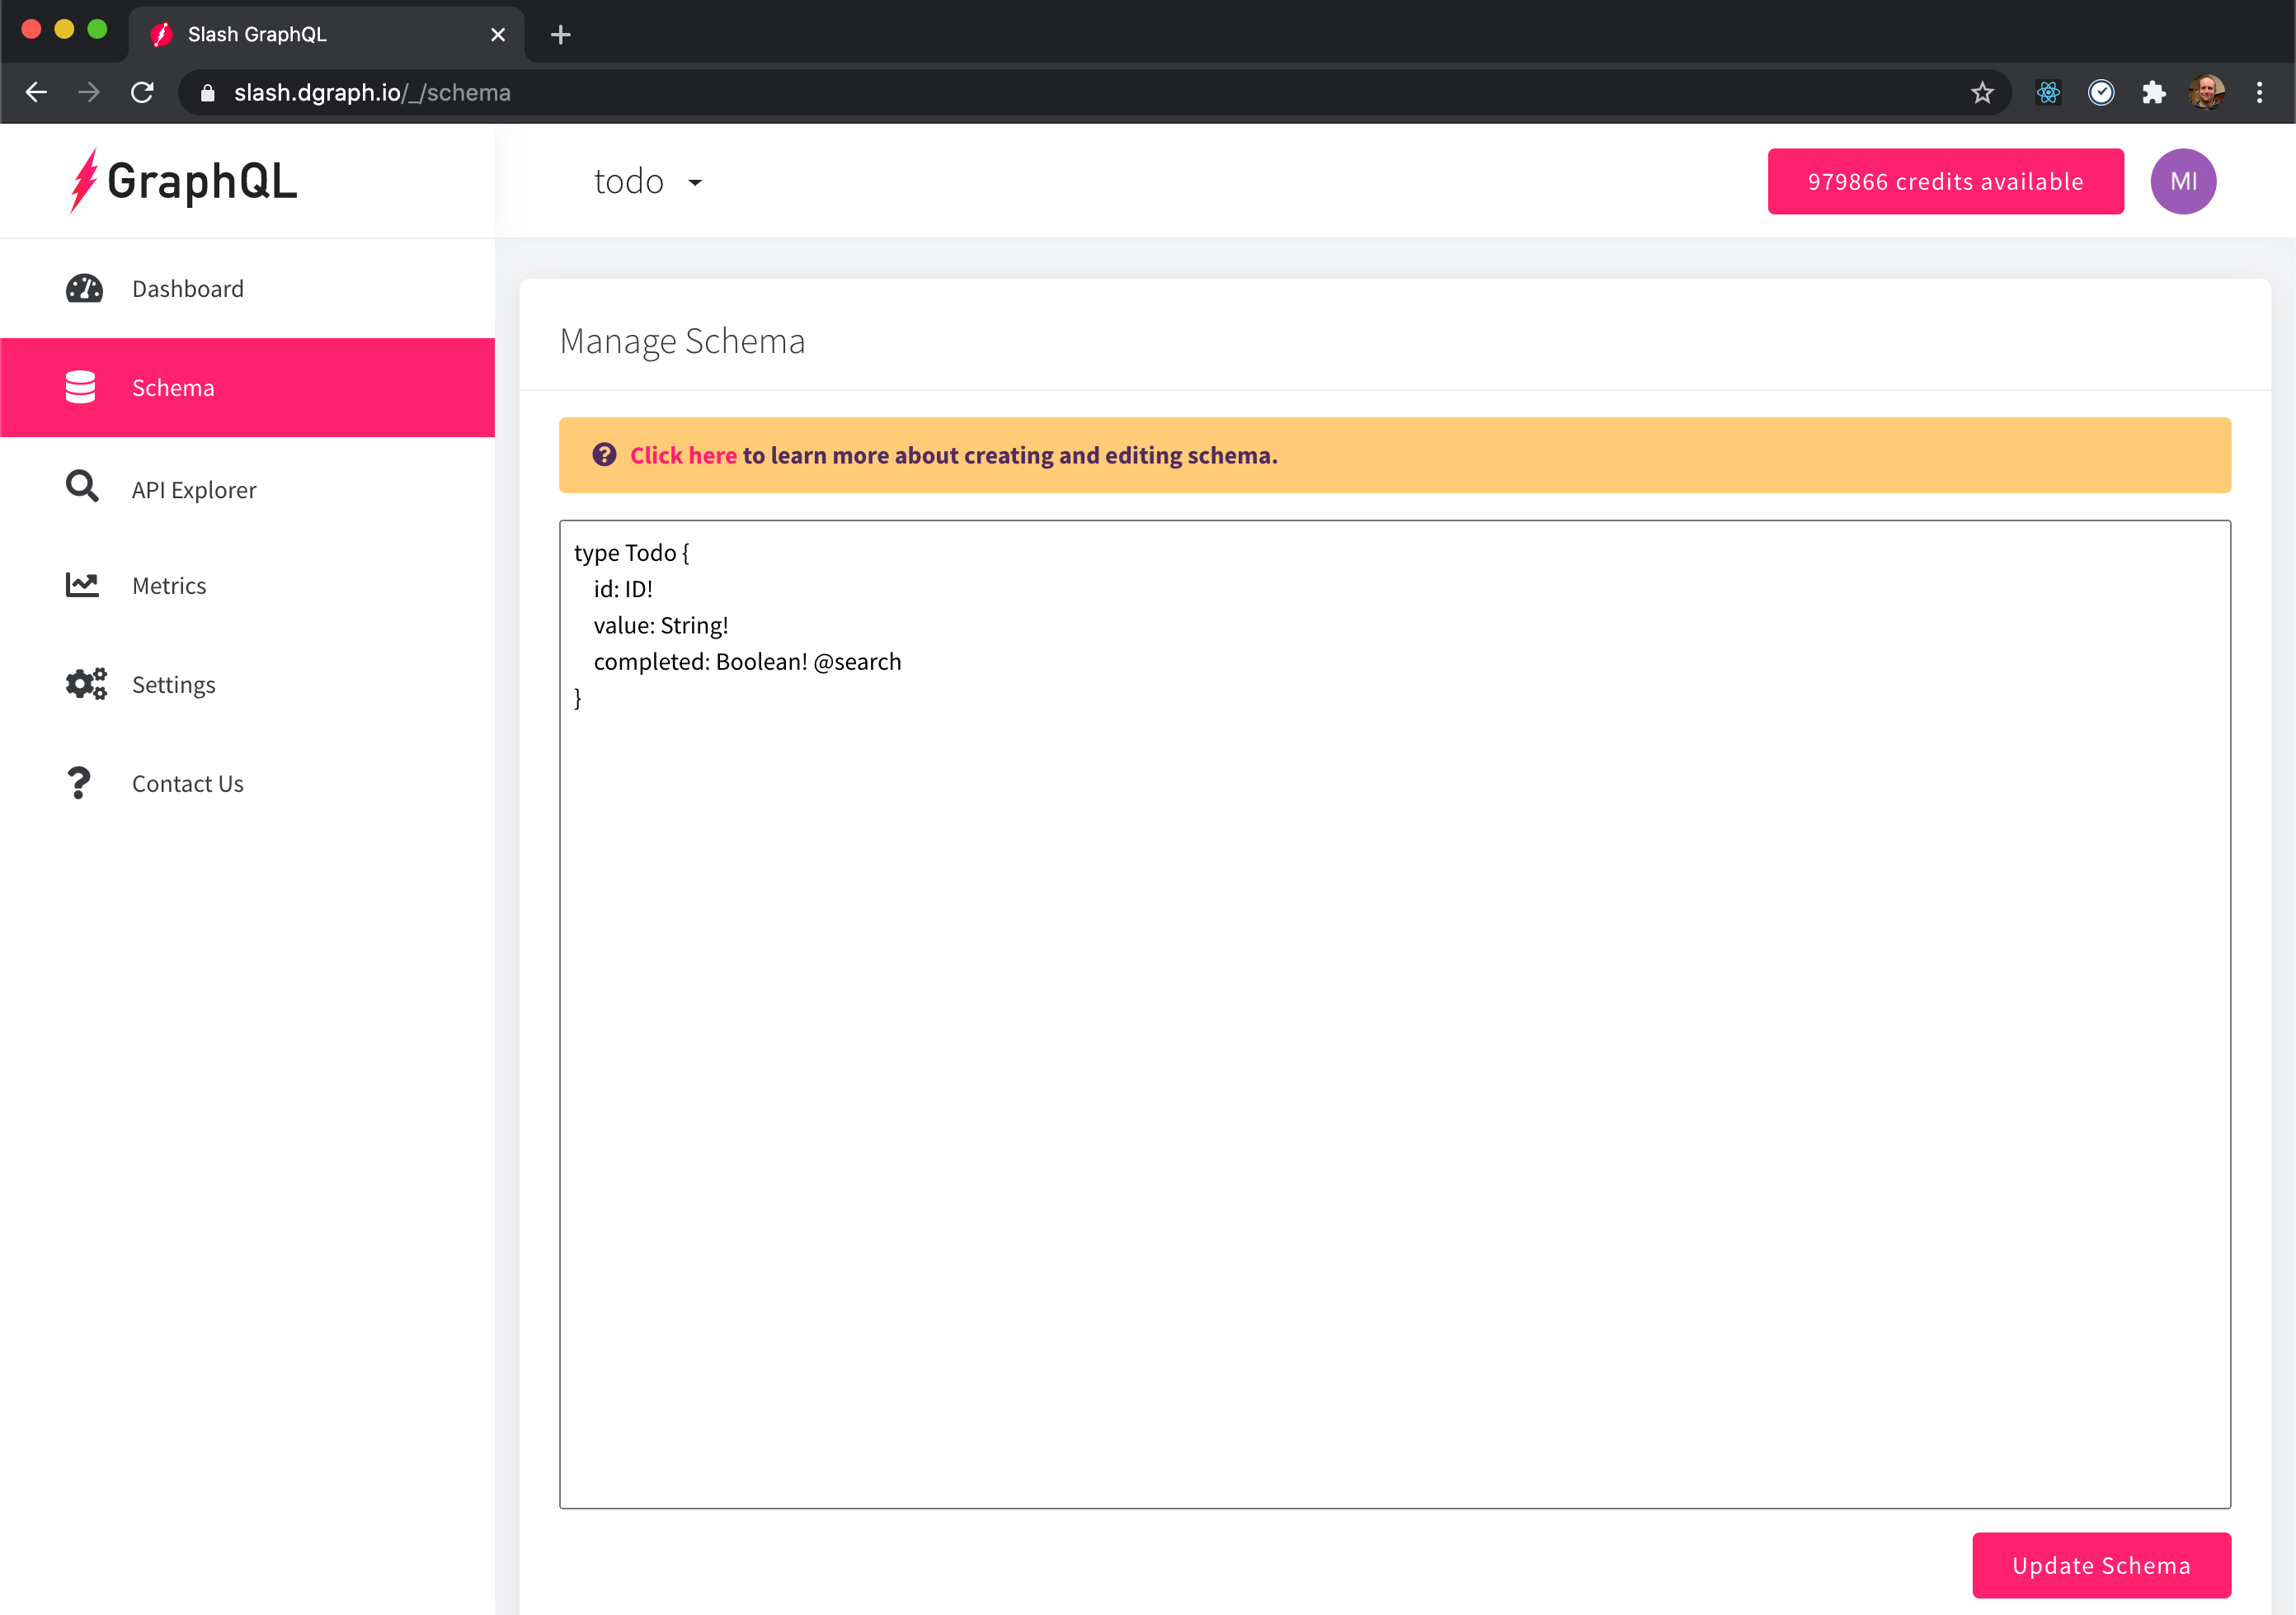
And you have a running GraphQL API on Slash GraphQL.
From the schema that was uploaded, Slash GraphQL generated a GraphQL API that lets you add, update, delete and query for Todos. You can access that API with any GraphQL tool: GraphiQL, GraphQL Playground, Insomnia, etc., as well as Apollo Client and any number of other GraphQL developer tools. There’s also a GraphiQL built into Slash GraphQL, so you can play with your GraphQL API right from the browser.
I added some sample data by running this GraphQL mutation.
mutation {
  addTodo(input: [
    {value: "Get a Slash GraphQL account", completed: true},
    {value: "Deploy a GraphQL backend", completed: true},
    {value: "Build a React app", completed: false},
    {value: "Learn more GraphQL", completed: false}
  ]) {
    todo {
      id
      value
      completed
    }
  }
}
Slash GraphQL can add multiple objects in a single mutation, as in the mutation above, and can also do deep mutations where you add a subgraph as a single mutation, without having to create each part in a separate mutation.
I used Slash GraphQL’s “API Explorer” tab and didn’t even have to leave the browser. Click the “API Explorer” tab on the left and you can check out the API that was generated, run queries and mutations, etc.
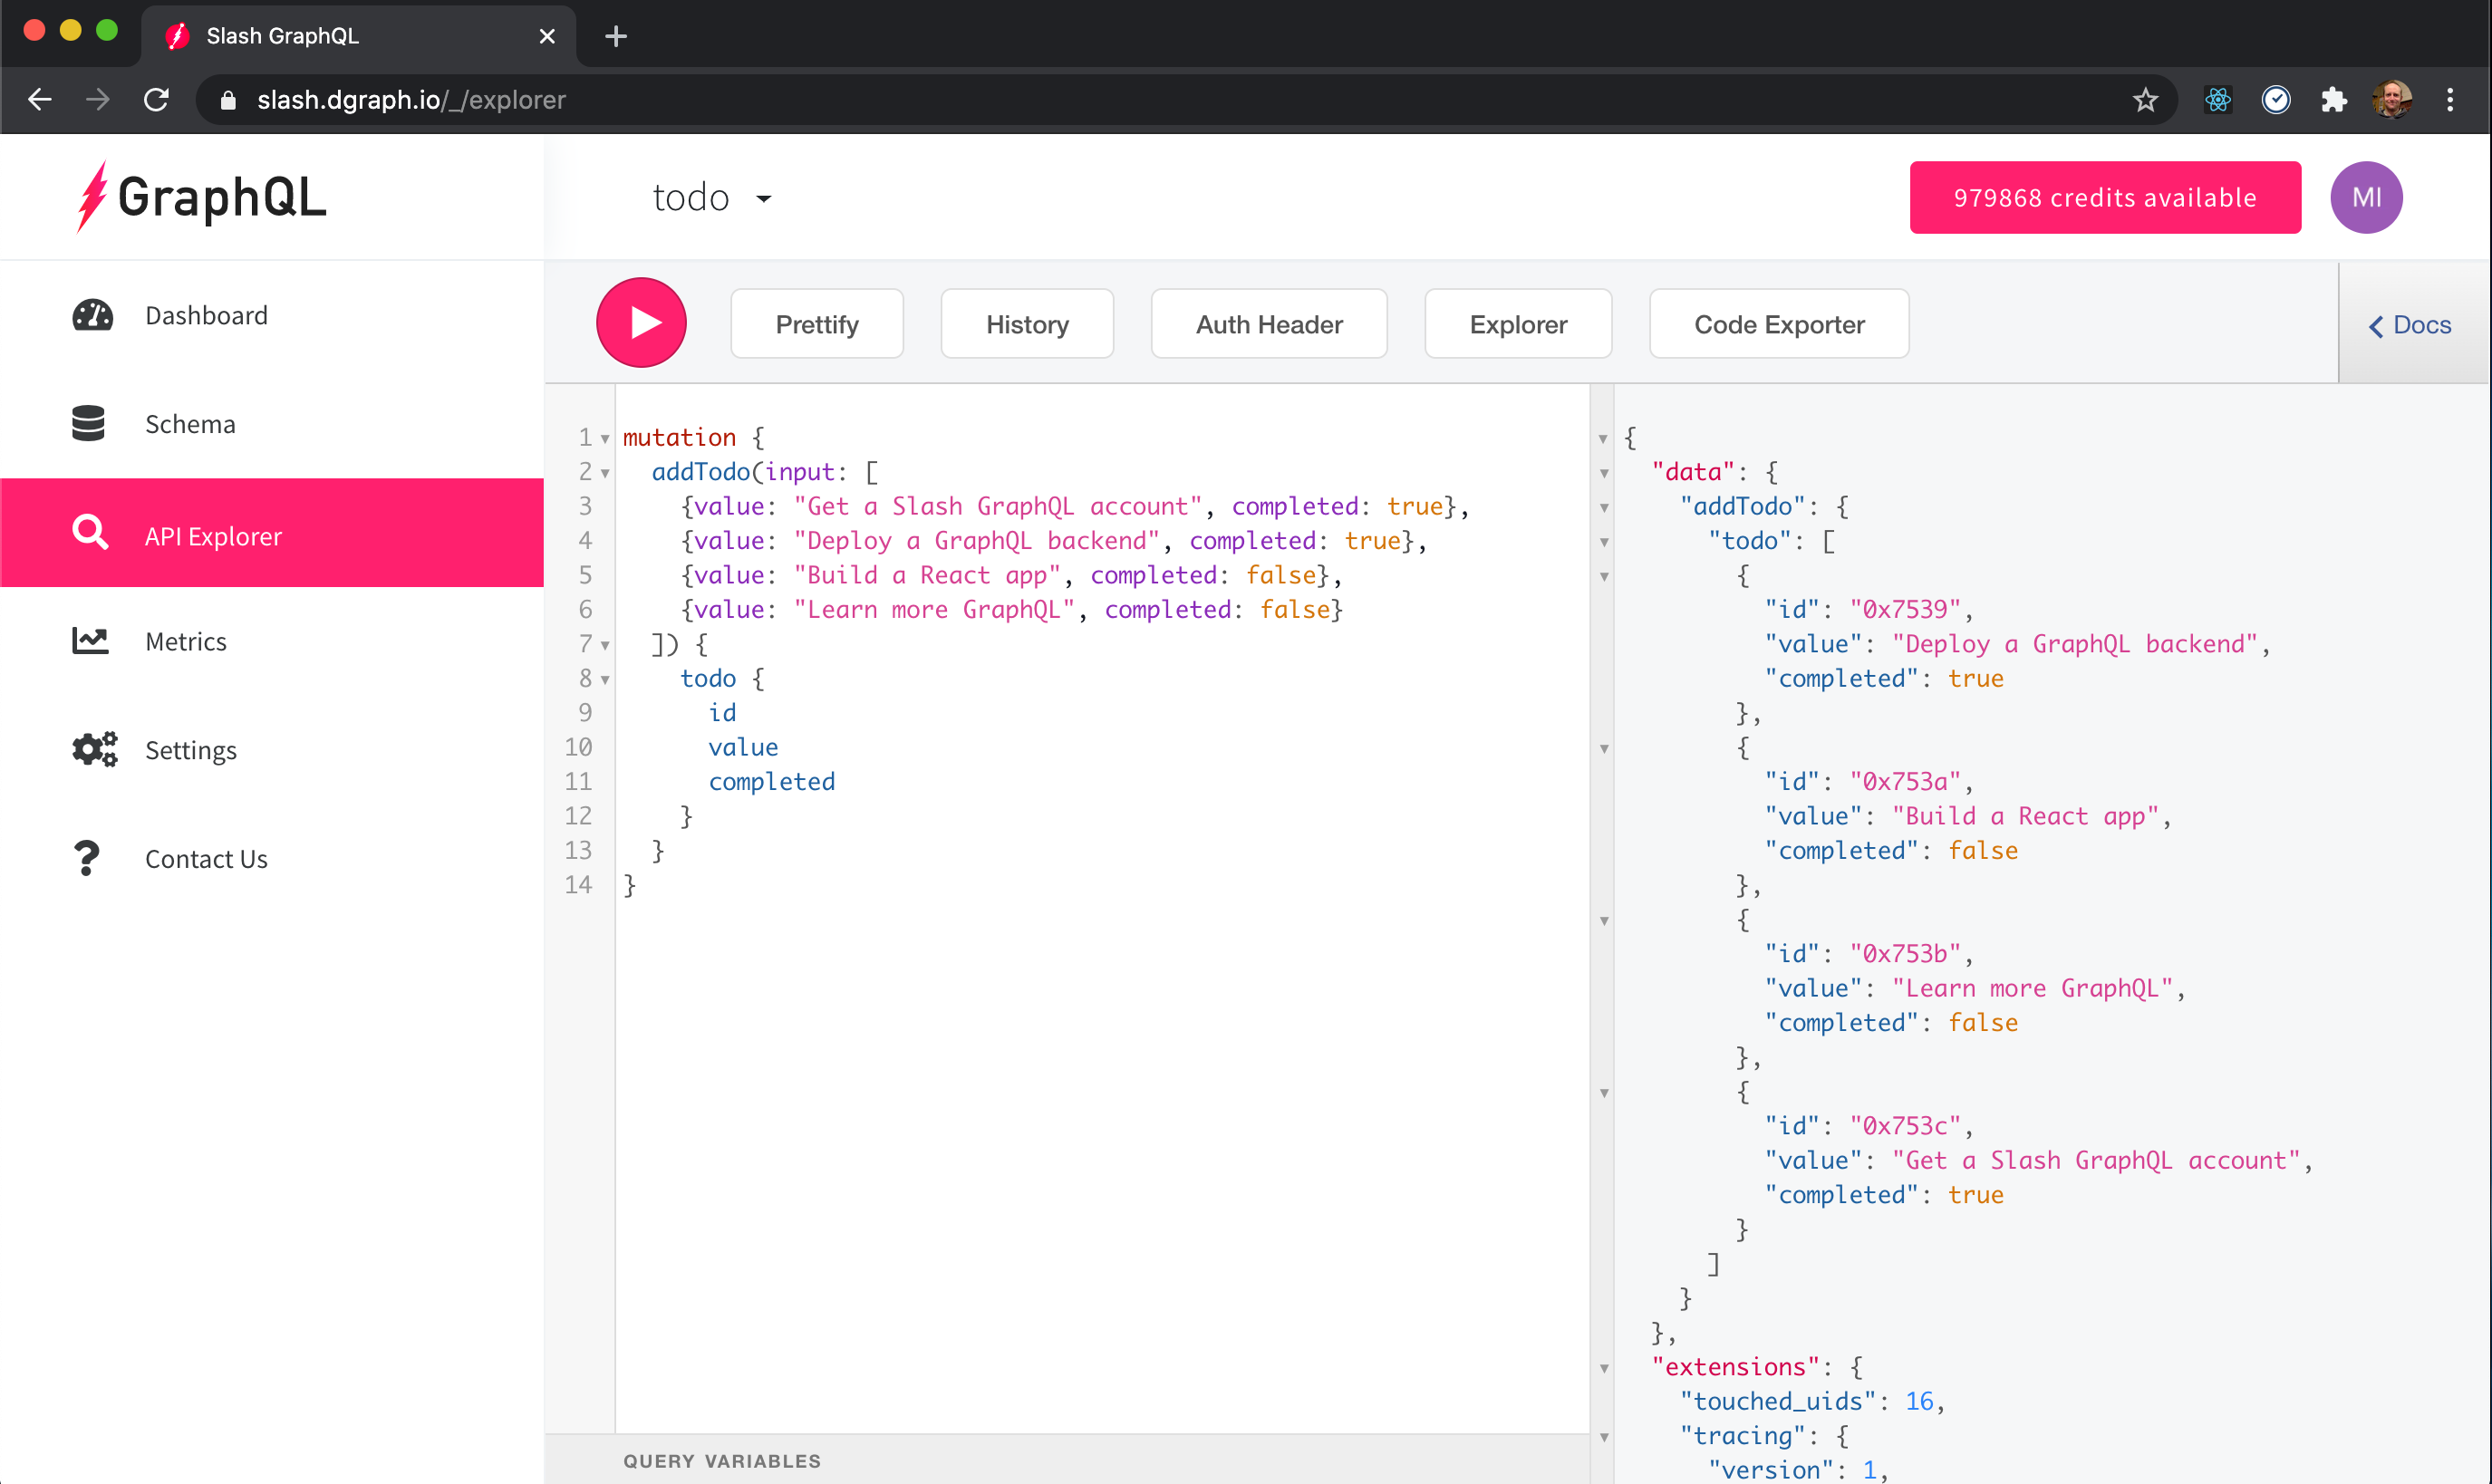
The response from the mutation is a JSON array of the todos we just created. When you’re writing the GraphQL App, you use the mutation response to re-render the page: for example, when a todo is added or removed from the list. In our case, we’ll be using a little trick and updating the screen from the client-side cache, so we don’t even need to re-query to re-render.
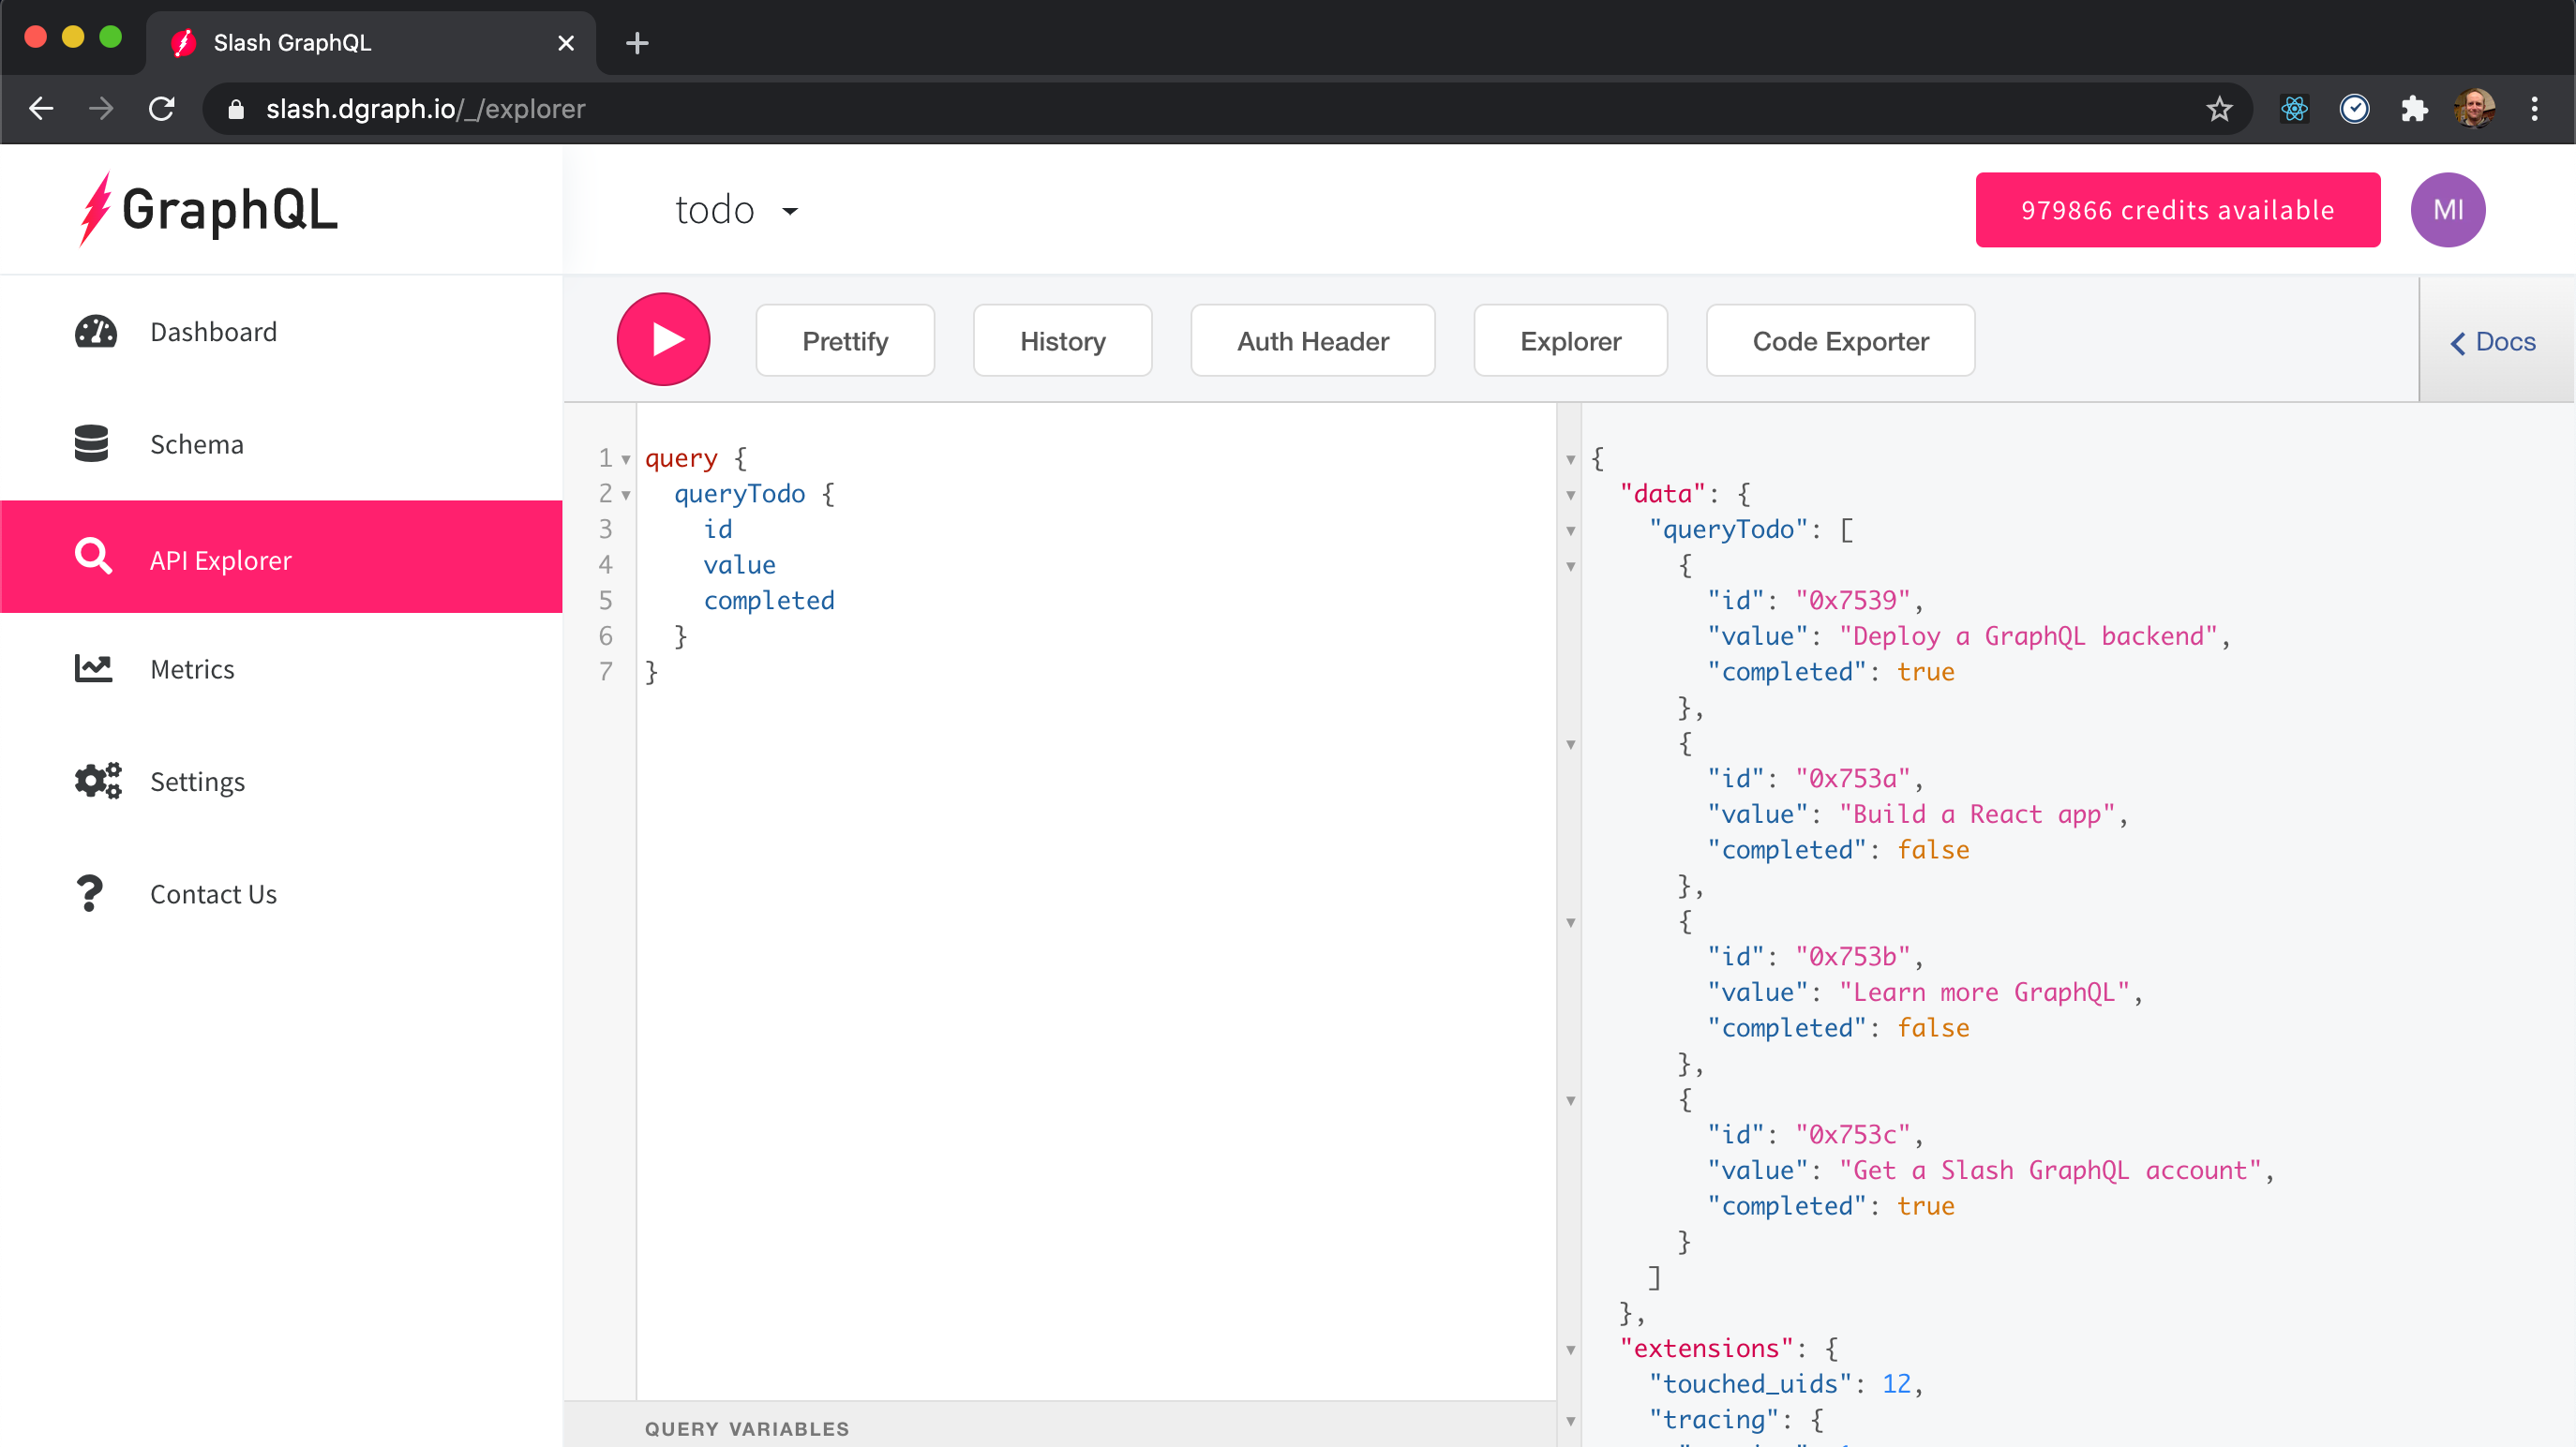
To render the list of todos we just need to ask Slash GraphQL for all of them in a GraphQL query.
query {
  queryTodo {
    id
    value
    completed
  }
}
In Slash GraphQL’s AP Explorer that looked like this.
As well as the addTodo mutation and queryTodo query, the API Slash built from the schema also contains an updateTodo mutation for updating existing todos and a deleteTodo mutation for deleting them. We’ll use all of those in our app.
Now that we have a running GraphQL API, let’s build a React app that uses the Slash GraphQL backend.
There are all kinds of styles or frameworks we could use to build and style this app. But, for a todo app, there happens to be this super sweet React-TodoMVC project. It’s perfect for this — it’s even built as “[…] an easy demo to show off your backend integrations.”
All you have to do get the initial data and implement a callback function for each of add, update, and delete. It deals with all the display and user interaction. We just have to deal with the data, which, in our case, is on Slash GraphQL. If you’re into your software engineering design patterns, React-TodoMVC (and lots of React) is a nice example of inversion of control: as the implementers of our app, we just have to care about the bits that matter to us, not everything else needed to make this run, and the library calls our code when it needs something.
Create the React app with:
npx create-react-app todo
cd todo
yarn add graphql @apollo/client react-todomvc
That uses create-react-app to create a boilerplate React app and then adds in the dependencies for GraphQL, Apollo Client 3.0 and the todo React component.
Apollo Client needs some setup that wraps the React components of the app. I set index.js to create a client pointing at https://urbane-powder-1224.us-west-2.aws.cloud.dgraph.io/cloud, and then use the ApolloProvider as the root of the component tree.
import React from "react"
import ReactDOM from "react-dom"
import App from "./App"
import {
  ApolloClient,
  ApolloProvider,
  InMemoryCache,
  createHttpLink,
} from "@apollo/client"

const createApolloClient = () => {
  const httpLink = createHttpLink({
    uri: "https://urbane-powder-1224.us-west-2.aws.cloud.dgraph.io/cloud",
  })

  return new ApolloClient({
    link: httpLink,
    cache: new InMemoryCache(),
  })
}

ReactDOM.render(
  <ApolloProvider client={createApolloClient()}>
    <React.StrictMode>
      <App />
    </React.StrictMode>
  </ApolloProvider>,
  document.getElementById("root")
)
With that, we can use the Apollo client in any component without further setup — when we run GraphQL, we need only specify the actual GraphQL query or mutation, and Apollo will take care of execution, state management, caching, etc.
Thanks to Slash GraphQL and react-todomvc this app is going to boil down to just on 140 lines of code in App.js. Here’s the basic structure that we’ll build on.
import React from "react"
import { useQuery, useMutation, gql } from "@apollo/client"
import { Todos } from "react-todomvc"
import "react-todomvc/dist/todomvc.css"

...GraphQL constants...

function App() {

  ...get data...

  const addNewTodo = (value) => ...
  const updateTodo = (modifiedTodo) => ...
  const deleteTodo = (id) => ...
  const clearCompletedTodos = () => ...

  return (
    <div>
      <Todos
        todos={data....}
        addNewTodo={addNewTodo}
        updateTodo={updateTodo}
        deleteTodo={deleteTodo}
        clearCompletedTodos={clearCompletedTodos}
        todosTitle="GraphQL Todos"
      />
    </div>
  )
}

export default App
We define a callback function for each of addNewTodo, updateTodo, deleteTodo and clearCompletedTodos and a GraphQL query that fetches the data from Slash GraphL when the component loads.
Let’s start with the query that loads the data from Slash GraphQL.
Getting the list of todos, is just a GraphQL query that asks for every todo, it’s id, value and completed flag. We saw exactly that query in the Slash GraphQL interface before. To use it in the app, it needs to be wrapped in gql so that it’s parsed and turned from text into GraphQL. So we add this as a constant at the top of App.js.
const GET_TODOS = gql`
  query {
    queryTodo {
      id
      value
      completed
    }
  }
`
The app needs the value to display that in the list of todos, needs the completed flag to know whether to cross out a todo or not, and needs the id so that when we are operating on an individual todo, we can tell Slash GraphQL exactly which todo that is.
Linking that query up with our React component means telling Apollo client to run the query with the useQuery hook like this const { loading, error, data } = useQuery(GET_TODOS). That returns three values. loading and error do exactly what you’d think they do, and data is the data of the JSON response you saw in the result of the query when it’s executed: e.g. data might look like this:
{
  "data": {
    "queryTodo": [
      {
        "id": "0x7539",
        "value": "Deploy a GraphQL backend",
        "completed": true
      },
      {
        "id": "0x753c",
        "value": "Get a Slash GraphQL account",
        "completed": true
      },
      ...
    ]
  }
}
That’s pretty easy to consume in a Javascript app. To render, the Todos component needs a list of todos, and, well, that’s exactly what the GraphQL response gives us — nothing to do; GraphQL set it all up for us.
Running the query and handling the result totals to just this much javascript:
  const { loading, error, data } = useQuery(GET_TODOS)
  if (loading) return <p>Loading</p>
  if (error) return <p>`Error: ${error.message}`</p>

  ...

  return (
    <div>
      <Todos
        todos={data.queryTodo}
        ...
      />
    </div>
  )
Next, let’s look at adding todos. We’ll need to implement the addNewTodo function. It takes a string value for the todo text const addNewTodo = (value) => ... and should add a new todo with that text. We’ve already seen the addTodo mutation that Slash GraphQL provides. We need to add it to the constants and call it, and we need to use GraphQL variables to tell GraphQL that the mutation expects some input. You can read mutation addTodo($todo: AddTodoInput!) { ... } a bit like a typed function definition that expects an argument $todo that it passes on to the actual addTodo(input: [$todo]) mutation in Slash GraphQL.
const ADD_TODO = gql`
  mutation addTodo($todo: AddTodoInput!) {
    addTodo(input: [$todo]) {
      todo {
        id
        value
        completed
      }
    }
  }
`
In the javascript app, you turn that into an executable function with the useMutation hook. The definition const [add] = useMutation(ADD_TODO) makes add a function that will execute the GraphQL mutation.
From here, the simplest implementation of addNewTodo is just:
function App() {
  const [add] = useMutation(ADD_TODO)

  ...

  const addNewTodo = (value) =>
    add({
      variables: { todo: { value: value, completed: false } },
      refetchQueries: [ { query: GET_TODOS } ],
    })
Our app passes that to React-TodoMVC as the function to call when a todo is added. So, when a user types in a todo and presses return, React-TodoMVC calls this function with an argument of the todo’s text value, then, when the add function is called, it builds the todo using the value and setting completed to false, and uses that as the variable to run the actual mutation on Slash GraphQL. The todo gets added to the GraphQL database, and, when that completes and returns, we refetch the GET_TODOS query to get all the new data off the server. Rerunning GET_TODOS causes the data result of const { loading, error, data } = useQuery(GET_TODOS) to change, and thus React re-renders the screen with the new data.
Sweet! A lot happens in the background, but our implementation is super simple. The remainder of the functions can be similarly easy. The deleteTodo function is defined as const deleteTodo = (id) => .... So it takes an argument of the id of the todo we are deleting and should remove it from the server. All told, that would be just this much:
const DELETE_TODO = gql`
  mutation deleteTodo($id: ID!) {
    deleteTodo(filter: { id: [$id] }) {
      todo {
        id
      }
    }
  }
`

function App() {
  ...
  const [del] = useMutation(DELETE_TODO)
  ...

  const deleteTodo = (id) =>
    del({
      variables: { id },
      refetchQueries: [ { query: GET_TODOS } ],
    })
Update and remove all the completed todos would be just as easy. That’s the whole app implemented as just the GraphQL definitions and the boilerplate to call them. Nice!
That was easy, but it’s actually not super great. There’s a loop there where we run the mutation, wait for it to complete, then re-run the query, wait for it to complete, then redisplay the data. That’s two trips to the server, and that can make the UI blink a little annoyingly or not seem responsive if there’s a visible lag.
And this is where the fun bit is. GraphQL and Apollo client have some nice things for us here. We actually have all the data we need to re-render the screen as soon as the mutation completes. addTodo, for example, returns the added todo’s id, value, and completed status. If we go back to the server and rerun the query, it’ll just return to us the todos we already knew about and this one extra todo. Similarly, after deleteTodo, it’ll just be the todos we already knew about, minus the one that got deleted.
This is where the client-side cache comes in. All our interactions with the GraphQL server are getting cached, so we can use the cache to avoid extra trips to the server.
The mutation functions returned by useMutation allow setting an update function that lets the app update the cached values with the mutation’s result. Doing so is just as much as reading the currently cached value and adding in the new todo.
const addNewTodo = (value) =>
add({
  variables: { todo: { value: value, completed: false } },
  update(cache, { data }) {
    const existing = cache.readQuery({ query: GET_TODOS })
    cache.writeQuery({
      query: GET_TODOS,
      data: { queryTodo: [...(existing ? existing.queryTodo : []), ...data.addTodo.todo] },
    })
  },
})
It’s a couple of extra lines over the simplest version, but it can help the UI to be responsive. In the case of delete, we need to remove the todo from the cache. That turns out to be just as easy as the simplest version.
const deleteTodo = (id) =>
  del({
    variables: { id },
    update(cache, { data }) {
      data.deleteTodo.todo.map(t => cache.evict({ id: cache.identify(t) }))
    },
  })
It’s a bit like telling the cache, hey this is what the result of GET_TODOS would look like if you actually did rerun that query, but don’t bother doing that.
The UI update loop is similar to before, except that instead of going back to the server to update the result of const { loading, error, data } = useQuery(GET_TODOS), it’s updated by the cache update function from the mutation result.
The updateTodo and clearCompletedTodos functions can be similarly updated to use the client-side cache, and, thus, the re-rendering experience in the app is smoother. You can actually re-render the UI while the mutations are happening in the background using optimistic rendering: because, for example, we know what the result of deleteTodo is going to be, we can update the UI while the work is going on. That makes the UI super smooth because there are zero trips to the server. But I’ll leave that improvement for another time.
There’s a Github repo here with the code of the app. Clone that, set up your GraphQL backend on Slash GraphQL, set the URL of your endpoint in index.js, and you have your own Slash GraphQL app to start working on. Start the React app with:
yarn install
yarn start
And, now, you are at this point in checking off the todos needed to get started using Slash GraphQL:

In just a few lines of code and one simple schema, we have an app up and running on Slash GraphQL. It’s the fastest way to get moving with GraphQL, and it keeps you in the GraphQL ecosystem the whole time, so you don’t need to worry about other tech stacks or translations from other data models.
There’s more that could be added to our app. For example, adding the ability to search todos is as simple as setting the schema with this value: String! @search(by: [term]). Slash automatically adjusts, no downtime, it just indexes the data and rebuilds the API, meaning you can iterate on your app quickly.
For me though, I’m going to turn this into a multi-user app by using Slash GraphQL’s built-in authorization mechanism. I’ll be adding Auth0 for a login service and using Netlify to deploy the frontend. Once that’s done, I’ll have a serverless GraphQL app up and running.
We are building a fast, transactional and distributed graph database. If you like what you read above, come join the team!
| Get started with Dgraph | https://docs.dgraph.io |
| Star us on GitHub | https://github.com/dgraph-io/dgraph |
| Ask us questions | https://discuss.dgraph.io |