Pick Your Packer: Building Intelligent Search with Hypermode and Dgraph
Pick Your Packer (PYP) is “Zillow for Food and Beverage.” They’ve built an easy-to-use platform for conne ...
Learn more

Update: On April 16th 2021, Slash GraphQL was officially renamed Dgraph Cloud. All other information below still applies.
In an application, the client sends requests to the backend server and gets responses. Sometimes, the backend needs to notify the client whenever that response changes: for example, any app that involves notifications. Applications that use real-time data, like live scores, also need a mechanism where the server can push an updated response to a query depending on events.
In this blog, we see how to achieve this using GraphQL subscriptions.
A GraphQL server usually supports a set of queries and mutations (operations) which forms the data interaction between the client and the server. The client sends a query or mutation and gets a response back from the server.
Subscriptions are a way to push data from the server to the clients that choose to listen to real-time messages from the server. Subscriptions are similar to queries in that they specify a set of fields to be delivered to the client, but instead of immediately returning a single answer, a result is sent every time a particular event happens on the server without the client needing to resend that request.
This can be achieved when the client opens a bi-directional communication channel with the server and sends a subscription query that specifies which event it is interested in. When an event is triggered, the server executes the stored GraphQL query, and the result is sent through the same communication channel opened by the client. One way to achieve this is by using WebSockets, which establish a two-way interactive communication session between the user’s browser and a server. This is different from the HTTP calls used for regular GraphQL queries, where a request is sent, a response is received, and the connection is closed.
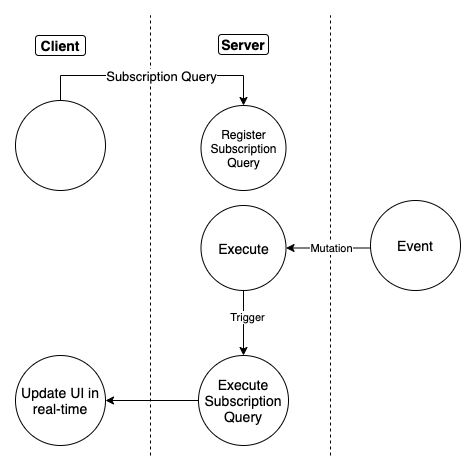
The client can unsubscribe by sending a message to the server. The server can also unsubscribe at any time due to errors or timeout. Another significant difference between queries/mutations and a subscription is that subscriptions are stateful, and thus require maintaining the GraphQL document, variables, and context over the lifetime of the subscription. For example, in the following diagram, the server must remember the subscription, requested fields, etc. from the client and use those to return a result in response to an event.
Now that we have a basic understanding of GraphQL subscriptions, let’s quickly create a small example with Dgraph GraphQL, NextJS, and Apollo Client.
In Dgraph GraphQL it’s very easy to enable subscription on any type. We just mention the directive @withSubscription in the schema along with the type definition.
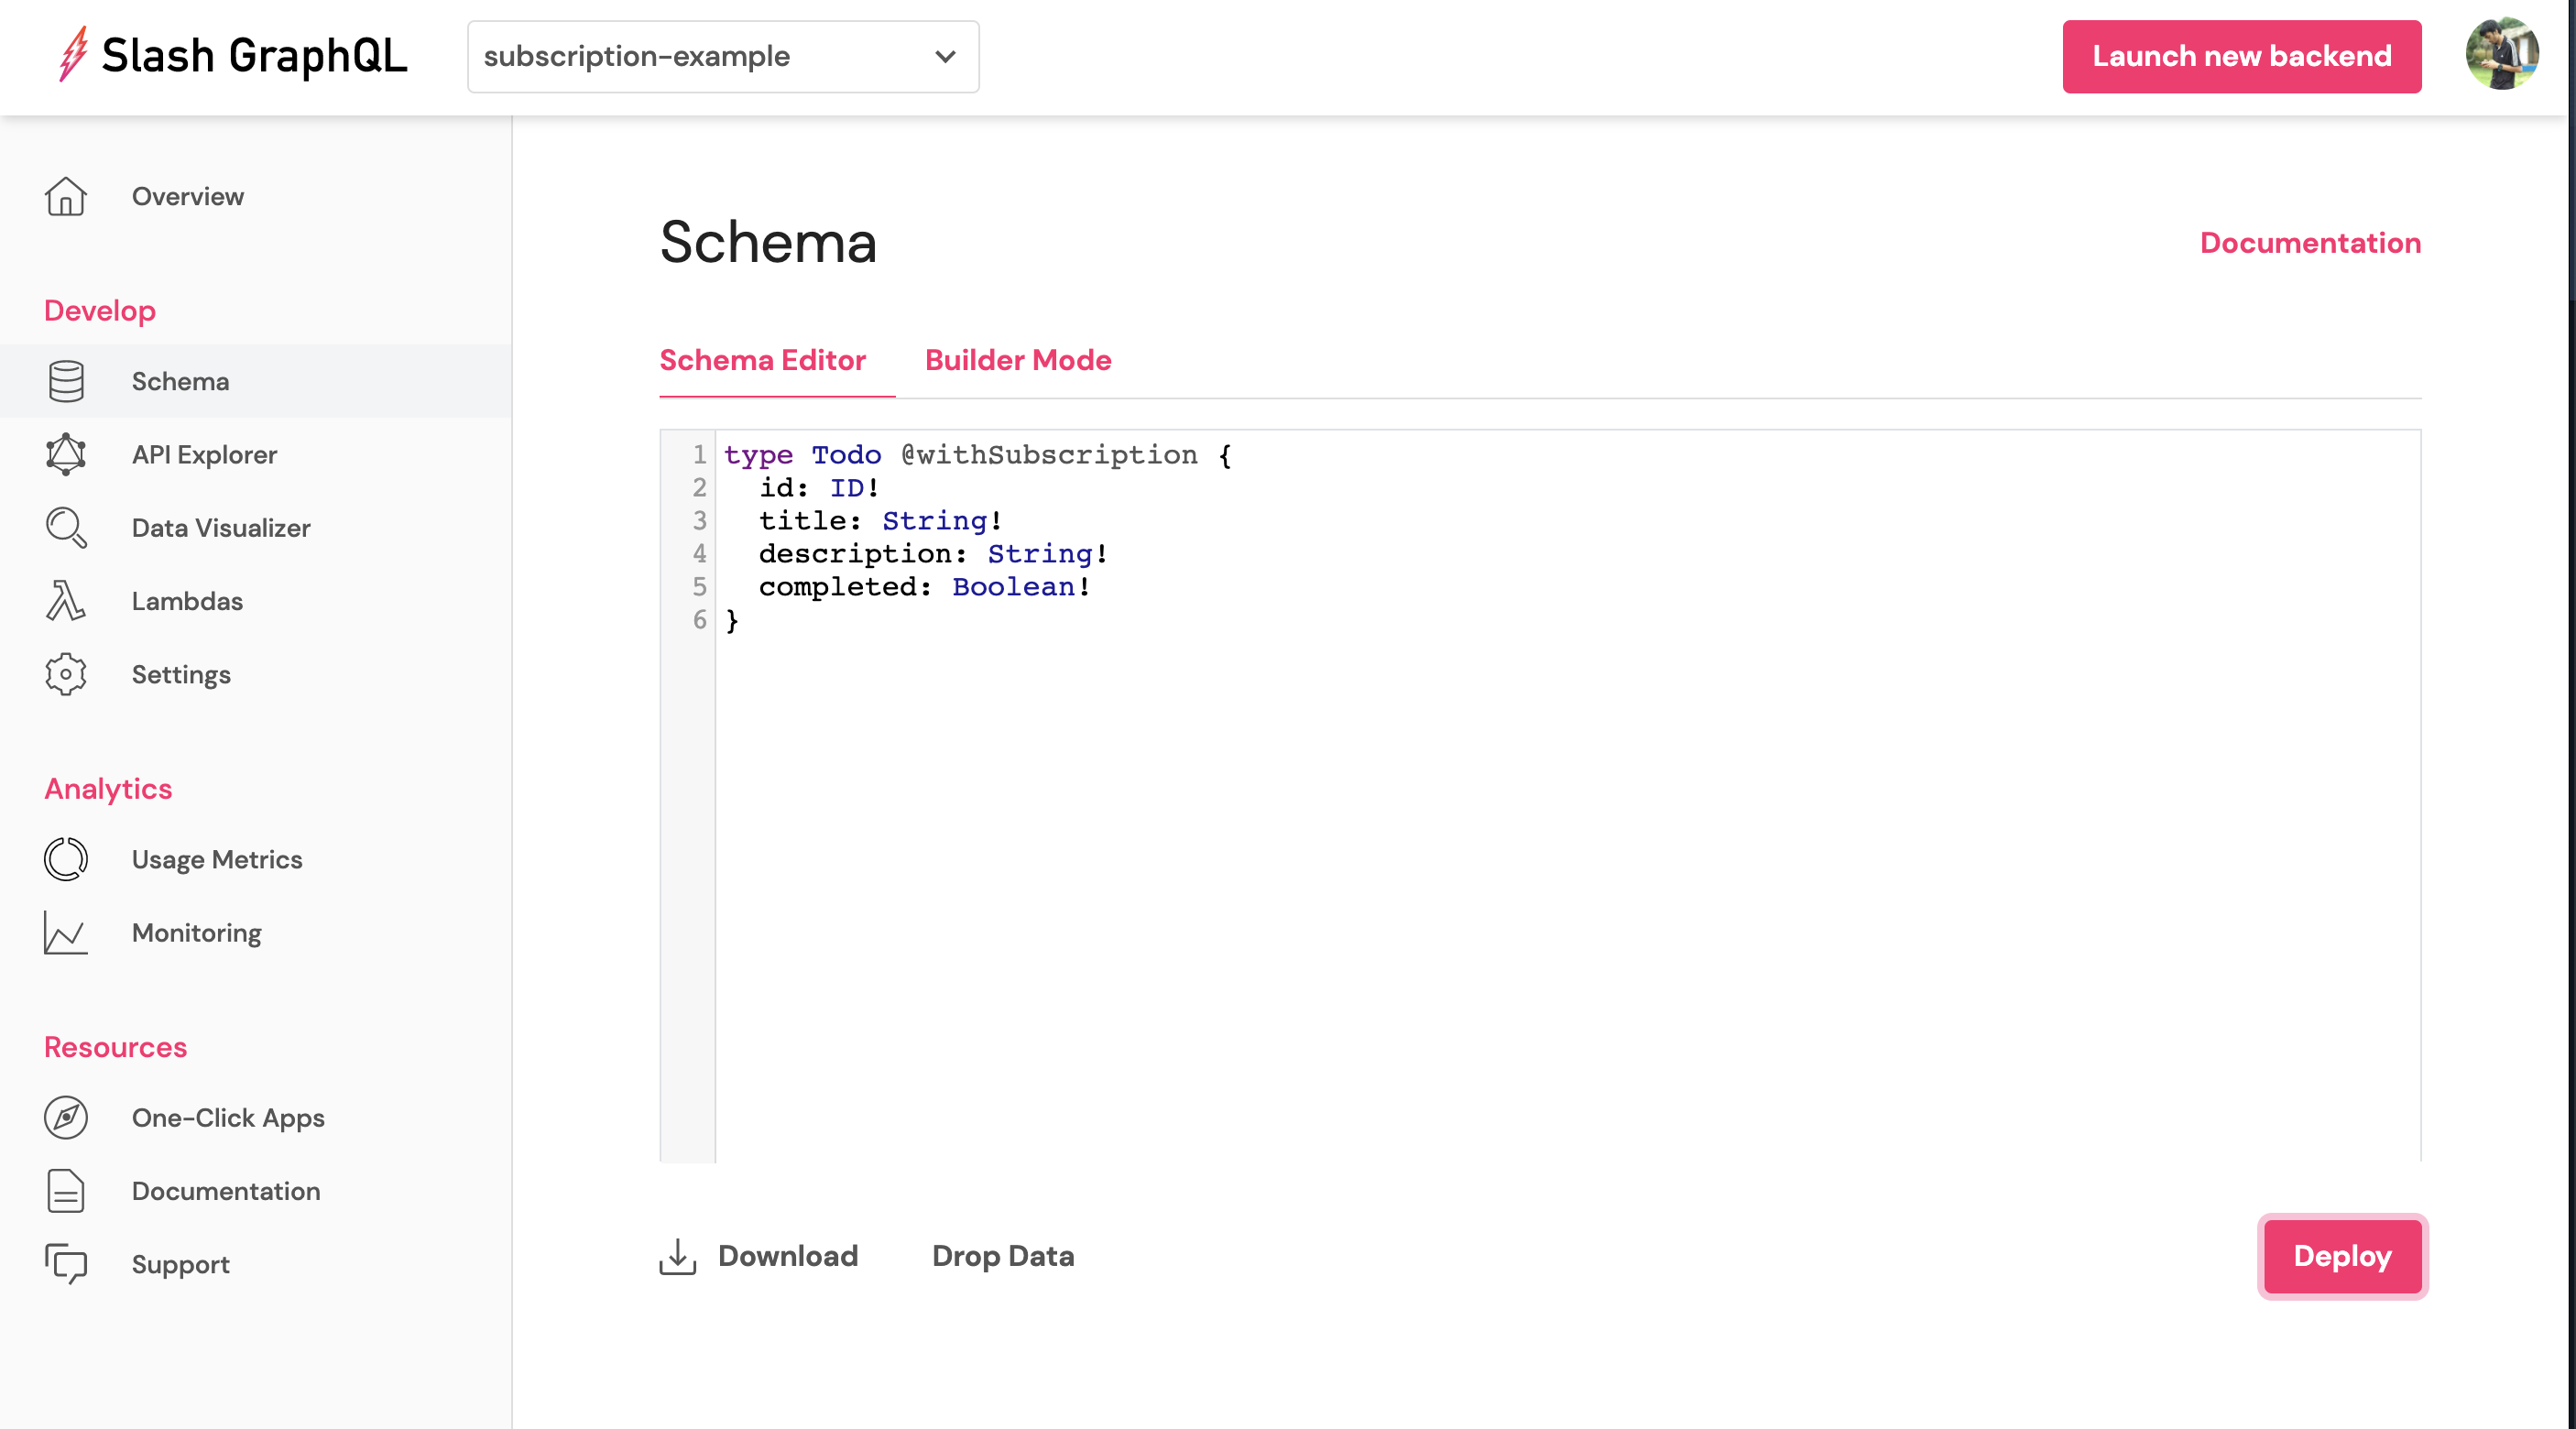
Create a basic schema and store it in a file schema.graphql.
type Todo @withSubscription {
  id: ID!
  title: String!
  description: String!
  completed: Boolean!
}
There two ways of doing this - by running Dgraph ourselves or by using Slash GraphQL, a fully managed backend service.
Let’s start Dgraph locally.
docker pull dgraph/standalone:latest
docker run -it -p 8080:8080 dgraph/standalone:latest
That started the Dgraph server. Now let’s submit the GraphQL schema.
curl -X POST localhost:8080/admin/schema --data-binary '@schema.graphql'
You’ll see the empty dashboard screen when you first log into Slash GraphQL.
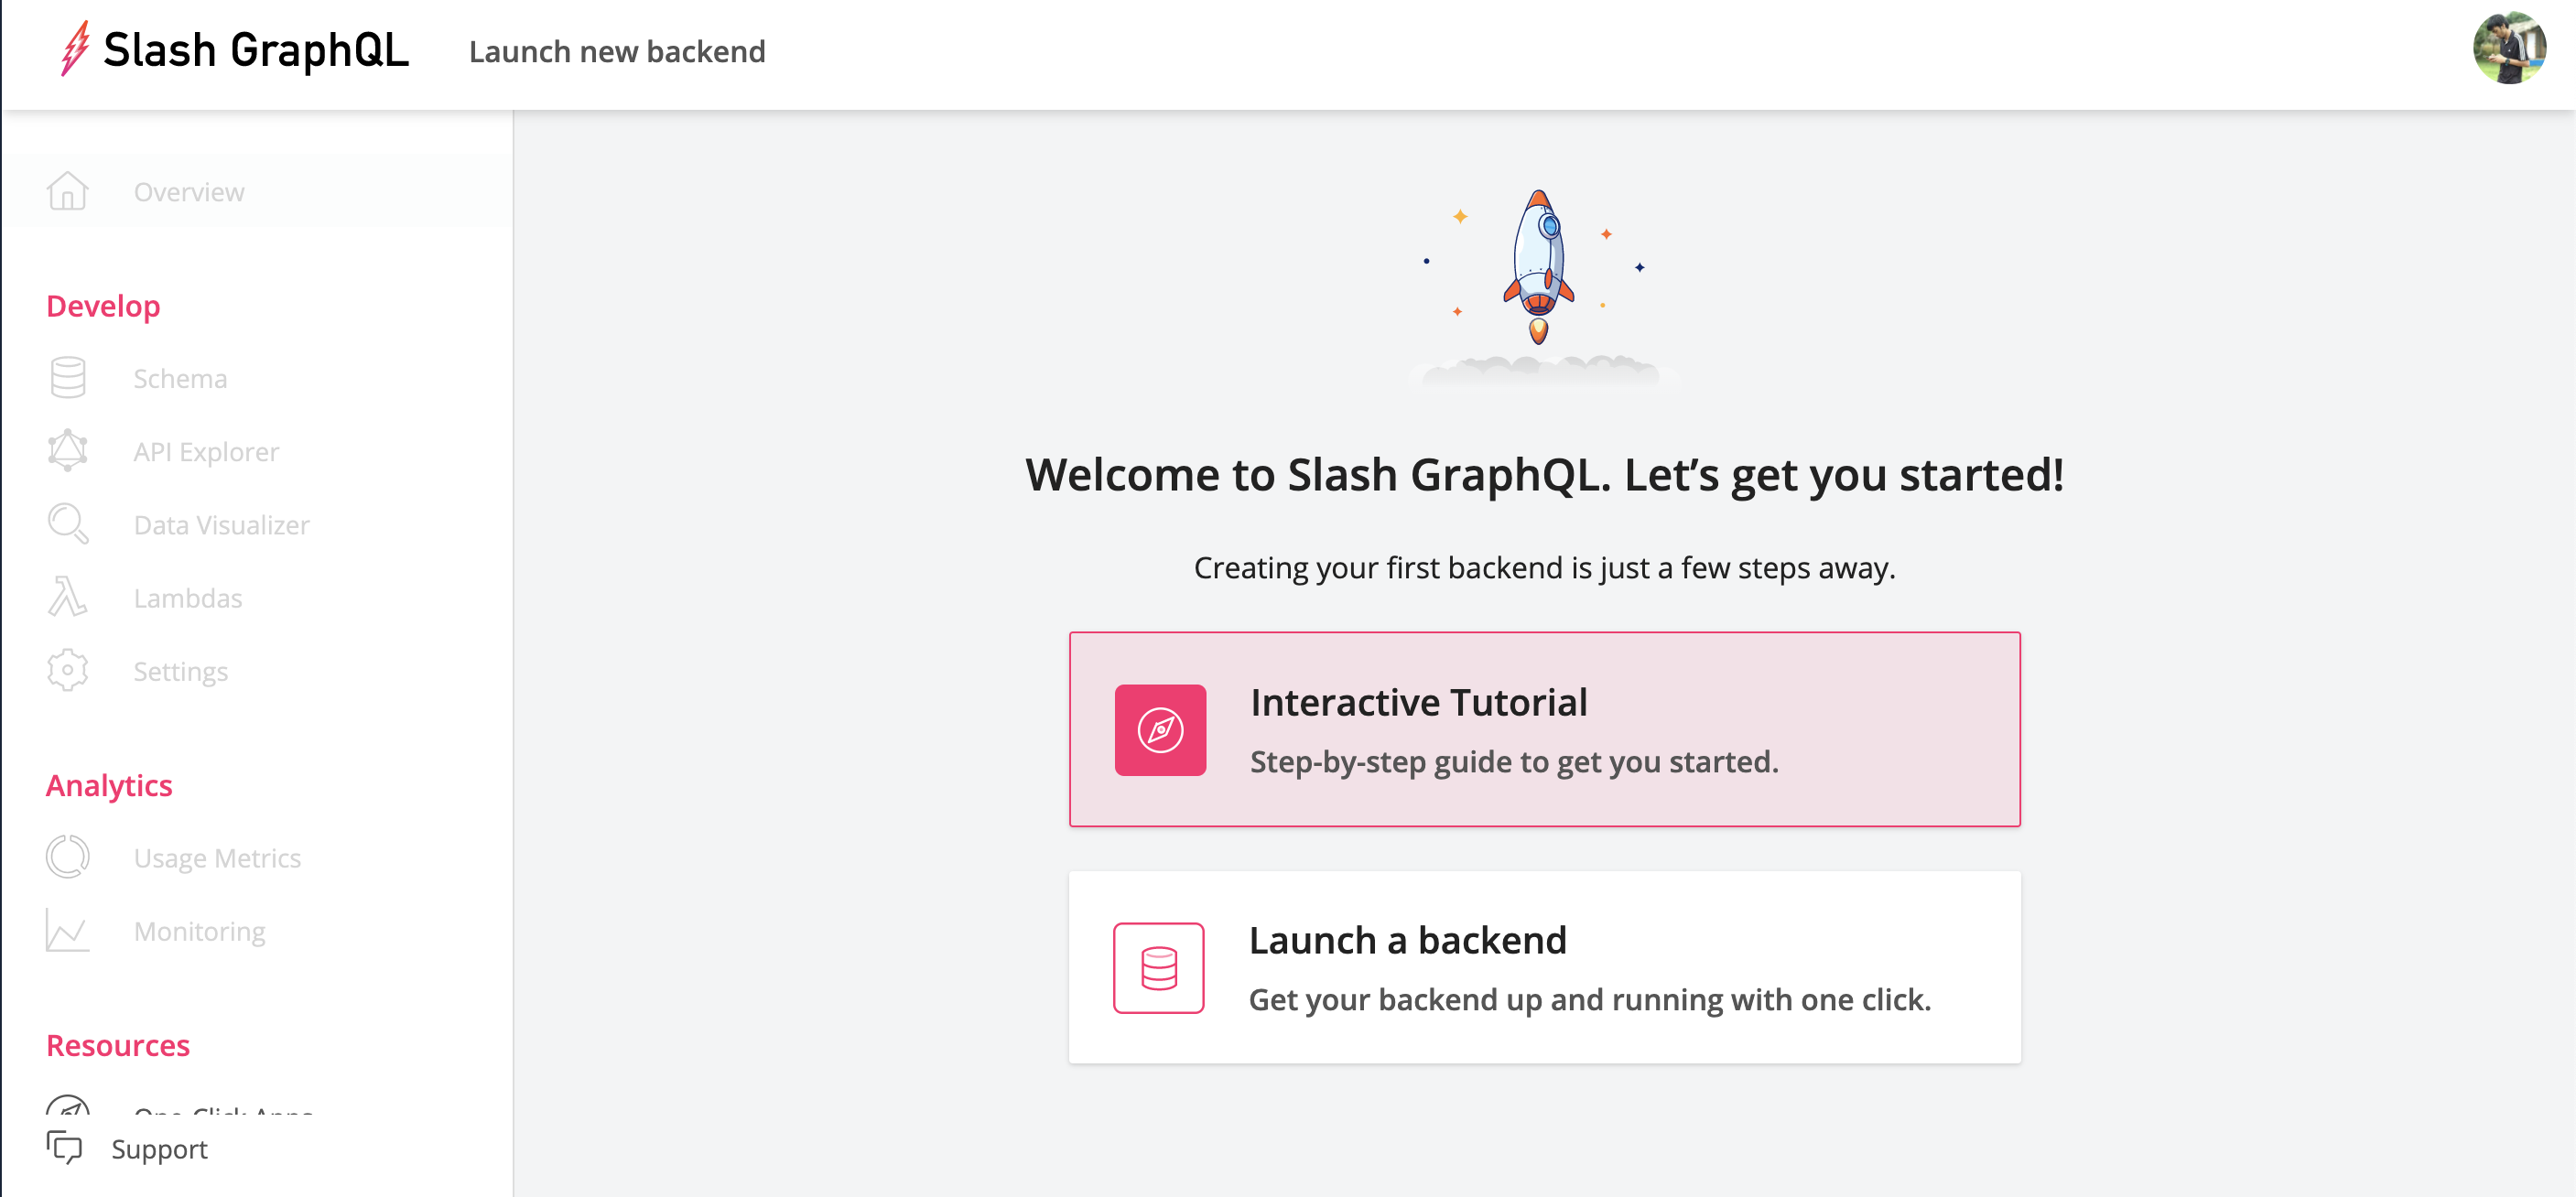
Just press the “Launch a backend” button. That takes you to a screen to create the backend. You can also check out the “Interactive Tutorial” if you like.
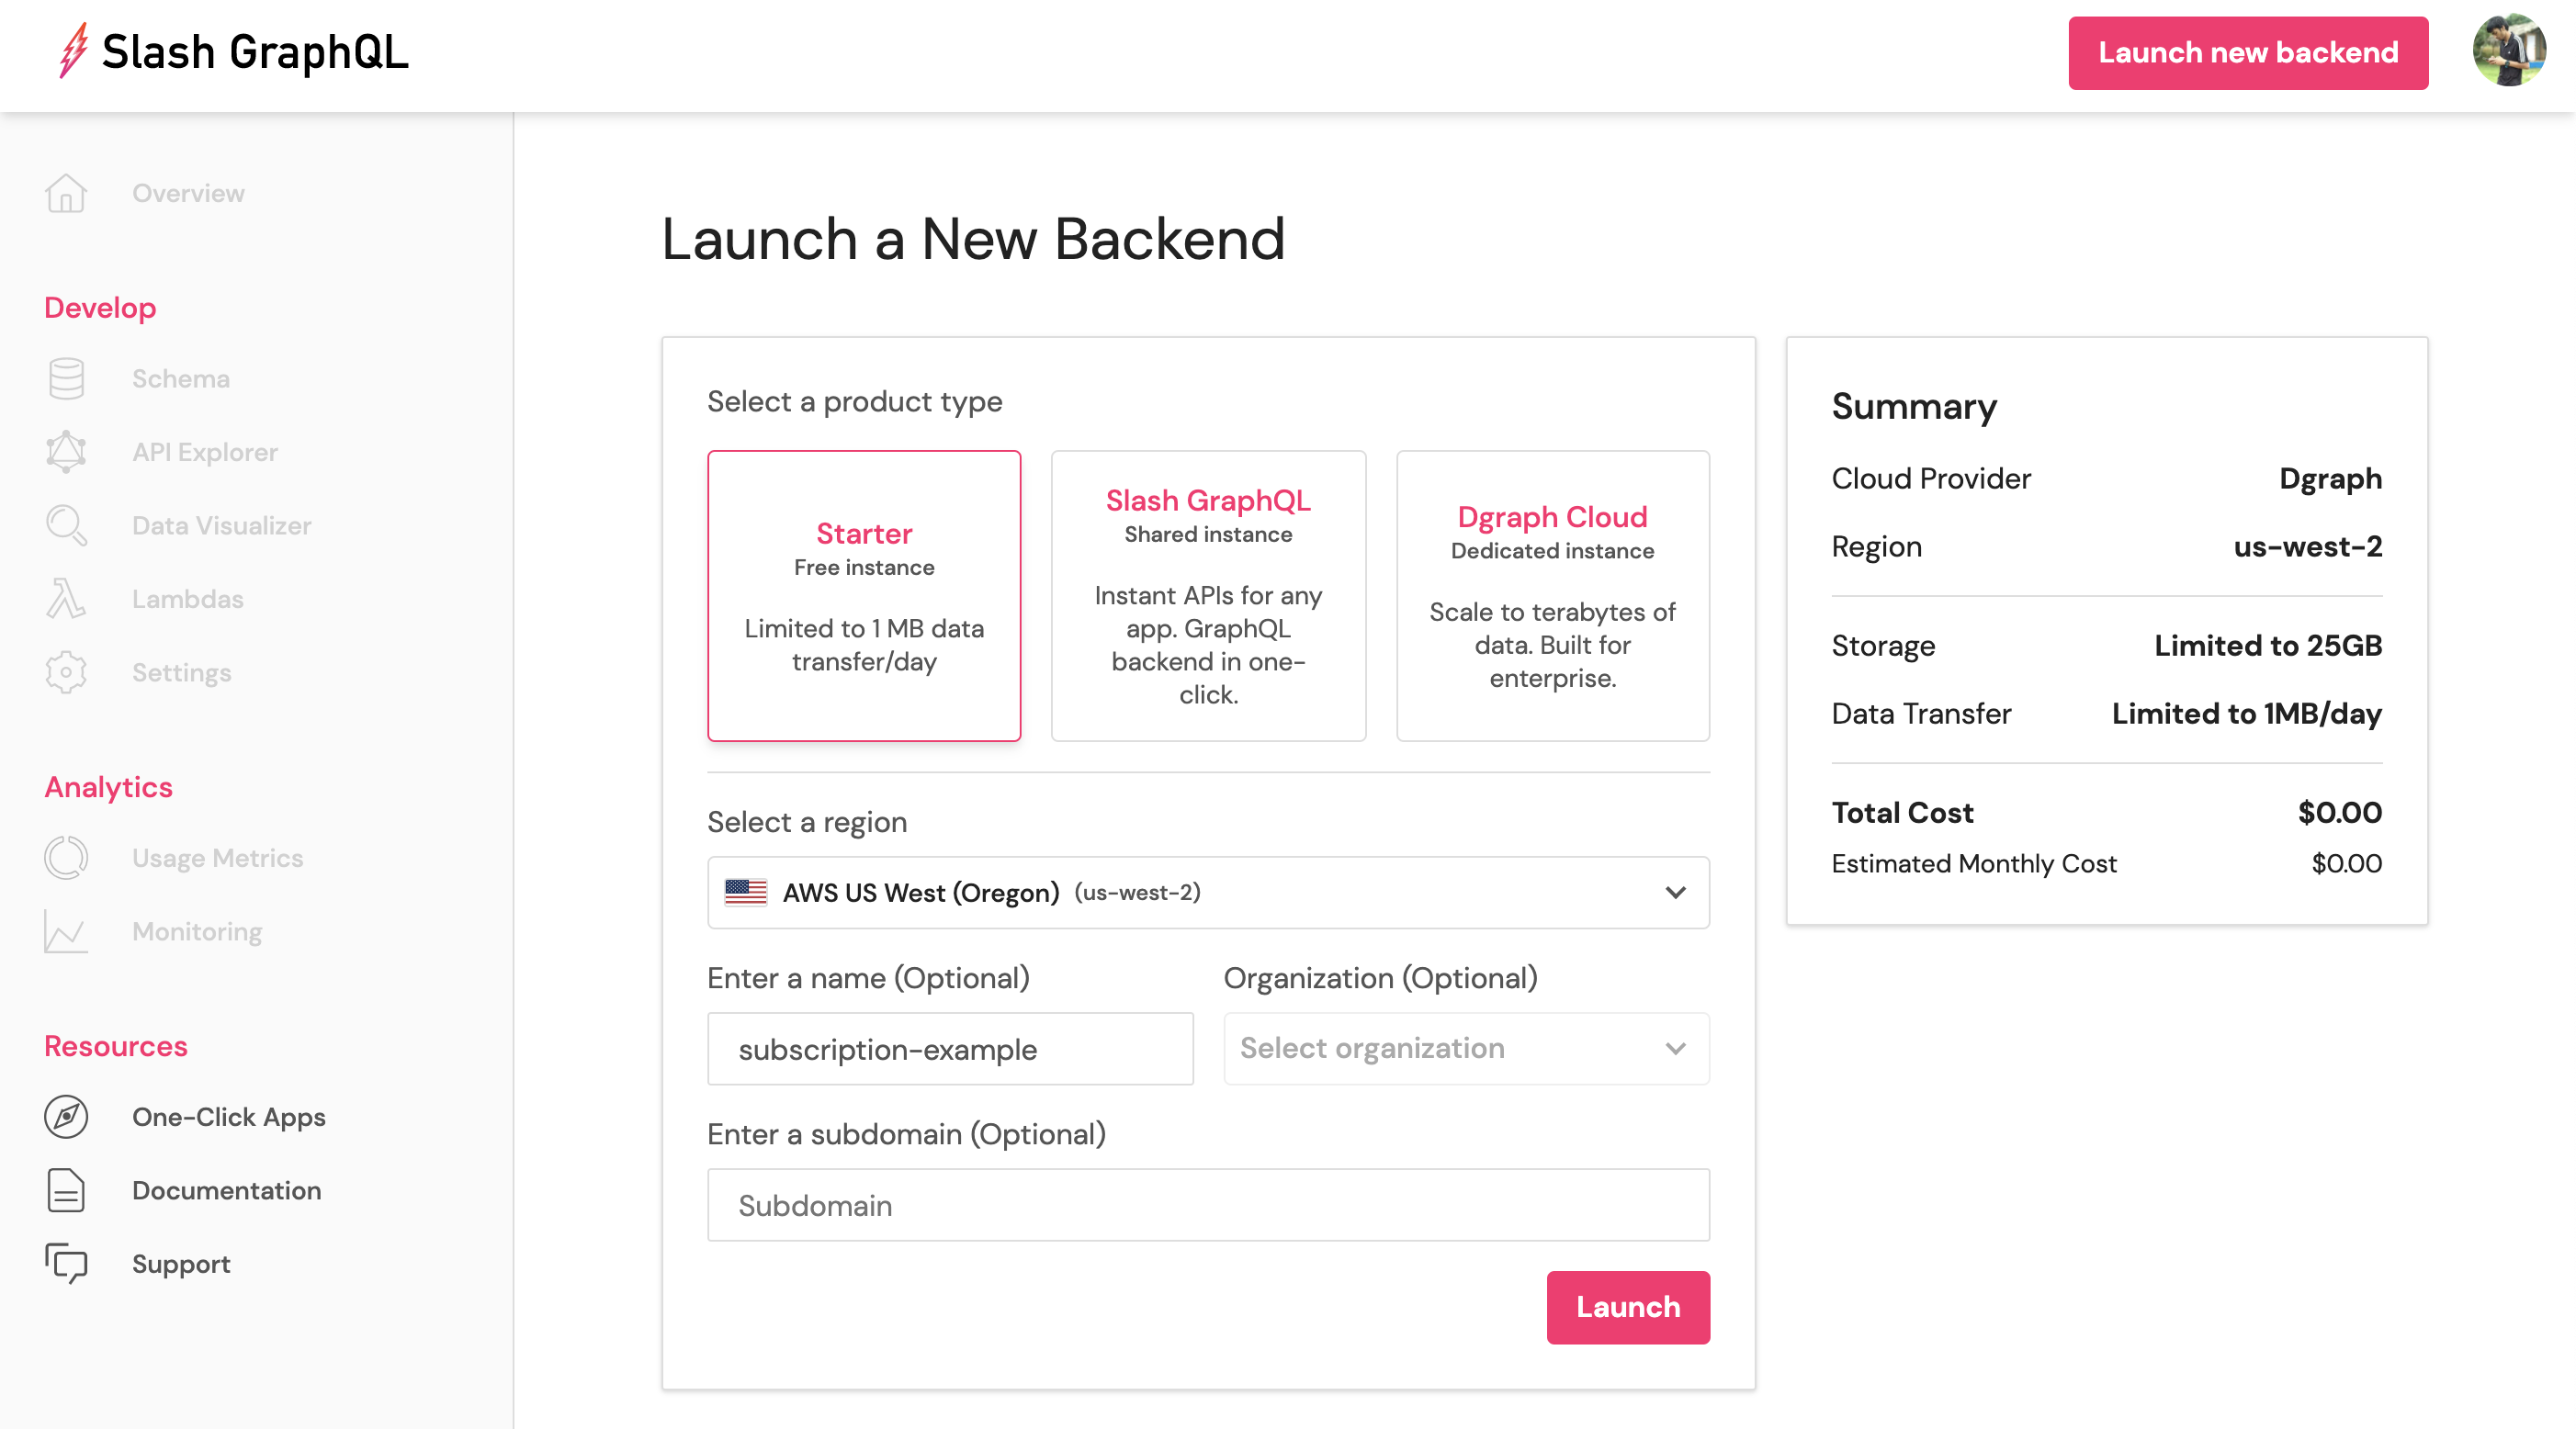
I named my deployment subscription-example, set it up in AWS US West region, and selected the Free billing plan. Clicking “Launch” spins up the backend infrastructure to serve the GraphQL app. That’ll spin for just a few moments, and once you have the green tick, it’s live.
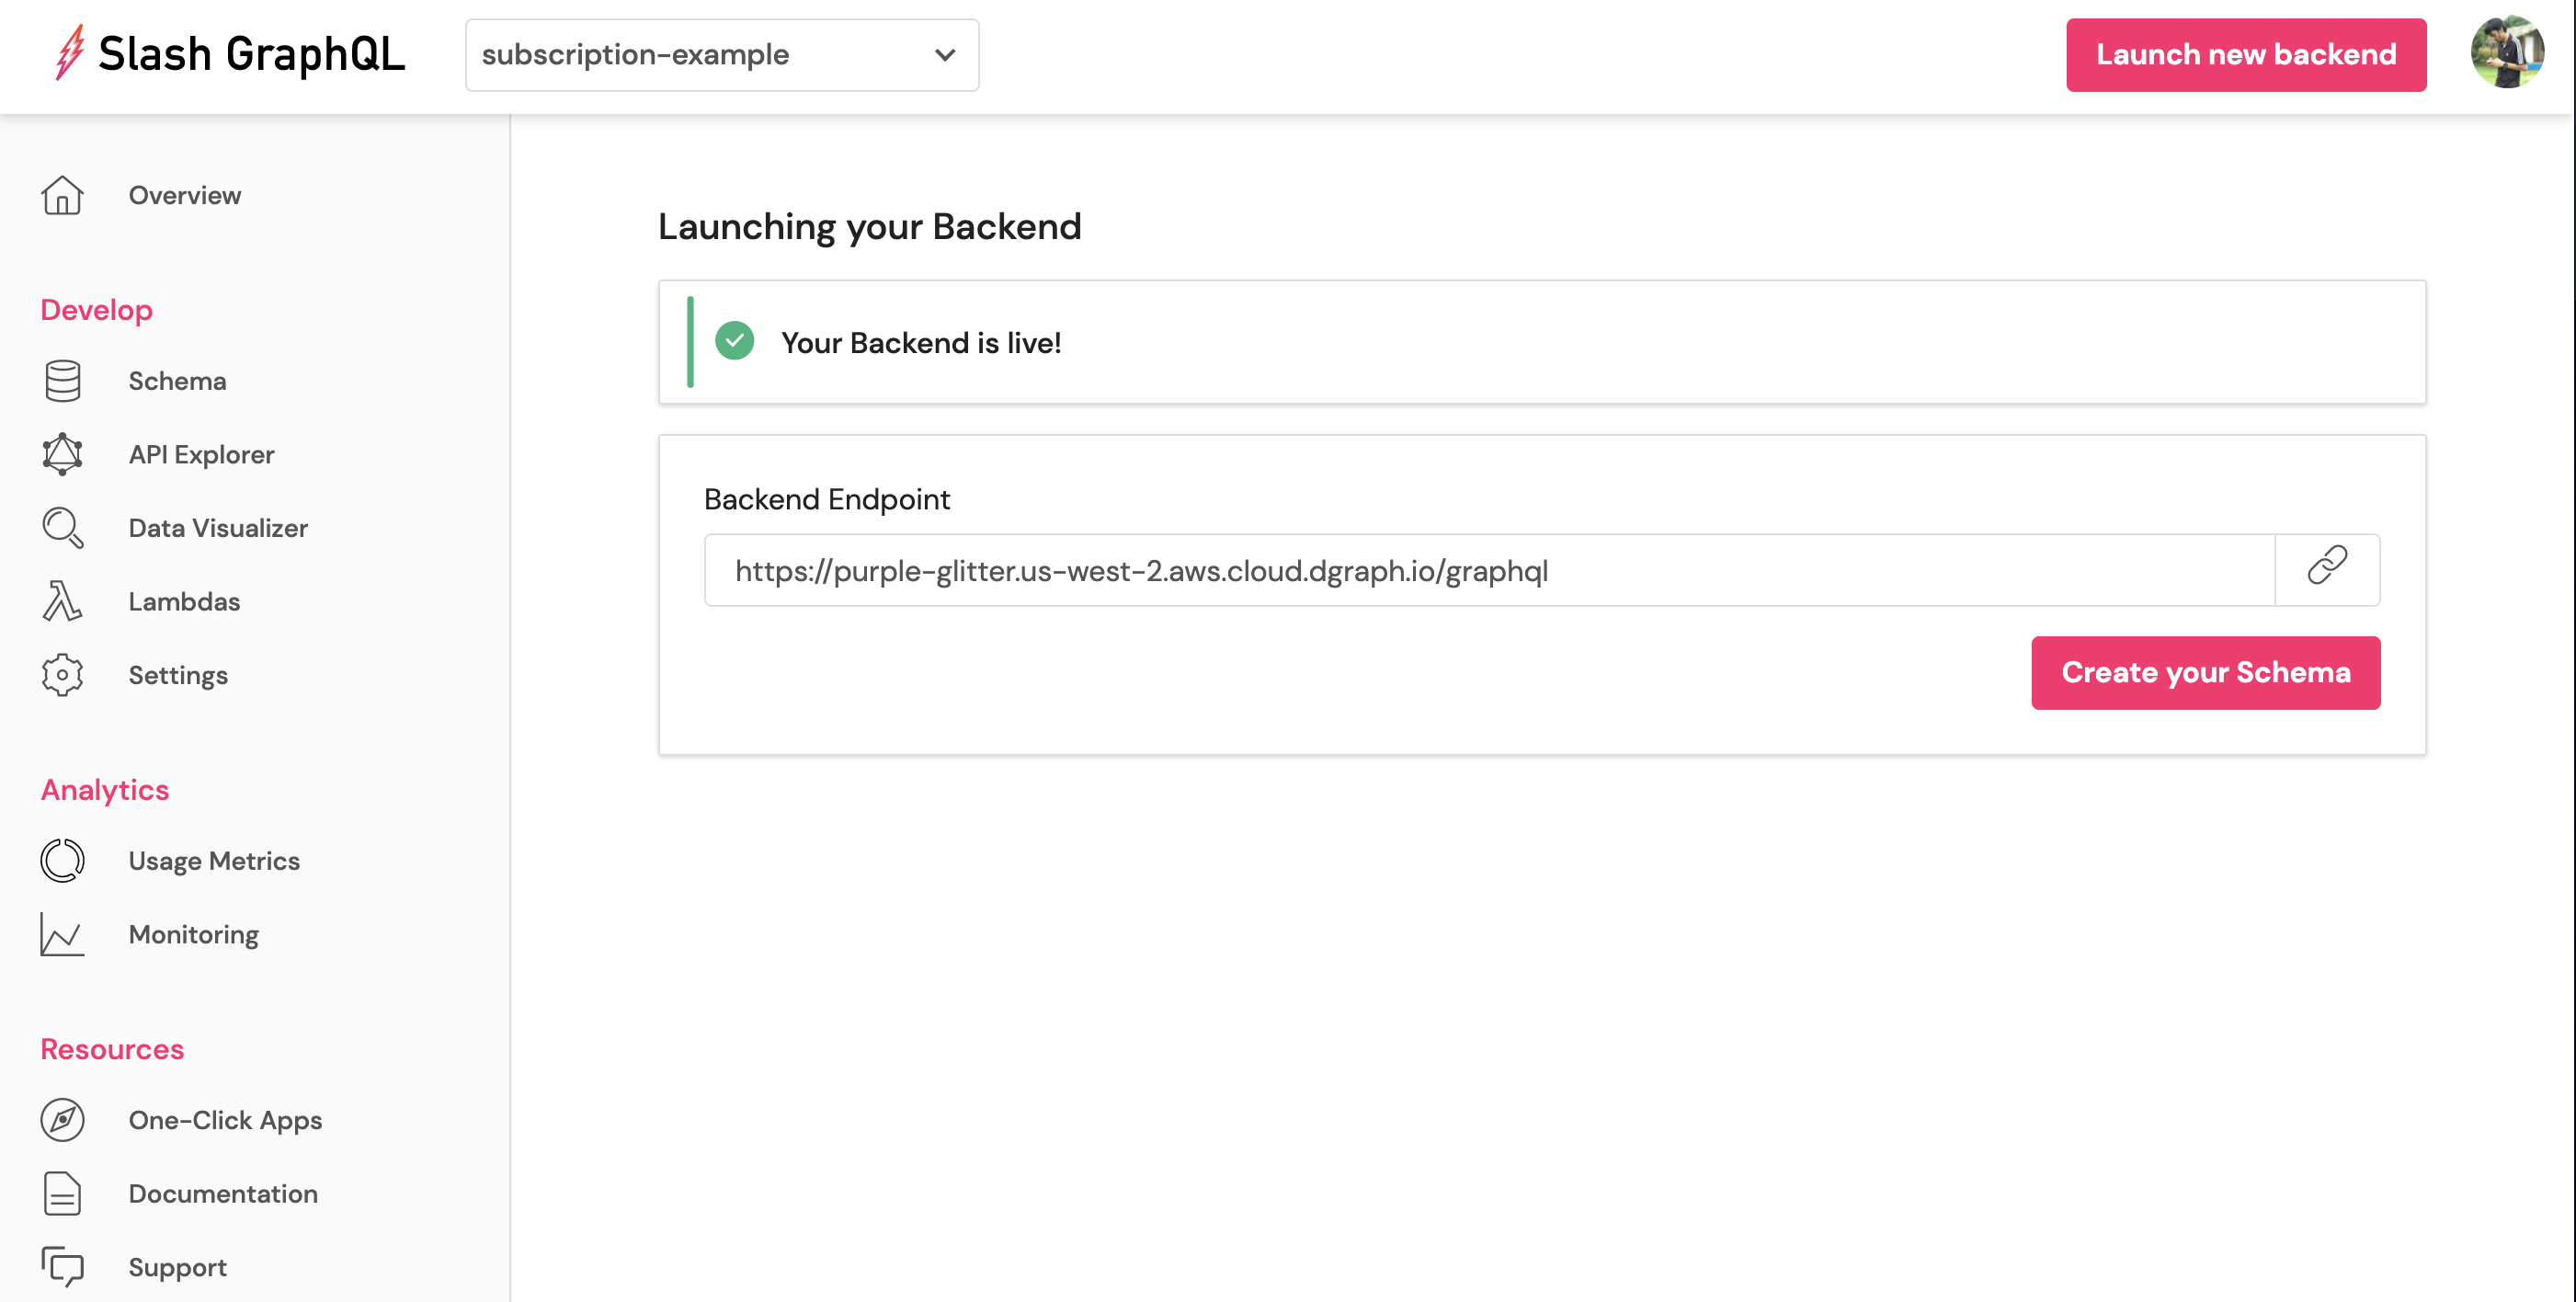
While it’s spinning up, note down the URL of your GraphQL API. You’ll need that to connect it to the NextJS app later.
Once the GraphQL backend is live, you give it your GraphQL schema, it serves a GraphQL API - no layers, no translations, no SQL, just GraphQL. So press “Create your Schema”, paste the schema in and press “Deploy”.
That’s it — the GraphQL API for the app is up and running and you can now connect it to a NextJS app. But first, let’s create our schema.
This will run an interactive CLI tool that will ask you to enter the name of the project (“todo-nextjs”) and then select a template, let’s choose “Default starter app” for this example. Since we’re using npx (npm package runner) we don’t need to install the package, we can directly run it.
npx create-next-app
Install Apollo Client and its dependencies that we will need.
cd todo-nextjs
npm install @apollo/client graphql @apollo/link-ws subscriptions-transport-ws
Set up Apollo Client in our pages/index.js file.
We want to use the WebSocket link only when it’s a subscription query and for all the other queries/mutations we wish to use the HTTP link. Let’s do that by reading the definition of the query sent using the getMainDefinition function.
Add the condition depending on the query definition.
import {
  ApolloClient,
  HttpLink,
  InMemoryCache,
  ApolloProvider,
  split,
} from "@apollo/client";
import { getMainDefinition } from "@apollo/client/utilities";
import { WebSocketLink } from "@apollo/link-ws";

const httpLink = new HttpLink({
  uri: "http://localhost:8080/graphql", // Or your Slash GraphQL endpoint (if you're using Slash GraphQL)
});

const wsLink = process.browser
  ? new WebSocketLink({
      uri: `ws://localhost:8080/graphql`, // Can test with your Slash GraphQL endpoint (if you're using Slash GraphQL)
      options: {
        reconnect: true,
      },
    })
  : null;

const splitLink = process.browser
  ? split(
      ({ query }) => {
        const definition = getMainDefinition(query);
        return (
          definition.kind === "OperationDefinition" &&
          definition.operation === "subscription"
        );
      },
      wsLink,
      httpLink
    )
  : httpLink;

const client = new ApolloClient({
  cache: new InMemoryCache(),
  link: splitLink,
});
Now quickly set up a UI to see GraphQL subscriptions in action.
Install Semantic UI for that.
npm install semantic-ui-react semantic-ui-css
Create a file components/TodoList.js and add the subscription query there. We just wrap our query with the subscription keyword.
subscription {
    queryTodo {
      title
      description
      completed
    }
  }
Then we pass it to the useSubscription hook, using which we subscribe to the above query, so now whenever a todo is added/removed/updated, the server pushes the changed data to the client which triggers a re-render of the React component, without needing to refresh the page.
import { useSubscription, gql } from "@apollo/client";
import { Card, Image } from "semantic-ui-react";

const GET_TODOS = gql`
  subscription {
    queryTodo {
      title
      description
      completed
    }
  }
`;

const TodoList = () => {
  const { loading, error, data } = useSubscription(GET_TODOS);

  if (loading) return <p>Loading...</p>;
  if (error) return <p>Error :(</p>;
  return (
    <Card.Group>
      {data.queryTodo.map(({ id, title, description, completed }) => (
        <Card>
          <Image
            src="/diggy.png"
            wrapped
            ui={false}
          />
          <Card.Content>
            <Card.Header>{title}</Card.Header>
            <Card.Meta>{completed ? "Done" : "Pending"}</Card.Meta>
            <Card.Description>{description}</Card.Description>
          </Card.Content>
        </Card>
      ))}
    </Card.Group>
  );
};

export default TodoList;
Now start the app and visit http://localhost:3000/.
npm run dev
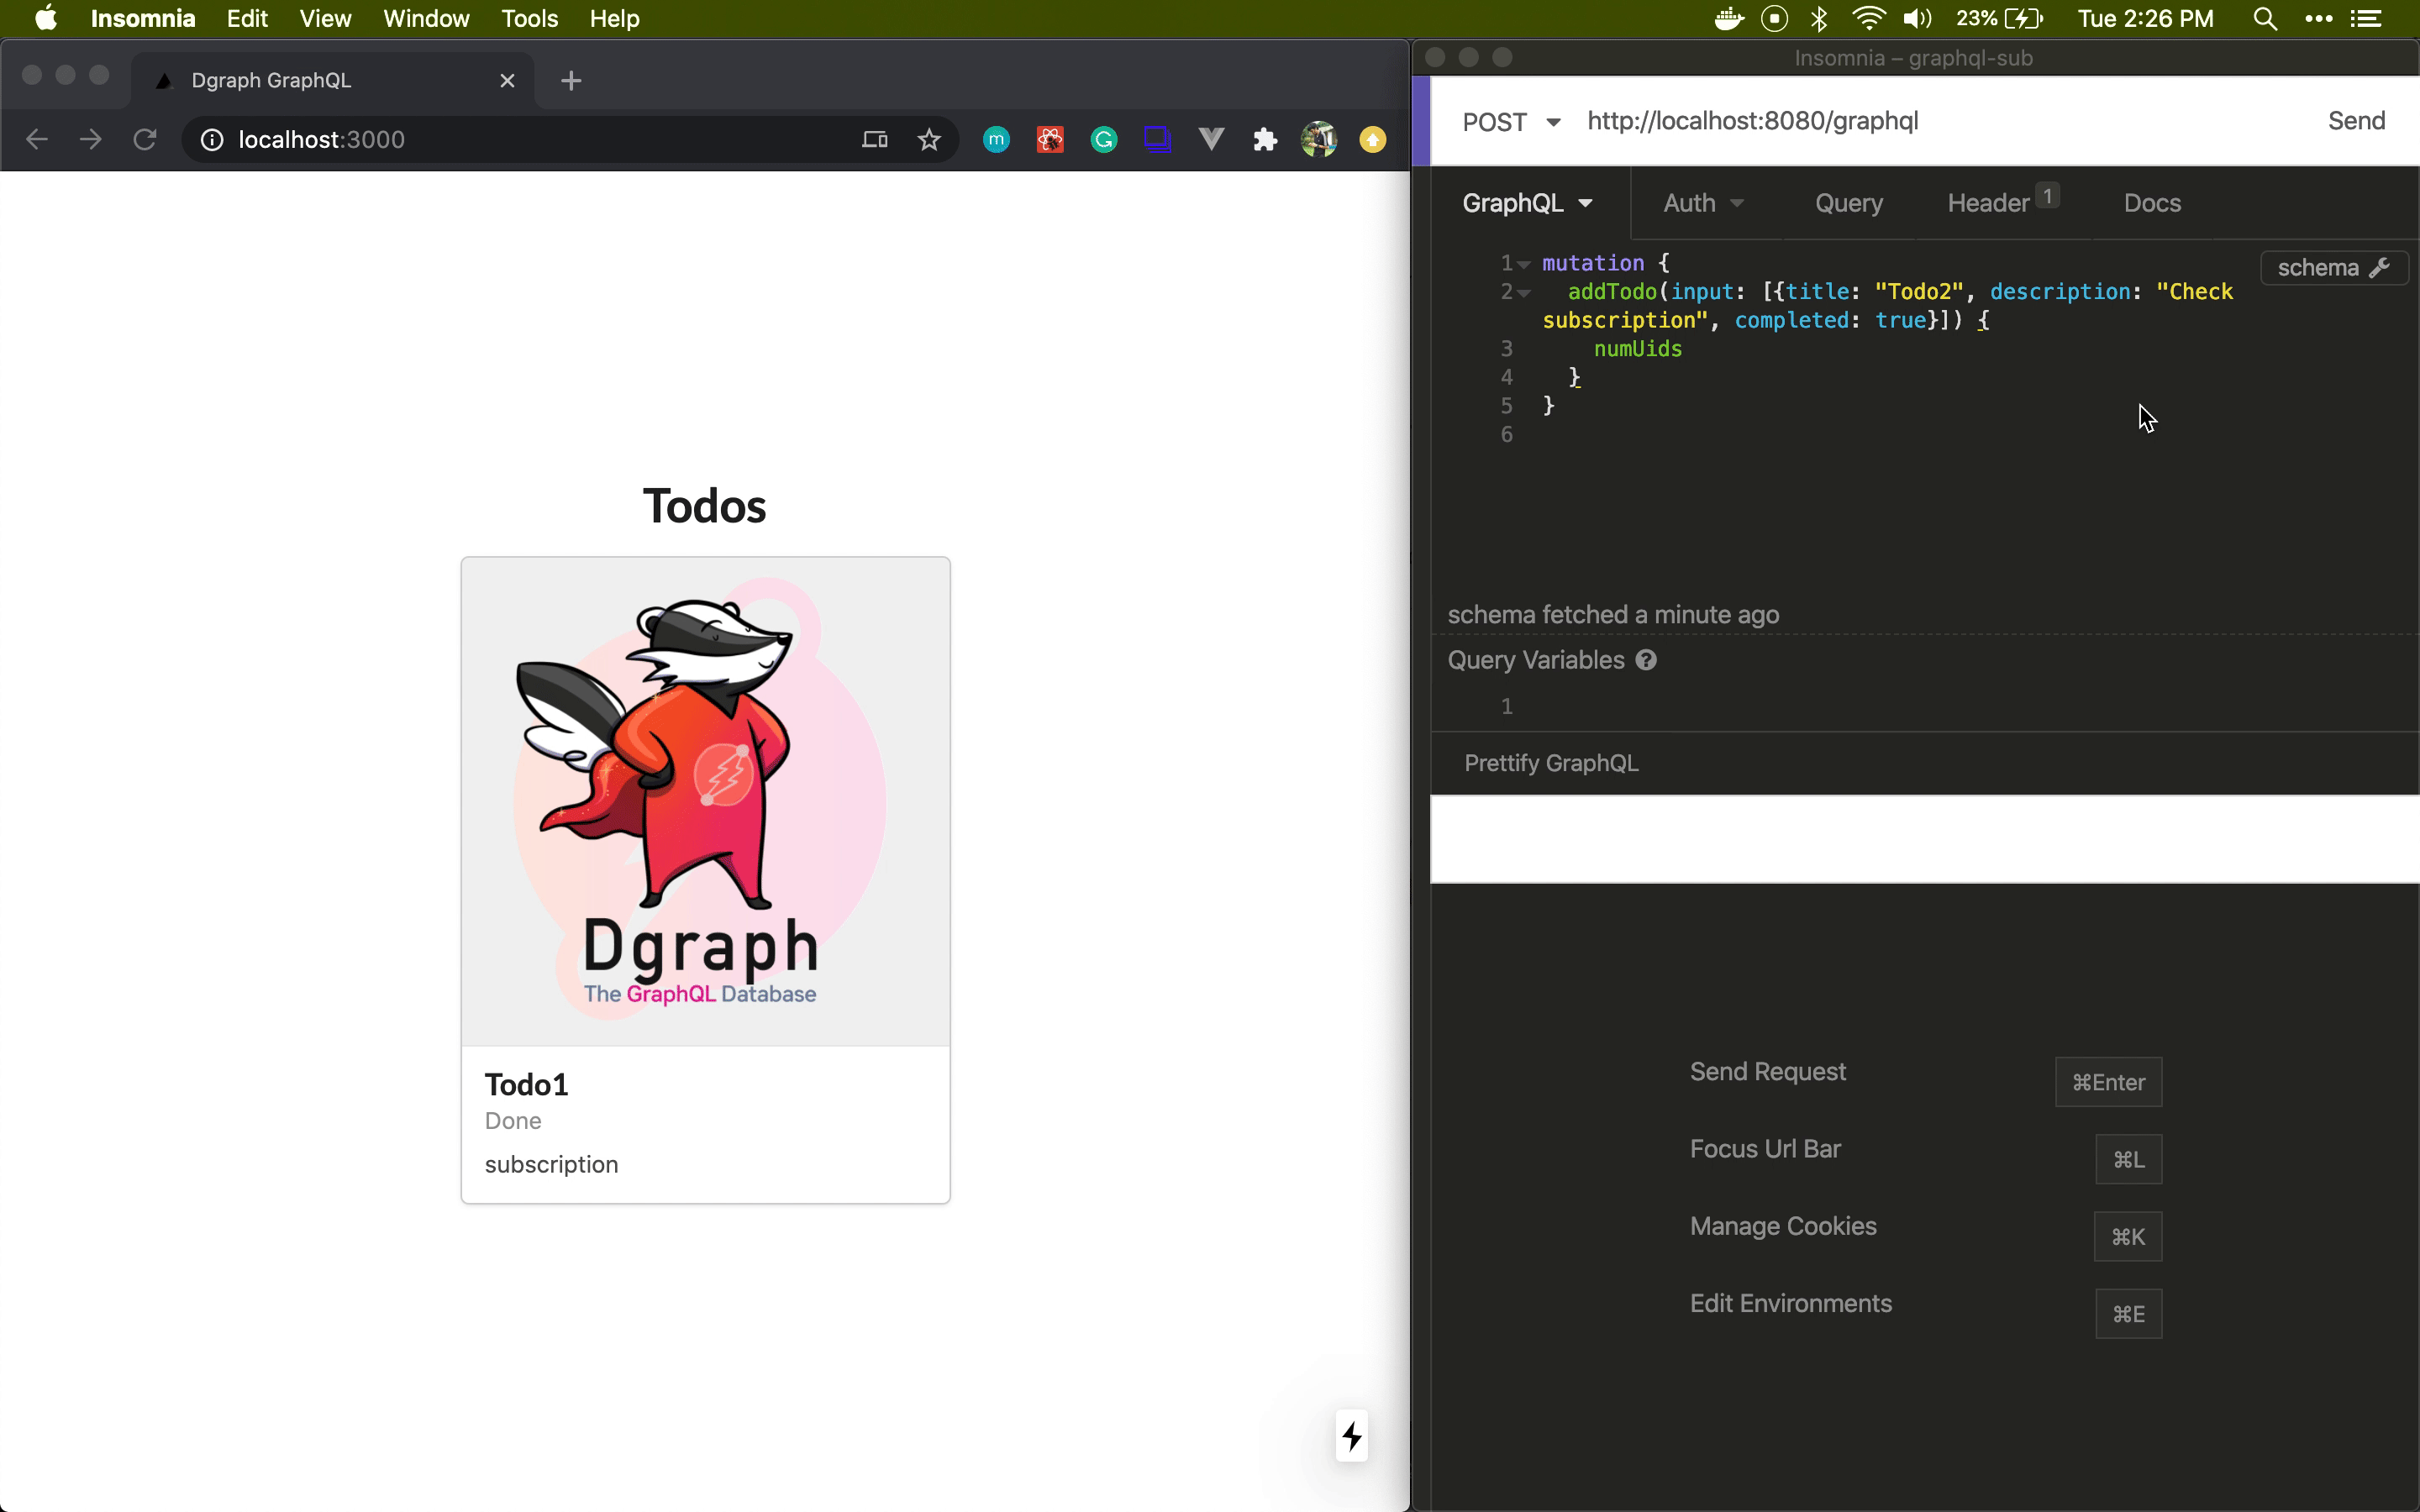
Let’s test this out by adding a todo through Insomnia or any other GraphQL client of your choice.
Fire the following mutation from your GraphQL client which points to your local Dgraph (http://localhost:8080/graphql) or Slash GraphQL instance (if you’re using Slash GraphQL) and see your UI update in real-time!
mutation {
  addTodo(input: [{title: "Todo2", description: "subscription", completed: true}]) {
    numUids
  }
}
Refer to the GitHub repo here, for the complete setup of the NextJS app.
In this blog, we learned how GraphQL subscriptions work. Then we created an example app with Dgraph GraphQL, which gives a quick and easy way to add subscriptions to your app.
Check out these docs if you want to learn about how to use authorization with subscriptions.
If you’re new to GraphQL or graph databases, Dgraph Learn has guided tutorials to walk you through the fundamentals. Sign up on Slash GraphQL and give it a try, if you haven’t already!