
Dgraph and Vector database - the best of two worlds
Dgraph and Knights Analytics discuss LLM Embeddings and Vector Databases for Augmented Information Retrie ...
Learn more
Update: On April 16th 2021, Slash GraphQL was officially renamed Dgraph Cloud. All other information below still applies.
A blank project is a pretty hard place to start. This post teaches you how to get from there to iterating fast on your app idea with Slash GraphQL.
Sure, there are boilerplate repos and starter kits. But, those tend to be most helpful if you already know what you are doing and just don’t want to write the boilerplate. What if you need to know the how, and what, and why, and where next?
This post is about my thought process and development setup as I’m starting with an empty repo and getting a GraphQL app with Slash GraphQL up and running. You’ll see some of the things I’m working towards and the kind of automation and dev tooling I use. The idea is that it helps me out in the first instance and keeps helping as the app moves further along.
My process is geared towards getting up and running quickly, using the tools in the GraphQL ecosystem to my advantage right from the start, setting up tooling to catch me if something breaks, and iterating fast.
I sketched out this post ’live’ while building the first versions of the app, so you can see the kinds of things I’m thinking about, even in the early stages, and how I often take a few extra keystrokes now to save time later. You’ll get the idea here. Along with getting up and running and iterating: I don’t like wasting time; I don’t want to do anything twice; and, I really want the GraphQL development ecosystem there to help me.
Slash GraphQL’s handling of GraphQL and evolving schemas is fantastic for iterating on an idea, so as much as I can, I’m trying to get Slash GraphQL and the tools in the GraphQL ecosystem to work in a way that speeds me along.
For me, part of that is Typescript + React + Apollo Client (with code generation) for a frontend stack. There’s lots of other ways to go, but, for me, that’s the smoothest development experience.
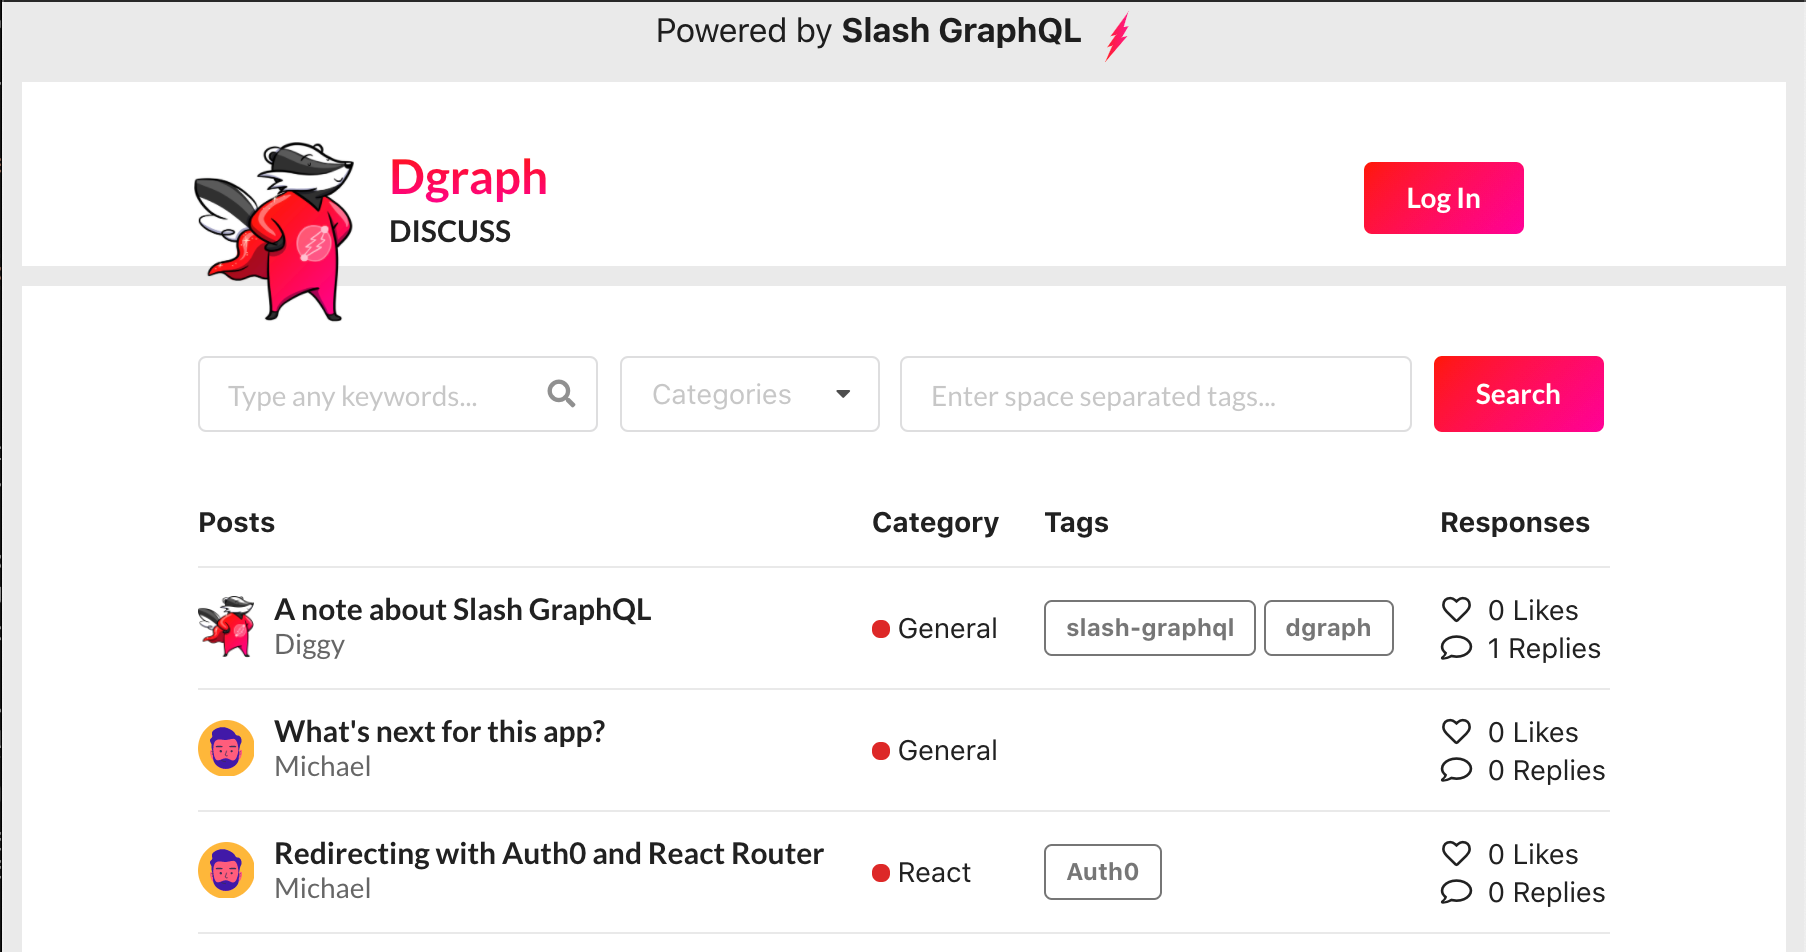
The app is a discuss clone: there are posts, which can be posted into any number of categories, and below the post is a stream of comments. There will be authors (who might have permissions to only some categories), likes on the posts, tags, searching, etc. I’m building it for a suite of tutorials about schema design, auth, and custom logic, so it will end up with enough functional to represent a real app.
For now, though, I don’t want to over design it. I just want to build something.
The tech stack for the app itself is:
To make the development run smoothly, I’m also going to use these tools:
I start by just getting something running. Anything on the screen is good. create-react-app does exactly that. Then, I layout a few simple components just to see where I am heading. GraphQL isn’t coming into it until I have something to iterate on.
You start with … well, there’s no other way to start.
npx create-react-app discuss-tutorial --template typescript
That’ll take a bit for everything to get setup — make tea.
Once that’s done, you have a (very) basic app. You can even run
cd discuss-tutorial
yarn start
And it’s there to see. Well, the React logo is there. Instead, let’s get our app boilerplate, not the React boilerplate, in there.
A complete (non-)secret about me is that I can’t layout a page to save myself. I can engineer anything you like, but putting an image and some text on the screen and making it look nice is somehow beyond me. When you see the finished product for this app, a kind designer will have stepped in to save my simple UI.
For now, I need something to help me get at least a decent first version. In this case, that’s Semantic UI React. It even has a boilerplate layout example of exactly what I need, phew!
yarn add semantic-ui-react semantic-ui-css
Before getting to GraphQL, I’m going to layout a simple header and a list of posts.
I add the Semantic React UI CSS to the project by adding
import 'semantic-ui-css/semantic.min.css'
to src/index.tsx.
Then, I add a directory components and add src/components/header.tsx with this
import React from "react"
import { Container, Image, Menu, Icon } from "semantic-ui-react"

export function AppHeader() {
  return (
    <Menu fixed="top">
      <Container>
        <Menu.Item as="a" header>
          <Image
            size="tiny"
            src="/diggy.png"
            style={{ marginRight: "1.5em" }}
          />
          Dgraph Discuss
        </Menu.Item>
        <Menu.Item as="a">
          <Icon name="home" />
          Home
        </Menu.Item>
      </Container>
    </Menu>
  )
}
Next, I layout the post list in src/components/posts.tsx.
import React from "react"
import {
Container,
Header,
Feed,
Icon,
} from "semantic-ui-react"
export function PostFeed() {
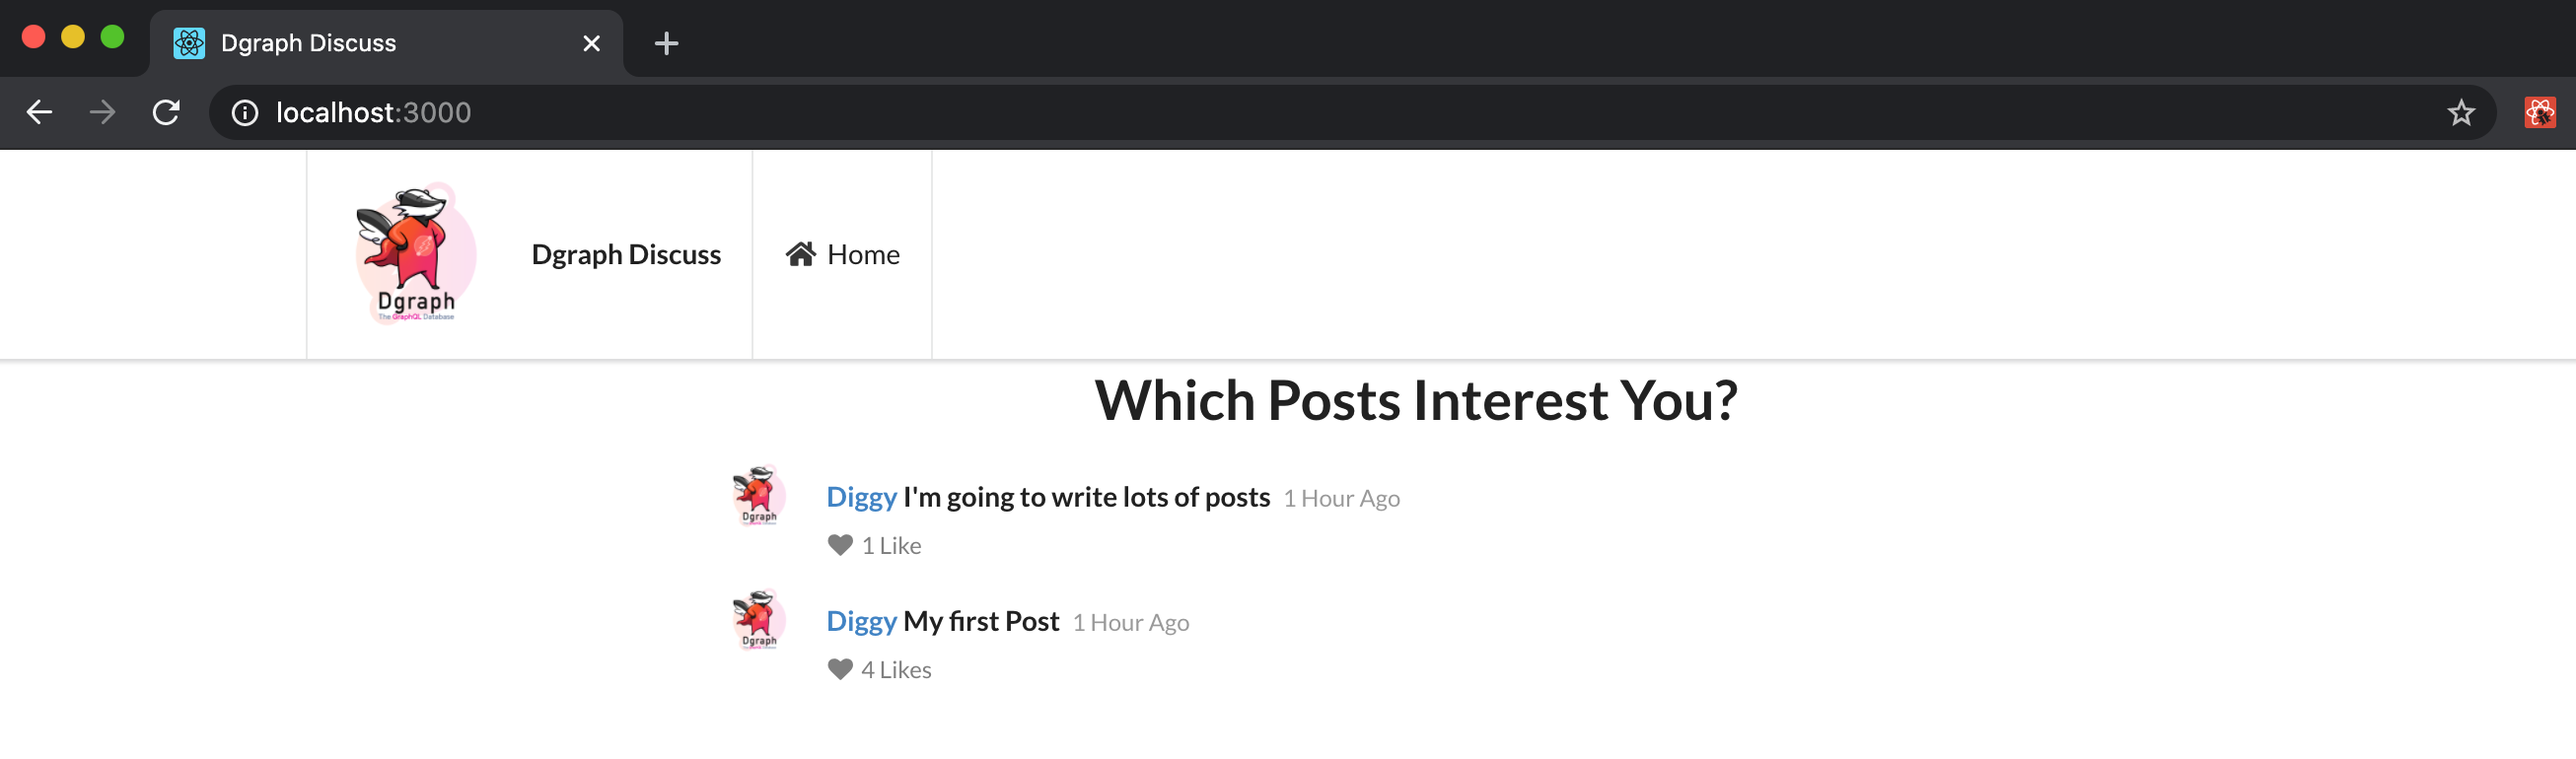
return (
<Container text style={{ marginTop: "7em" }}>
<Header as="h1">Which Posts Interest You?</Header>
<Feed>
<Feed.Event>
<Feed.Label>
<img src="/diggy.png" />
</Feed.Label>
<Feed.Content>
<Feed.Summary>
<Feed.User>Diggy</Feed.User> I'm going to write lots of posts
<Feed.Date>1 Hour Ago</Feed.Date>
</Feed.Summary>
<Feed.Meta>
<Feed.Like>
<Icon name="like" />1 Like
</Feed.Like>
</Feed.Meta>
</Feed.Content>
</Feed.Event>
<Feed.Event>
<Feed.Label>
<img src="/diggy.png" />
</Feed.Label>
<Feed.Content>
<Feed.Summary>
<Feed.User>Diggy</Feed.User> My first Post
<Feed.Date>1 Hour Ago</Feed.Date>
</Feed.Summary>
<Feed.Meta>
<Feed.Like>
<Icon name="like" />4 Likes
</Feed.Like>
</Feed.Meta>
</Feed.Content>
</Feed.Event>
</Feed>
</Container>
)
}
Those two components are used together to make a simple home screen in src/components/home.tsx.
import React from "react"
import { PostFeed } from "./posts"
import { AppHeader } from "./header"

export function Home() {
    return (
        <div>
            {AppHeader()}
            {PostFeed()}
        </div>
    )
}
The src/components/index.tsx exports just what I need to the rest of the app. I could have made something like a src/pages directory at this point, but decided not to be too opinionated about project structure at this early stage. Soon, I’ll iterate on the project structure. For now, this is about right.
import { Home } from "./home"

export { Home }
Finally, we can set that screen as the app landing page in src/App.tsx.
import React from 'react';
import './App.css';
import { Home } from './components';

export default function App() {
  return (
    <div className="App">
      {Home()}
    </div>
  );
}
And we are off the ground.
That much is this commit in GitHub
I haven’t considered everything I’ll need later, but starting an app is about iterating on a working product, not trying to do everything at once. Better to get things working and build from there.
I’ve got something on the screen, so I’m ready to do some GraphQL.
Getting GraphQL for this stage of the project is simply about getting Dgraph running a GraphQL API. There’s two ways:
Those aren’t mutually exclusive. It’s exactly the same product, exactly the same GraphQL interface, same everything, except local Vs hosted.
For this app, we are heading down the path of the a GraphQL backend hosted on Slash GraphQL, serverless authentication with Auth0, and the frontend deployed to Netlify.
Even with that, there’s some choices around how to setup my development and testing environments. Often, I’d choose to spin up local Dgraph instances in docker as a completely trashable development environment, with maybe shared dev or test versions on Slash GraphQL. In this case, I’ll be working closely with another developer, even with some remote pair programing, so it makes sense to host the development server in Slash GraphQL.
With that in mind, I spun up a hosted GraphQL backend on Slash GraphQL as the development server. You can find instructions on getting started with Slash GraphQL in, for example, my previous blog.
It’s a dev server, so pretty soon I’ll be wrapping automation around creating it and filling it with dev data.
I’m going to design a piece of my schema now: we are iterating here; I don’t want to go too far down a path of schema design without getting working software; and, Slash GraphQL is fantastic at allowing iteration while you are developing.
So let’s just take an understandable slice that corresponds with what we are currently building and get working with that. Let’s take posts (which have an id, a title, some text, and a category it was posted in) and categories (a category id, name, and all the posts).
As GraphQL, that’s this type definition:
type Post {
    id: ID!
    title: String!
    text: String!
    category: Category! @hasInverse(field: posts)
}

type Category {
    id: ID!
    name: String!
    posts: [Post]
}
I’m about to get all my GraphQL tooling working, and I know I should keep the GraphQL schema out of the app’s src directory, partly because it’s really part of the backend, not the client, but also because the Apollo VS Code extensions doesn’t like it in the src sub tree. So, I make a deploy directory and save the schema as file deploy/schema.graphql
Because Dgraph is a GraphQL database, all you have to do is load your schema and you can start working with GraphQL. There’s no faster way on earth to from your idea to a running GraphQL app.
I can turn that schema into a running GraphQL API by either by pasting it in as the schema in Slash GraphQL’s Web UI or using Slash GraphQL’s command line tooling. In my previous blog I used the Web UI, and I’m focusing on automation here, so I’m heading for the command line tooling.
Install the Slash GraphQL command line tools and login with
npm i -g slash-graphql
slash-graphql login
then, you can set the schema without leaving your VS Code window:
slash-graphql update-schema -e <your-slash-graphql-backend> deploy/schema.graphql
And with that, I have a GraphQL API up and running and can start iterating on my UI. Time to roll up my sleeves and jump in. Except…
For me, I’m early in an app, so I’m likely to iterate on that schema and upload it number of times, tear down the development server and start again, add sample data, etc. I hate doing that stuff by hand, so I always automate it — that normally works out less effort in the long run and it’s repeatable, reliable, and I can hand it over to others. Similarly, I want all the GraphQL tooling that I like to use there for me when I start my app, otherwise, I’m fumbling around without the automation that helps me work fast even when things are simple.
So I’ll pause for a second to get my GraphQL development environment setup and I’ll get a really sweet development experience with Slash GraphQL.
This is the point where experience tells me that it’s better to set up some automation and all my GraphQL tooling now, rather than tripping over something later. So I’ll take a couple of setup steps to get things in the shape I like them for development. Others might prefer to charge forward at this point and come back to setup. I just want all my tooling helping me all the time.
Few things suck more than loosing 1/2 a day’s work having to rebuild your dev environment by hand, or, worse, doing it by hand and realising in the end that you’ve missed a step and have to start again.
I often tell people I work with not to give themselves ‘make work’ — you’re a programmer, not a computer; don’t set yourself up to do manual tasks that should be automated.
So I setup everything, and automate everything at the start. Whenever I think that I should come back to it when it first hurts, it’s already slowing me down and I should have done it earlier.
The basic GraphQL + React setup is
yarn add graphql @apollo/client
That’s GraphQL, plus Apollo Client 3.0. That much will get you a long way. But, here’s the bit I love best: Typescript.
I can’t really see the point of GraphQL without Typescript. I have this wonderful schema, with all the types, and the queries and mutations are typed for me. If I jump into Insomnia, or GraphQL Playground, I get intellisense, syntax highlighting, type checking, etc. Why would I program in my code editor without those things?
If I end up just writing:
const My_Query = gql`...`

...

const [data, loading, errors] = useMutation(My_Query)
then I’ve lost all the fun GraphQL bits. The result data will be untyped, so as I’m laying out a component, I’ll start writing data.allPosts., but there’s no intellisense to help me find what fields are there, if I change something or make an error, there’s no red squiggle to let me know I’ve gone astray. So I can make a simple typo, or a single change and have little idea what I just broke until something stops working in the UI.
For me, types just make the development so much faster.
So I use Typescript and my editing environment is always helping me out. I use GraphQL Code Generator to generate and type all the code I need to access my GraphQL. Lastly, I use Apollo VS Code extensions and I get GraphQL aware intellisense everywhere.
GraphQL Code Generator is awesome. Feed it a GraphQL schema and it generates everything you could ever need to develop with that schema.
I hook up GraphQL Code Generator directly to the Slash GraphQL instance serving my GraphQL API. Then, I get code generation of everything I need to use my GraphQL API, and as I iterate on the schema, I can regenerate everything right from the hosted development instance.
GraphQL Code Generator is only needed at development time, so I add it to the project using the -D option.
yarn add -D @graphql-codegen/cli @graphql-codegen/typescript @graphql-codegen/typescript-operations @graphql-codegen/typescript-react-apollo @graphql-codegen/add @graphql-codegen/near-operation-file-preset
You can run
yarn graphql-codegen init
> ... answer questions ...
But I’ve been here before, so I just jump in and add a file codegen.yml in the top-level project directory. My Slash GraphQL backend is deployed at https://discuss-tut-dev.us-west-2.aws.cloud.dgraph.io/cloud, so I add the following.
overwrite: true
schema: "https://discuss-tut-dev.us-west-2.aws.cloud.dgraph.io/cloud"
documents: 'src/**/*.graphql'
generates:
  src/types/graphql.ts:
    plugins:
      - typescript
  src/:
    preset: near-operation-file
    presetConfig:
      baseTypesPath: types/graphql
      folder: types
      extension: .ts
    plugins:
      - typescript-operations
      - typescript-react-apollo
    config:
      reactApolloVersion: 3
      withHOC: false
      withHooks: true
      withComponent: false
That tells GraphQL Code Generator to introspect the GraphQL at https://discuss-tut-dev.us-west-2.aws.cloud.dgraph.io/cloud (where Slash GraphQL is serving the GraphQL API), generate using the typescript plugin and place the generated code near-operation-file (we’ll see what that means in few steps).
Then I add "generate-types": "graphql-codegen --config codegen.yml" to the scripts key in package.json, so it now looks like:
"scripts": {
  "start": "react-scripts start",
  "build": "react-scripts build",
  "test": "react-scripts test",
  "eject": "react-scripts eject",
  "generate-types": "graphql-codegen --config codegen.yml"
}
Now, whenever the schema in my development GraphQL database changes, I can regenerate the project’s types.
So we’ve got Typescript to help us use GraphQL and warn us if we do something wrong, and GraphQL Code Generator to auto generate all the bits we need, let’s now get VS Code to play along nicely, by adding the Apollo VS Code extensions.
I added the extension to VS Code and, then, at the project’s top level added a file apollo.config.js with the contents:
module.exports = {
    client: {
      service: {
        name: 'local',
        url: 'https://discuss-tut-dev.us-west-2.aws.cloud.dgraph.io/cloud',
      },
      includes: ["src/**/operations.graphql"],
      excludes: ["src/**/*.{ts}"]
    }
  };
(Again, you should substitute in the URL of your Slash GraphQL backend.)
This setup also tells the Apollo tools to introspect the GraphQL API at https://discuss-tut-dev.us-west-2.aws.cloud.dgraph.io/cloud, which it will use for syntax highlighting etc. Then we are telling it that we really want GraphQL editing help with operations.graphql files (you’ll see those in a second), but also don’t get confused by the .ts files generated by GraphQL Code Generator.
Now that the GraphQL development environment is set up, building an app and iterating quickly is so much fun. As a developer, you can’t have much more fun than moving at lightning speed, seeing your changes instantly in your app, and knowing that the tooling will catch you if you make a mistake.
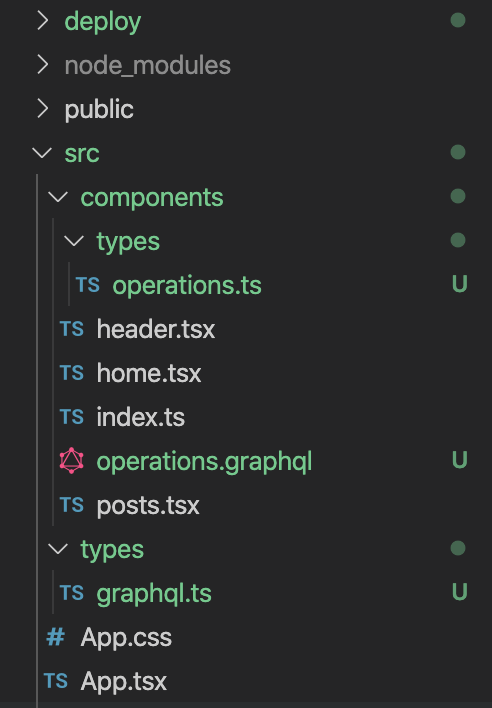
The structure of the project is starting to develop a bit more. At this point in the development, I’m laying out a directory structure like this:
public
scripts
src
  components
    component1.tsx
    component2.tsx
    operations.graphql
    types
      operations.ts
  ...
  types
    graphql.ts
I’ll write my GraphQL queries and mutations in the operations.graphql file that makes sense for the components that they apply to (for example, I might add subdirectories here) — Apollo Vs Code jumps in and gives me intellisense while I’m writing that GraphQL. Then, I press ‘go’ on GraphQL Code Generator and it generates the types directories with global types for the things that make sense globally and in the local types directories for things that are local to the components - magic.
Having operations.graphql file in the directory for the components that it applies to makes it really easy for me to find the GraphQL (rather than it being split as strings in a number of javascript files) while still making it clear what components the GraphQL applies to. Starting with global GraphQL operations or having them hidden inside javascript files tends to suck in the long run.
For the moment, we just have the single src/components directory, so I create a file src/components/operations.graphql, I start editing a GraphQL query, and …
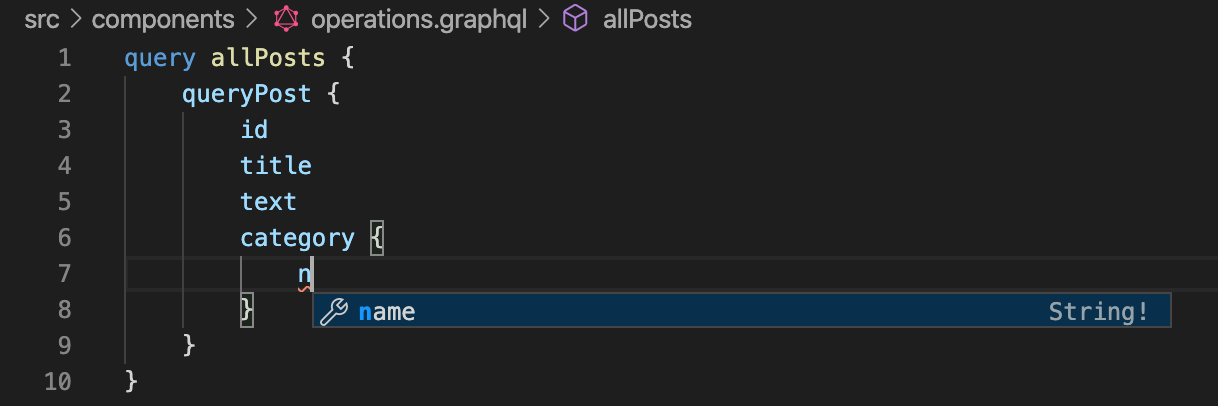
boom — tool chain helping me out already. I’ve got a Slash GraphQL API running, Apollo VS Code extension introspects that endpoint and I get GraphQL aware intellisense while editing. Nice!
But we aren’t done — src/components/operations.graphql now looks like this:
query allPosts {
    queryPost {
        id
        title
        text
        category {
            name
        }
    }
}
I run
yarn run generate-types
and pop:
Now I’ve got all the types and function definitions I need to layout my components with ease.
With all the definitions in place, I can now layout my components with intellisense and the safety of types as I iterate on my app and schema. Here goes!
I’ll edit src/components/posts.tsx so it generates the post list from the GraphQL query instead of the hardcoded data. Where does my data come from? From the allPosts query above, but GraphQL Code Generator has done all the work for me, so all I need is:
const { data, loading, error } = useAllPostsQuery()
And when I go to layout that data into my React components…
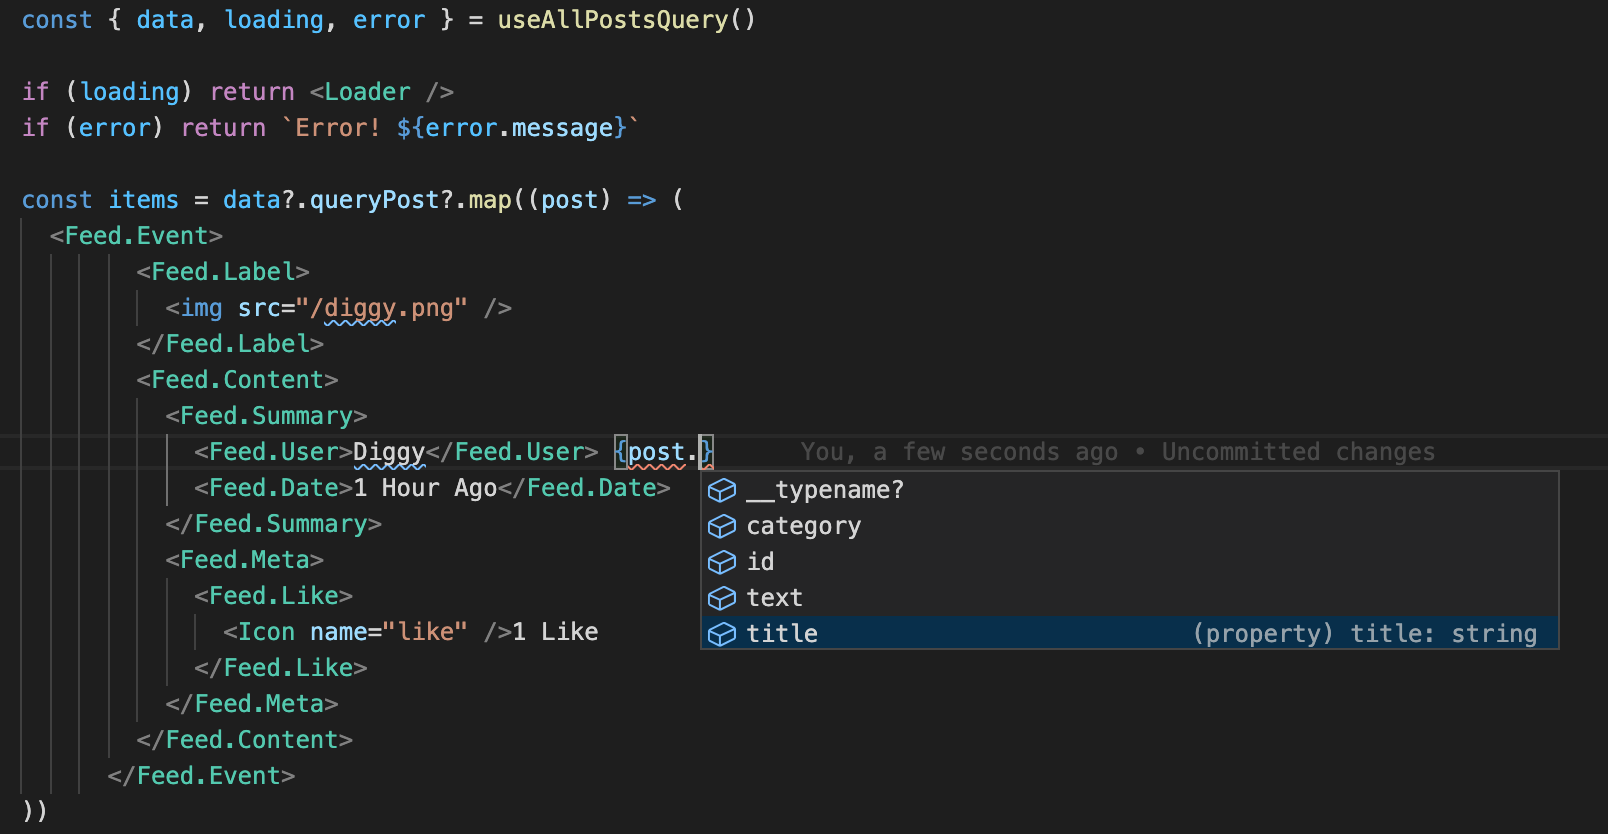
Dgraph GraphQL + Typescript + React for the win!
My intellisense and types are hooked all the way from my editor to Slash GraphQL, so I can’t make a mistake, I don’t need to wonder what’s in data, and I can move super fast.
I need to update src/index.tsx so it uses an ApolloClient and ApolloProvider hooked up to the Slash GraphQL instance.
import { ApolloClient, InMemoryCache, HttpLink, ApolloProvider } from '@apollo/client';

const client = new ApolloClient({
    cache: new InMemoryCache(),
    link: new HttpLink({
      uri: "https://discuss-tut-dev.us-west-2.aws.cloud.dgraph.io/cloud",
    }),
  })

ReactDOM.render(
  <ApolloProvider client={client}>
    <App />
  </ApolloProvider>,
  document.getElementById('root')
);
Then, add a little sample data and we have a running GraphQL app.
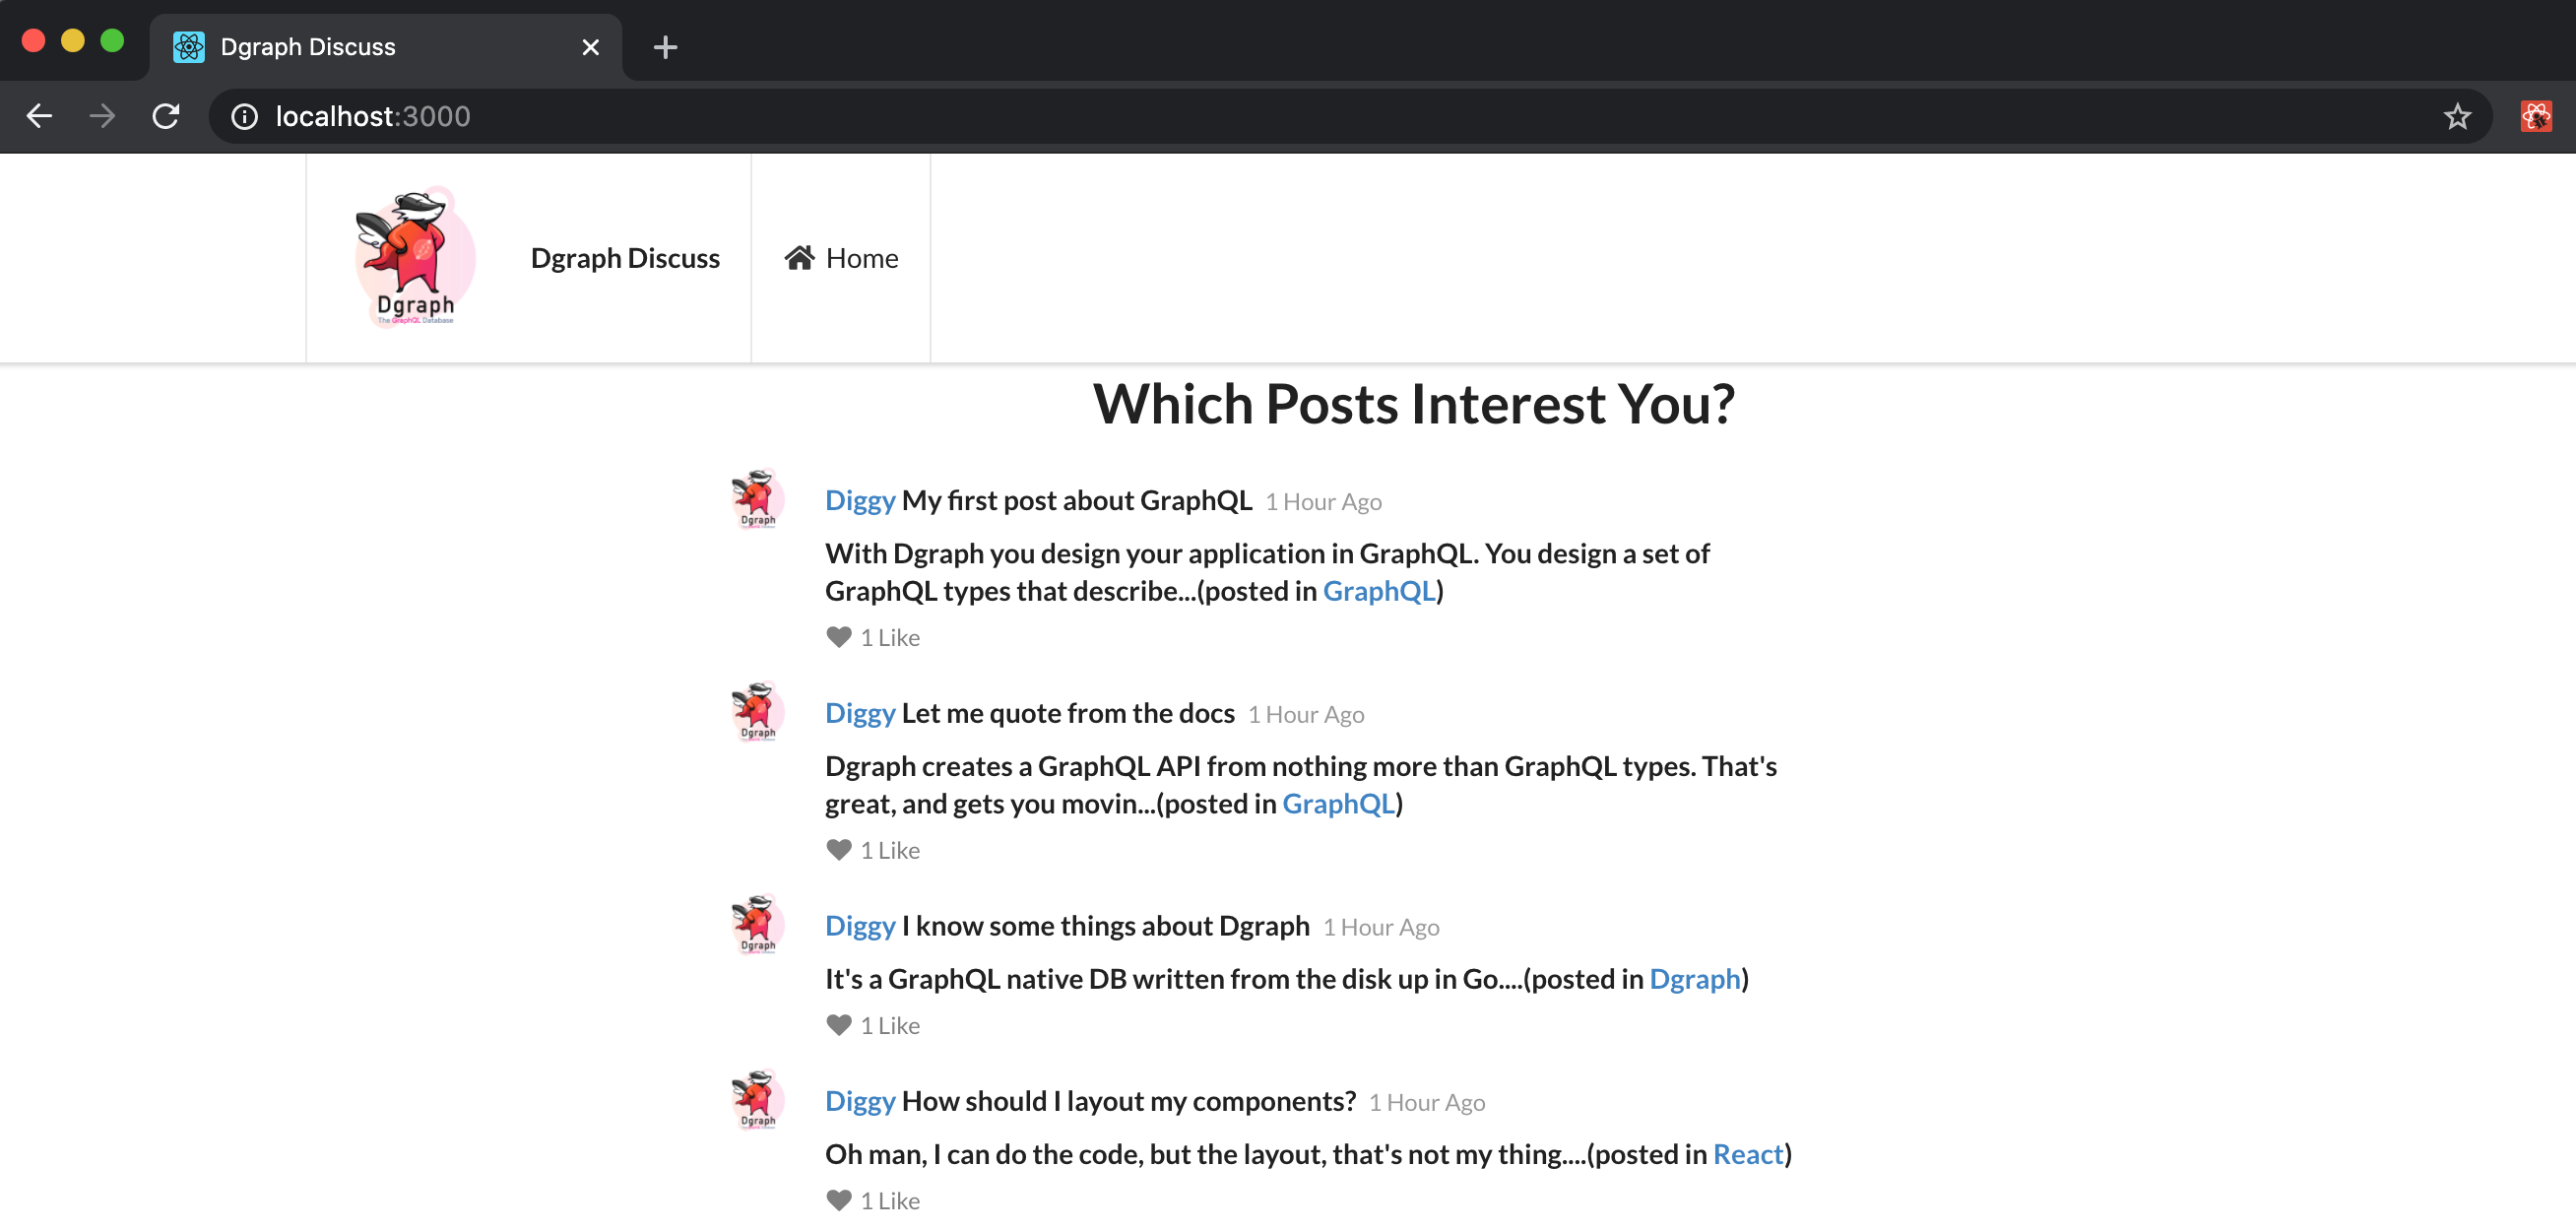
We need some sample data to seed the development server. I could load up Insomnia, or GraphQL Playground or Postman and do this by hand, but, like I said, as the app moves forward, I know I’ll need to do this a few times. So I’ll set up something repeatable. Doing it once is quick and it’ll help me move fast as things change.
I’ve decided to stay thematic and do this setup in Javascript. I could just run some bash scripts, but Javascript seems like a nicer option for now: for all the same reasons as why I’m doing the app with Typescript and GraphQL Code Generator — I get dev help, I get intellisense, types etc.
So I work in the deploy directory and quickly create a ts-node application to load my data. You’ll understand the ideas by now: I’m going to use the same pattern as I do with the React app. I add sub dir deploy/dev-setup, to that I add an operations.graphql file for my mutations, then initial-data.ts, generate types, and now I can code up the sample data with all my tooling helping me out.
First, I add the dependencies.
yarn add cross-fetch
yarn add -D ts-node
My data initialization is just GraphQL, so intellisense helps me to make deploy/dev-setup/operations.graphql like this:
mutation InitCategories($categories: [AddCategoryInput!]!) {
    addCategory(input: $categories) {
        category {
            id
            name
        }
    }
}

mutation InitPosts($posts: [AddPostInput!]!) {
    addPost(input: $posts) {
        post {
            id
        }
    }
}
Apollo VS Code extensions gives me intellisense etc to write that quickly and yarn run generate-types generates everything fun to code up the data insertions in initial-data.ts. It’s no more work than just running the mutations in, say, Insomnia … but it’s repeatable, in source control, and I’ll save way more than any extra key strokes later!
That much is this GitHub commit.
Now I’m cook’n. I can write GraphLQ in my operations.graphql files with the help of GraphQL IntelliSense. From that, I generate types, then, I layout in React with ease. When I need to iterate and add to the schema or add some sample data, I’ve set myself up for success from the start.
So let’s do just that. The initial schema didn’t contain users. I’ve also laid out some things in the UI that I didn’t have in the initial schema that I’ll want in the end: publication dates, likes, user avatar image. I don’t want to get lost in the details. It’s the broad structural strokes of the app I want working at this point - no point having a clickable likes if you can’t navigate between pages or apply authorization.
So I’ve decided to add publication date, likes and hard code some avatar images. That way I can have some realistic data and get a good visual check that things are working, while I concentrate on getting routing and then authorization working. Later, I’ll come back to adding/editing posts, clickable likes etc.
I update the schema to this:
type Post {
    id: ID!
    title: String!
    text: String!
    datePublished: DateTime
    likes: Int
    author: User!
    category: Category! @hasInverse(field: posts)
}

type Category {
    id: ID!
    name: String!
    posts: [Post]
}

type User {
    username: String! @id
    displayName: String
    avatarImg: String
    posts: [Post] @hasInverse(field: author)
}
And GraphQL and automation kick in and my iteration is easy. I load the schema into Slash GraphQL - instant new GraphQL API. Pick up the changes with Apollo VS Code and GraphQL Code Generator, then I’m happily adding sample data for users with help from my editor, updating the queries and laying out with the new schema with confidence.
Only a couple of minutes of coding, a joy to do — Crushed it!
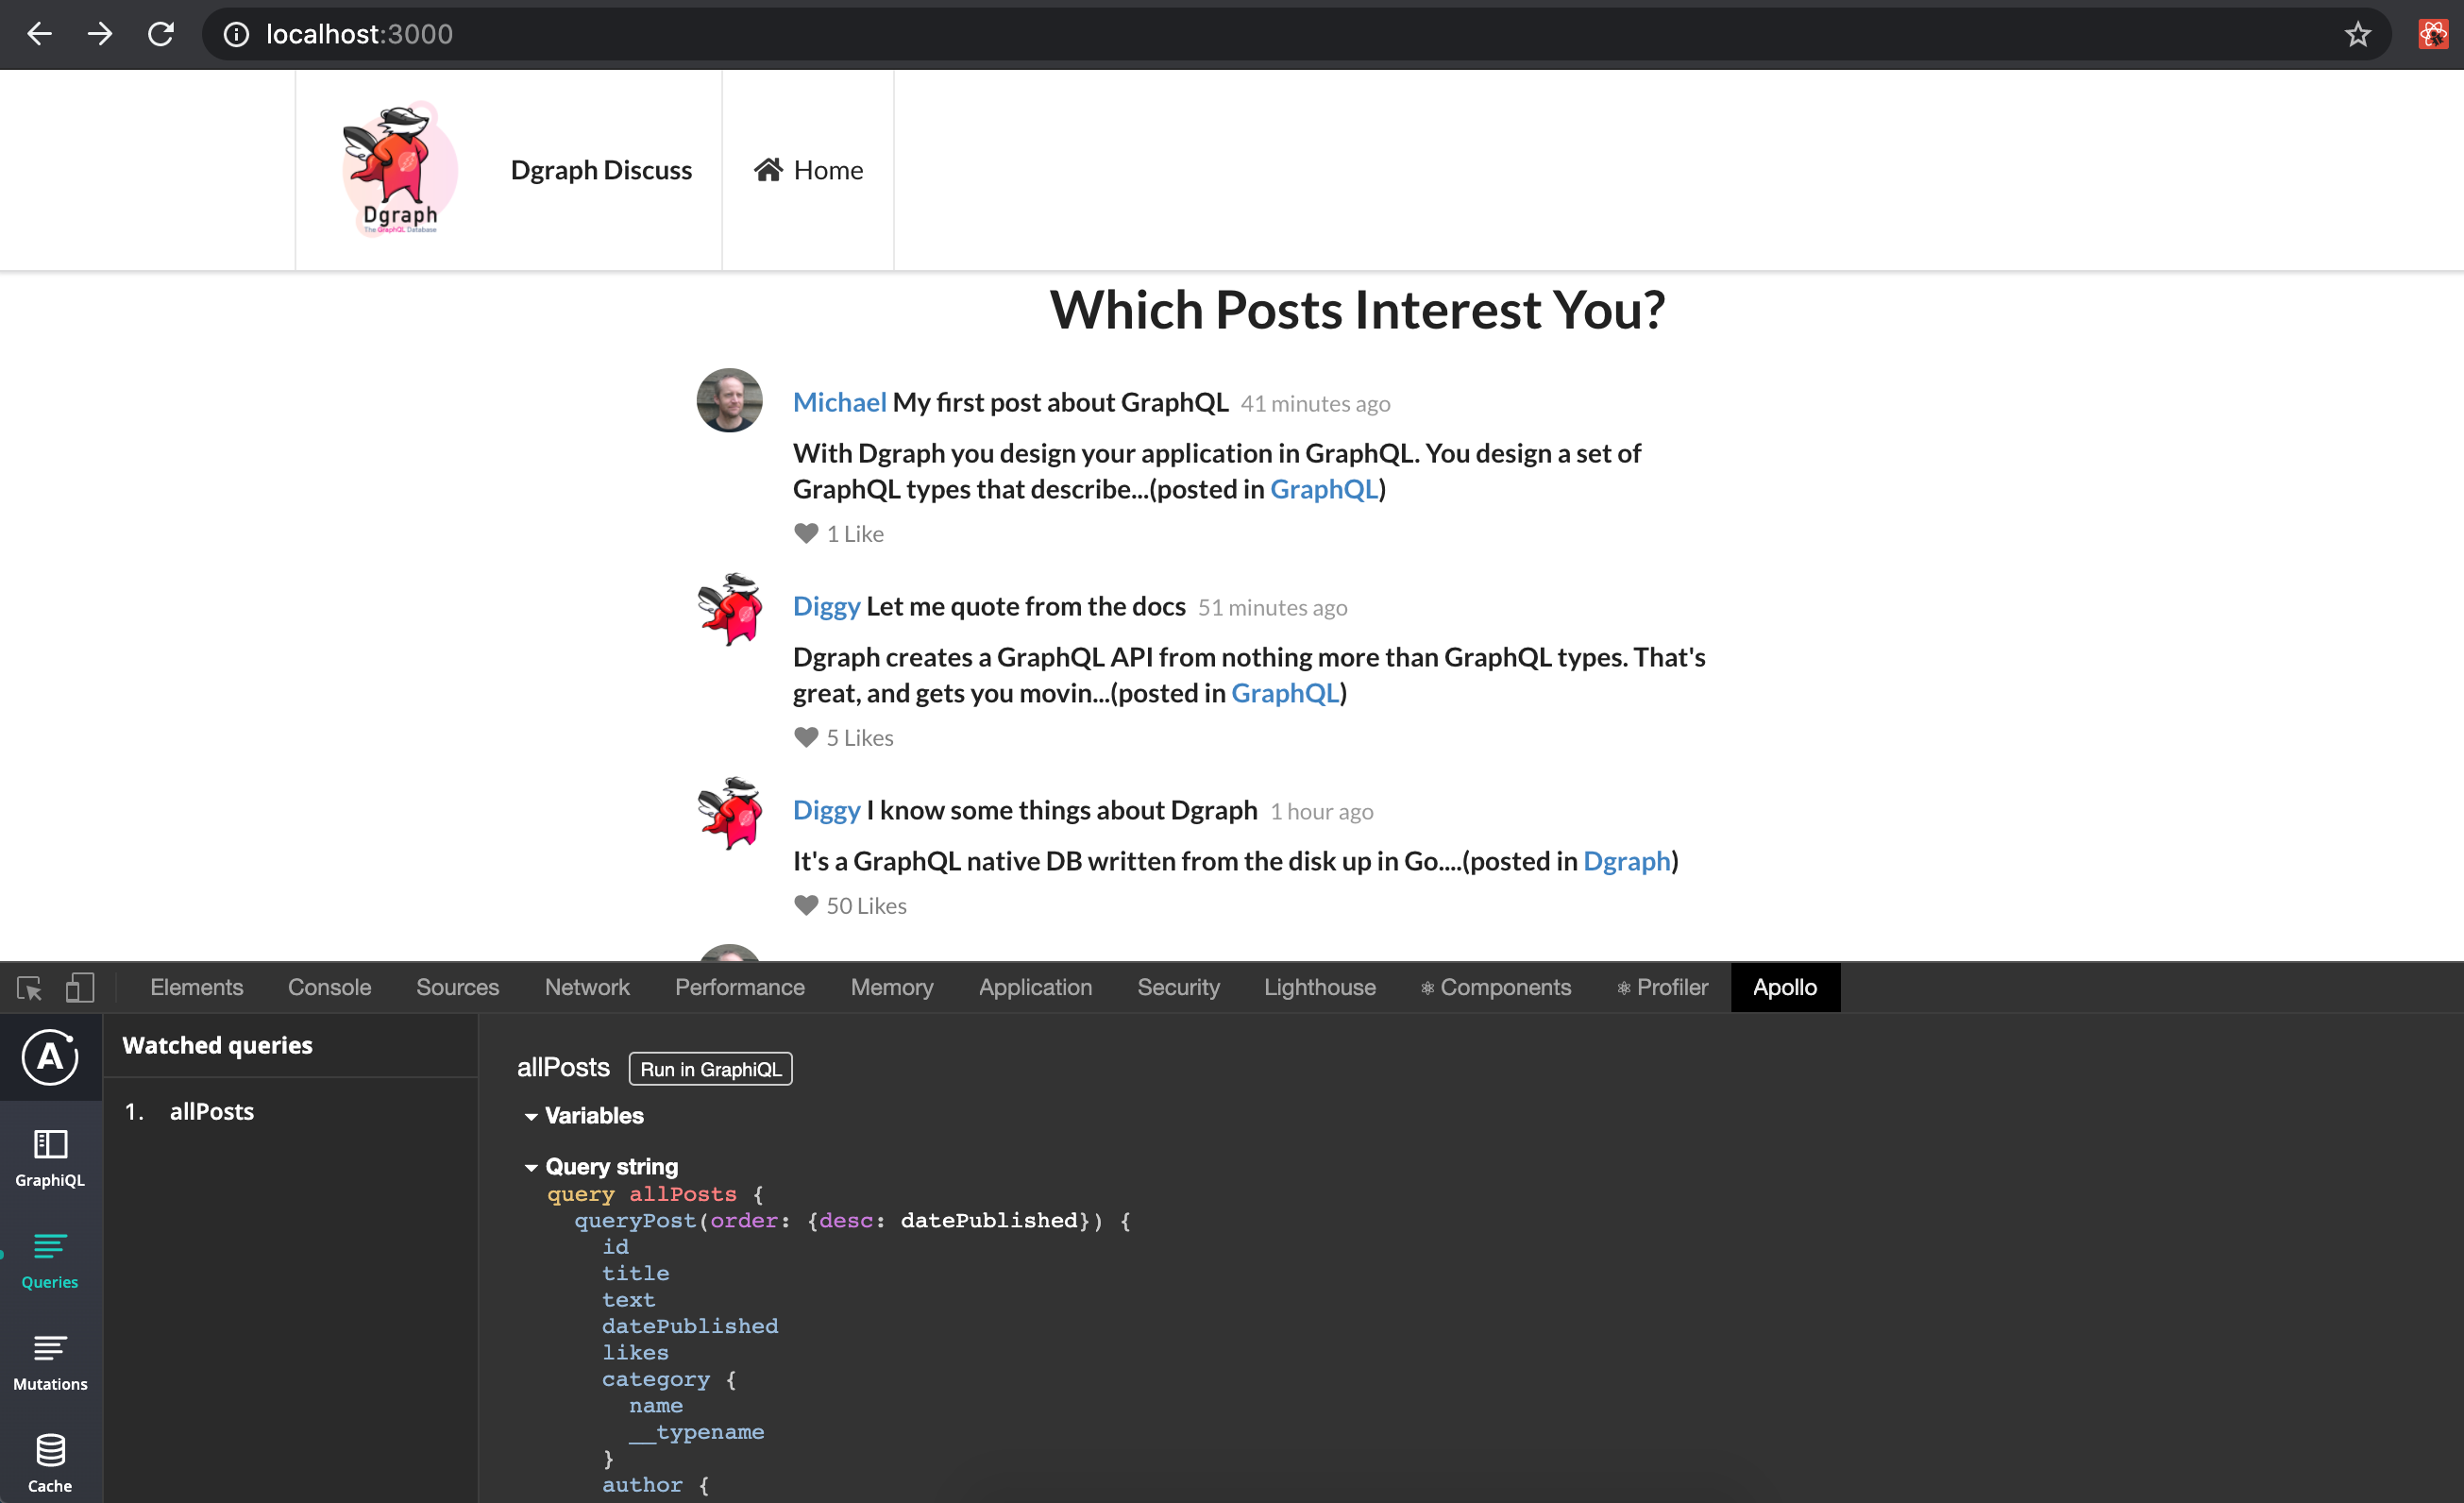
Now that we’ve got a bit of GraphQL going in the UI, it can be helpful to open up the Chrome developer tools and check out the Apollo tab (you’ll need to install the Apollo Client Developer Tools for Chrome). It shows you the queries used to generate the page, the data returned, what’s in the cache, nice - no console.log() for me.
That much is this commit in GitHub
When I added the users, I tore down the existing Slash GraphQL instance, added users to the sample data set, then brought it up and added the data. That seemed like the quickest approach at this point — I didn’t want to pick through the current setup and try to hand curate the existing data. That’s why I automated my development environment. Of course, if this weren’t early development, I’d be building a data migration that would automate upgrading the dev, and eventually production, instance.
Soon, I’ll add search to the post list page. It’ll be as simple as updating the schema to include an @search.
type Post {
  ...
  title: String! @search(by: [term])
}
When I make that sort of change, I’ll just upload the new schema and keep working. Dgraph will index the existing data and generate a new GraphQL API. I’ll regenerate all the types, and I’ll layout the search box with ease. No point adding that right now, it’ll be better to make that change as part of a single PR/commit later. Instead, let’s iterate on the working app and add page routing.
This is the next big structural item to get working. What we have so far is a single page, not really a Single-Page-App. Apps like this one work by holding the one Javascript page open in the browser and that builds different views for each URL.
That is the magic of React router, so let’s add it to the app, and add the type definitions to our development environment
yarn add react-router-dom
yarn add -D @types/react-router-dom
The router interprets the url and loads different components depending on which part of the site is being visited. That will be the post list page we’ve been working on at the / url and we’ll now add a page for each post at /post/{id}.
The routing itself is a component at the top level of the component tree in src/App.tsx.
export function App() {
  return (
    <div className="App">
      <BrowserRouter>
        <AppHeader />
        <Switch>
          <Route exact path="/post/:id" component={Post} />
          <Route exact path="/" component={Home} />
        </Switch>
      </BrowserRouter>
    </div>
  )
}
That’s pretty much it, we just have to add href links so that clicking on a post’s title takes you to url for the posts id.
<a href={"/post/" + post?.id}>
  {post?.title}
</a>
At this point, I’ll also enable the ‘home’ button in src/components/header.tsx to route us back to the landing page.
<Menu.Item as={Link} to="/">
  <Icon name="home" />
  Home
</Menu.Item>
I updated src/components/operations.graphql to add a query that gets the data to display a post.
fragment postData on Post {
  id
  title
  text
  datePublished
  likes
  category {
    name
  }
  author {
    username
    displayName
    avatarImg
  }
}

query getPost($id: ID!) {
  getPost(id: $id) {
    ...postData
  }
}
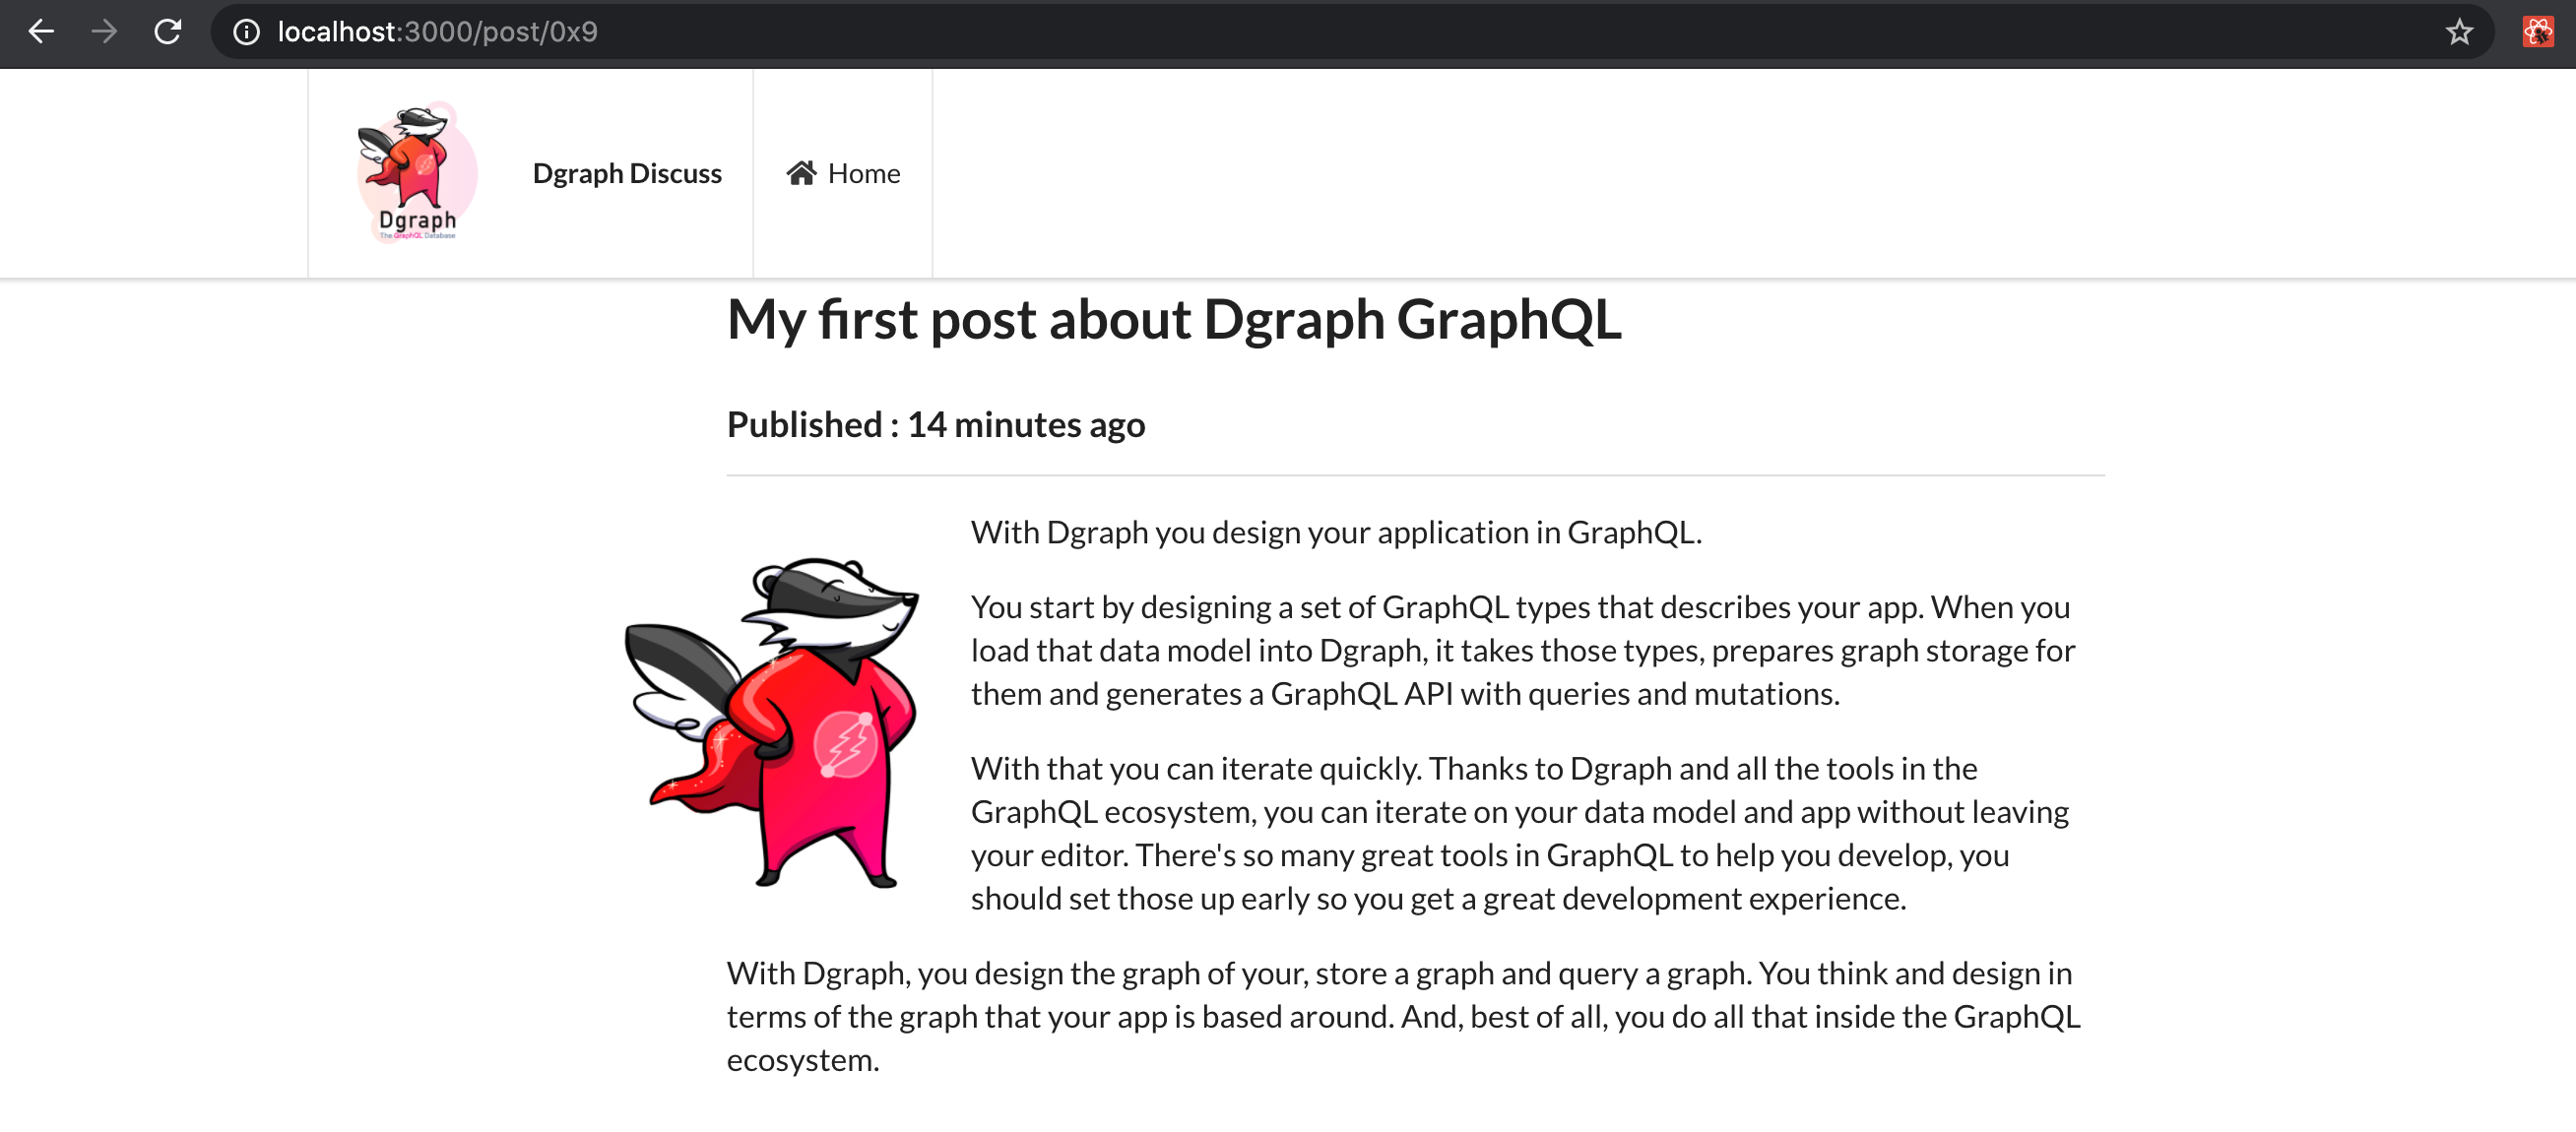
Of course, GraphQL aware intellisense helped there, and once I’d regenerated all the type definitions, laying out a page for a post in src/components/post.tsx was just a matter of letting the editor help me layout the data from the query into the right places on screen. Now if I click on a post title, I get routed to a url like localhost:3000/post/0x9, the React router kicks in and the page for a post’s data gets rendered.
That’s here in GitHub.
At this point, I can display the sample data, but it’s a bit limited. So, I did another quick iteration by adding faker.js (with types, of course). Faker generates pretty nice sample data for all kinds of things like names, companies, addresses, text, etc.
Now, I can have any bespoke data I care about (I always want Michael as a user, so I can log in as me once I add auth), and also quickly load as much faked sample data as I need to flesh out the development data and make it look realistic. As I move forward, I’ll add more initial posts, more sample users and comments, etc. Because I’ve automated this from the start, it’ll be simple to get that sample data in easily and just as simple to rebuild if needed.
That’s enough for one post. I’m moving on to adding the authorization in Dgraph and authentication via integration with Auth0. Once auth is in, I’ll add a deploy step to Netlify and the rest of the mutations. Those additions can be the subject of another post or the tutorial I’m building out of this.
We have an app with internal routing, a landing page for all the posts and a unique page for every post. I want to add mutations to add and edit posts, clickable likes, comment threads, and more, but the plan is for all those to only be available if you are logged into the app as a user, so there’s no point adding that now. Next I’ll get the auth up, and then come back to that.
I used Slash GraphQL and the other tooling in the GraphQL ecosystem to get me off the ground and moving fast with my app. Because I’ve automated everything, I won’t get lost and lose time in wondering what state my sample data is at; I won’t make a change and have some part of the UI stop working and then have to lose time hunting it down; and I really don’t have to do much to iterate on my idea and GraphQL schema - load the new schema into Dgraph, let the types re-generate, keep working. Those extra bits of set up mean I can iterate fast and with confidence that I’m not going to break anything as I go.
Ok, that’s it for now. I’ve got to jump back in and add auth and more features … and you could jump in too, and whether you set up like have or not, you can also get your app going quickly with Dgraph and Slash GraphQL.
Check out our docs and other blogs if you need more help getting started with Slash GraphQL.
Update: since I wrote the above, the app source is now available on GitHub here and I’ve deployed a live version on Netlify for you to play with. On the running app, you can view posts without logging in, or login to add posts and comments.